Continuing professional development
Continuing professional development (CPD) is a system where professionals update or refresh their knowledge and skills to maintain competence to practise. For example, paramedics meet training requirements aligned to developments in pre-hospital care; law practitioners undertake training each year to maintain their practising certificate.
CPD can involve any relevant learning activity, formal or informal. An important concept is that the participant achieves their qualification outside of the CPD plan — the goal of the CPD plan is to maintain compliance via continuous training.
How CPD works in Janison Academy
- Users are linked to a CPD Plan that specifies the points required to become compliant.
- Points are assigned to catalogue items. When a user completes a catalogue item, the linked points are achieved.
- Once all points in the plan have been achieved, the user is compliant.
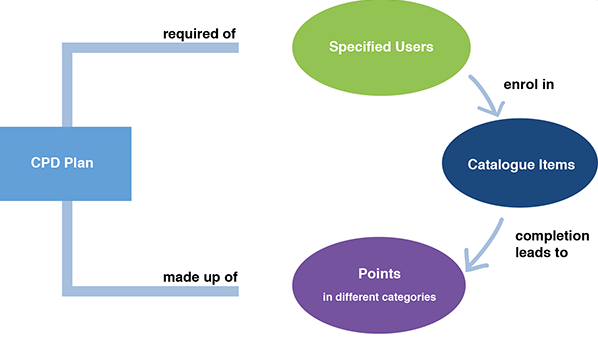
CPD has several dependencies that need to be set up first:
| Dependency | Description |
|---|---|
| Tags | Used to name the CPD item — for example, a paramedic CPD tag might be Clinical. |
| Points | Allocated to tags in the CPD plan. |
| CPD Plans | Sets of requirements for the user to complete. |
| RPL | Enabled if users can earn CPD points externally. |
CPD plan colour legend
A colour code visually displays compliance:
 Green — Compliant
 Yellow — Low risk
 Orange — High risk
 Red — Non-compliant
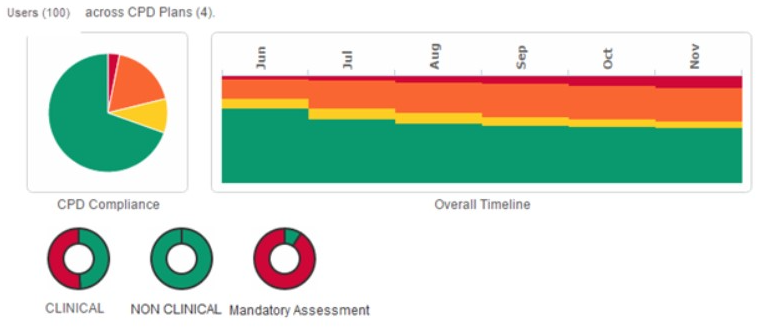
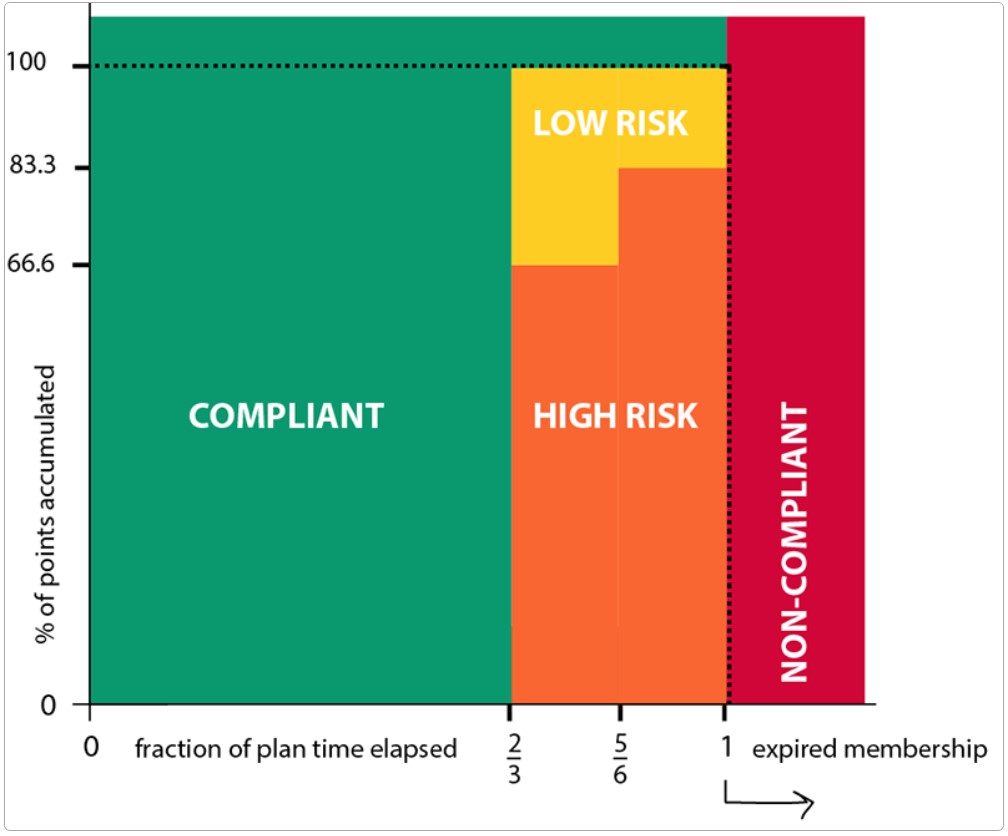
These are calculated using the following algorithm:
- For the first ⅔ of the plan, a user is compliant.
-
For the last ⅓, the status algorithm applies:
- If the user has ⅓ to ⅙ of their plan to go and has accumulated less than 66.6% of their points, they're high risk; otherwise low risk.
- If the user has less than ⅙ of their plan to go and has accumulated less than 83.3% of their points, they're high risk; otherwise low risk.
- If the user has achieved all required points, they're compliant.
-
If the user's membership has expired, they're non-compliant.
CPD points
Points are numeric values used to set and achieve CPD requirements. They're used in two places:
- The CPD plan, which sets the number of points required for compliance.
- Catalogue items, where points give them value toward meeting the plan requirements.
When a user completes the required catalogue items, points are matched to the CPD plan linked to the user, and when all points are achieved the user becomes compliant.
Enable points
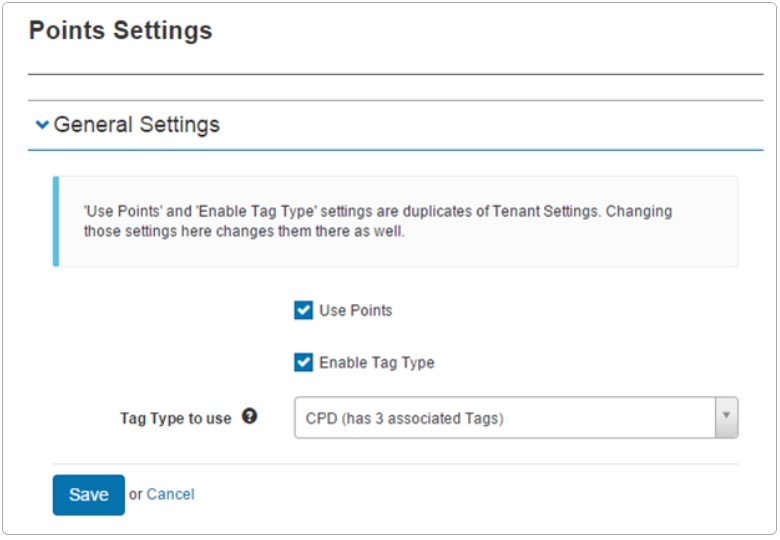
- Select Settings > CPD Points Settings.
- Select the edit pencil.
- Check Use Points.
- Check Enable Tag Type and select the tag type that contains your CPD tags.
-
Select Save.
CPD points colour legend
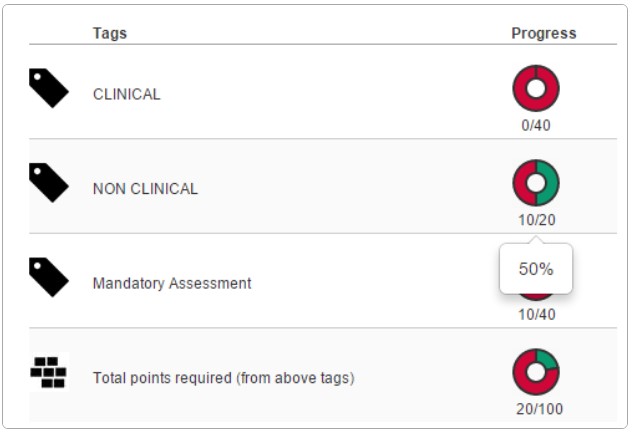
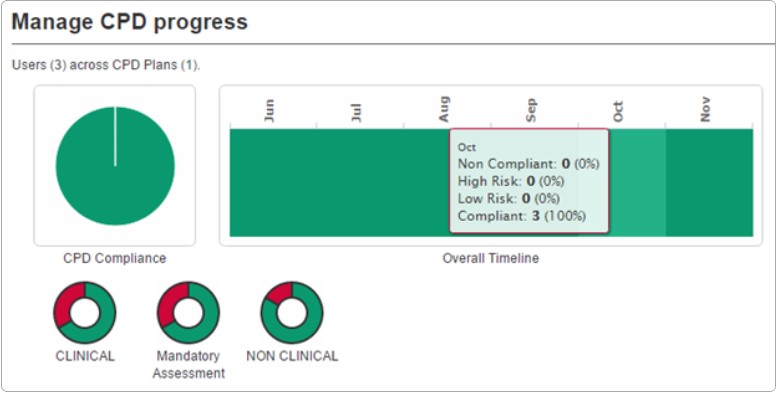
Point colours don't have the same meaning as plan colours. There are two colours — red and green — representing percentage completion per tag. 0% is red, 100% is green, and 50% is half red and half green.
CPD tags
Tags name the CPD points. They're used in two places:
- The CPD plan, where points are assigned to tags.
- Catalogue items, to identify which points the learning relates to.
Create a tag type
-
Select Manage Learning > Manage Tags > Manage Tag Types.

-
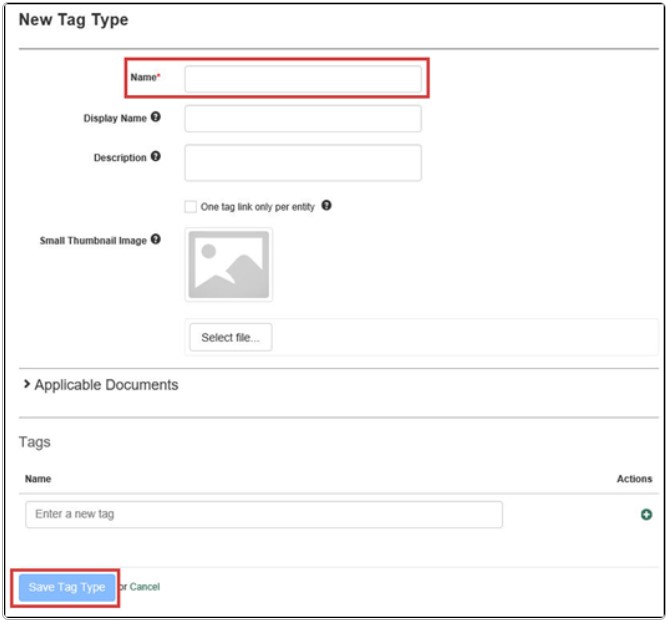
Select Add Tag Type.
-
Give it a Name (for example, CPD).
- Select Save Tag Type.
Create tags
- Select Manage Learning > Manage Tags.
-
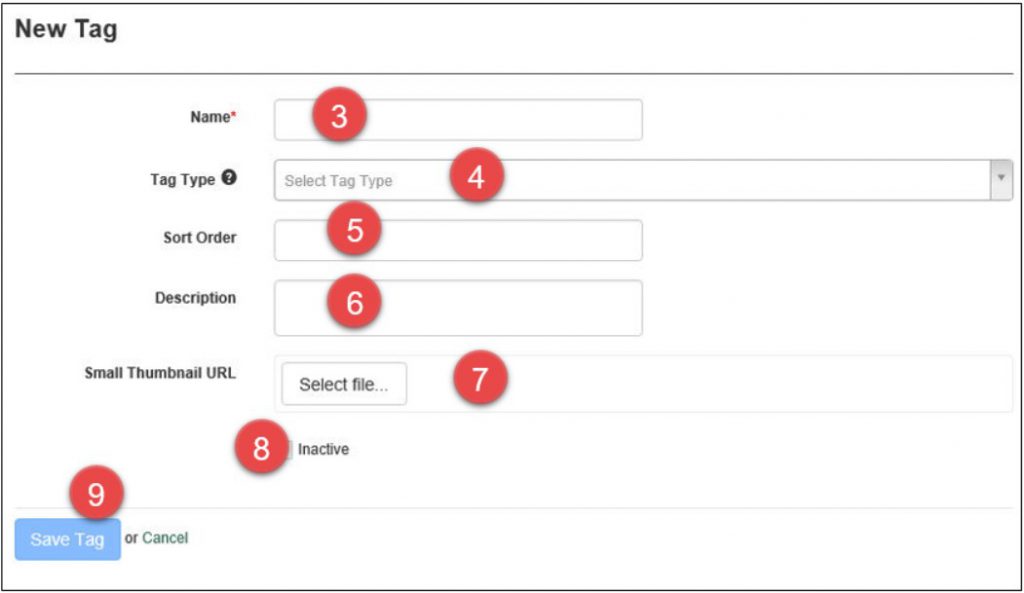
Select Add Tag.
-
Enter the Name (mandatory).
- Select the Tag Type from the dropdown.
- Leave Sort Order and Small Thumbnail URL blank for CPD.
- Optionally add a Description.
- Ensure Inactive is unchecked unless no longer required.
- Select Save Tag.
CPD plans
CPD plans let you design the requirements and allocate them to specific users. For example, a lawyer's plan differs from a paramedic's. Requirements are set by selecting tags, specifying minimum points, and the time frame to achieve them. When a learner is assigned, they're deemed compliant — the goal is to maintain compliance through continuous training.
Create a CPD plan
- Select Manage Learning > Manage CPD.
-
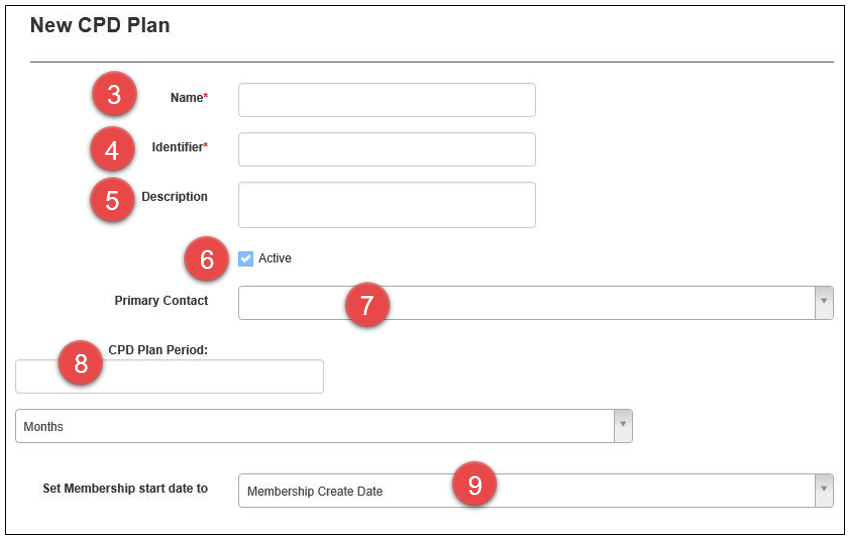
Select Add CPD Plan.
-
Enter the Name (mandatory).
- The Identifier auto-populates (mandatory).
- Optionally enter a Description.
- Active is enabled by default.
- Optionally select a Primary Contact.
- Set the CPD Plan Period — enter a number and select Days, Weeks, Months, or Years. Forever means no restriction.
-
Set Membership start date — select:
- Membership Create Date — the date the user is added.
- Selected Date — choose a specific date via the calendar.
- Do Not Set — no start date (usually paired with Forever).
What points are required?
This section lets you select any number of tags and the minimum points learners must obtain from each.
- Select the tag in the dropdown.
- Select Add.
- Enter the Minimum CPD Points for each tag.
- The Total Points is calculated from the tags above.
Note
Only tags in the tag types specified in Settings > Points Settings appear in the dropdown.
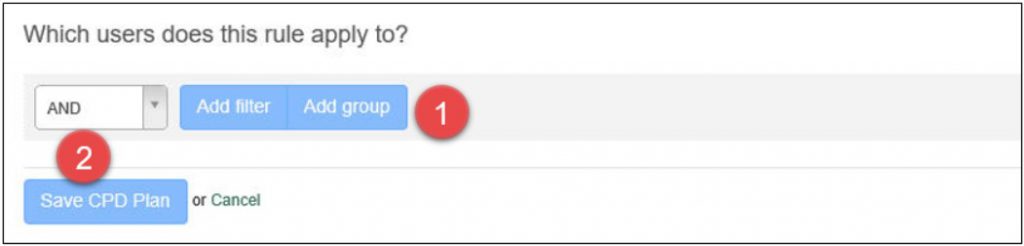
Which users does this rule apply to?
Specify which users to add to the plan via filters (organisations, positions, groups, etc.). For more on filters, see the document on building filters.
When fields are complete, select Save CPD Plan.
Updating memberships
Once your plan is created, you can view and update memberships.
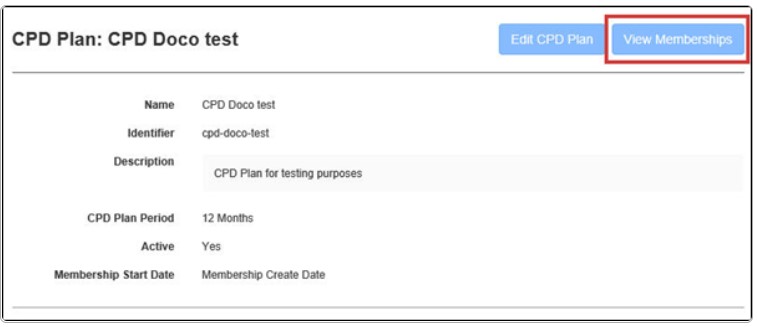
- Select View Memberships.
-
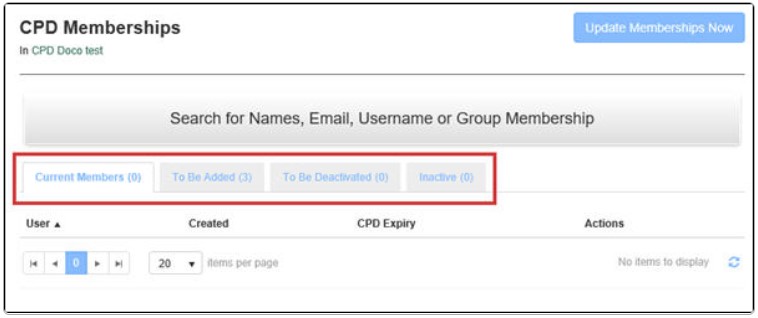
Four tabs filter memberships:
- Current Members — already members of the plan.
- To be Added — match the rule but aren't yet members.
- To be Deactivated — no longer match the rule (after a rule change).
- Inactive — were members but were deactivated.
-
Select Update Membership Now to add users in the To Be Added tab.
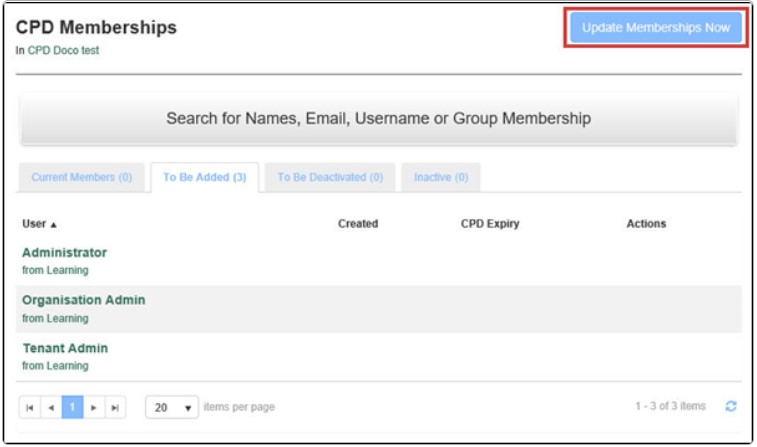
The users now display in Current Members.
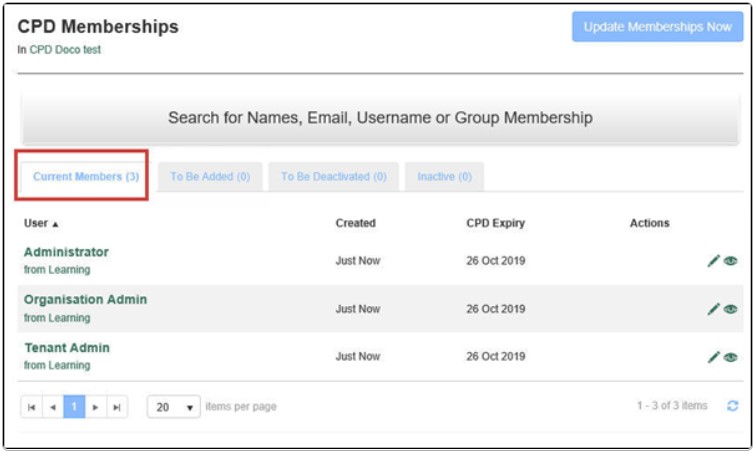
From this screen you can edit or view a membership.
Edit a membership
The Edit icon lets you change the Start Date and set the plan to Inactive for the user.
- Change the Start Date via the calendar.
- Deselect Active if needed.
-
Select Save CPD Membership.
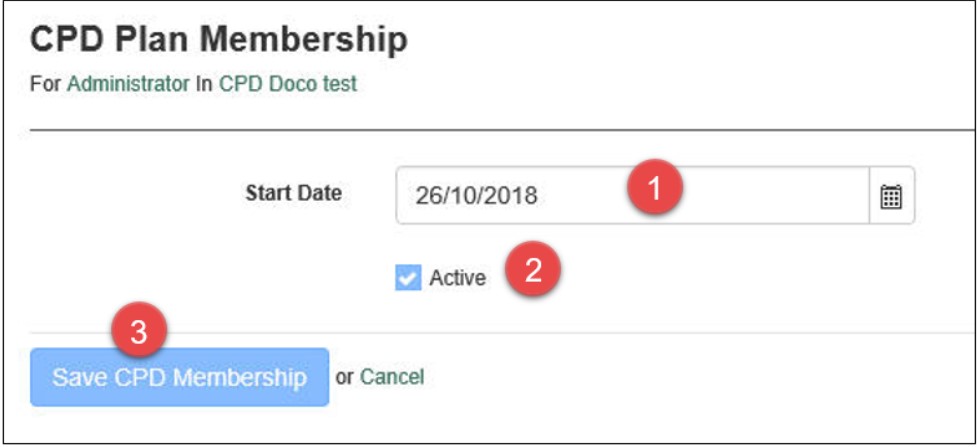
View membership
The View icon opens a page where the user's progress can be viewed, more points can be awarded, the membership can be edited, and it can be rolled over.
Award more
Use to award points — for example for Recognition of Prior Learning (RPL).
- Select Award More.
- Select the Catalogue Item (mandatory).
- The User defaults to the member.
- Set the Completed date.
- Optionally enter Comments.
- In Point Allocation, optionally select Include Consequent Enrolment Expiry.
- Select Save RPL.
Rollover membership
Rollover refreshes the membership for a new period and creates a new membership. The currently active membership is completed.
Warning
This can't be undone.
- From Manage CPD Plan, select the CPD Plan Name.
- Select View Memberships.
- Select the Edit icon for a user.
- Change the Start Date if needed.
-
Select Save CPD Membership.
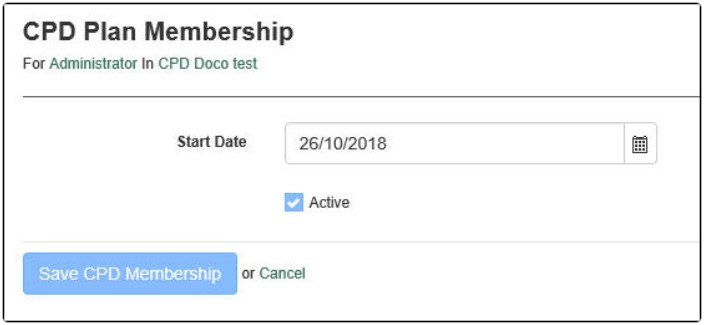
-
Select Rollover Membership.
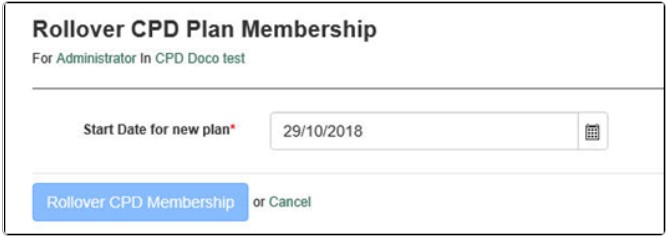
-
Select the Start Date for new plan (must be after the current membership expires).
-
Select Rollover CPD Membership.
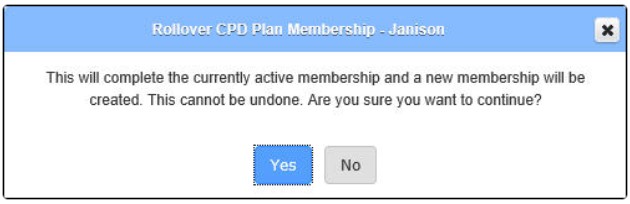
-
Select Yes to confirm. The new membership starts on the date specified.
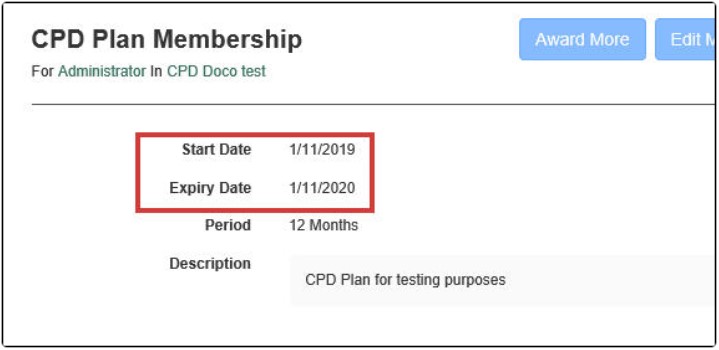
Membership history
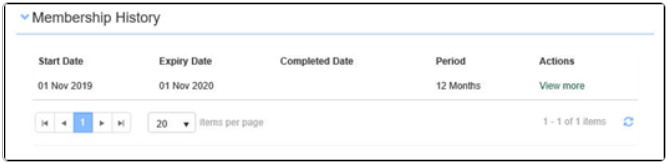
The old plan membership is viewable on the current membership details page in Membership History.
CPD tag sets
When creating a CPD plan, tags can be grouped into tag sets. This gives greater control over the organisation of tags and points required.
Tag sets are created in the What points are required? section.
Example use:
- The Mandatory tag set could require learners to complete all learning content with the included tags.
- The Elective tag set could require learners to complete a certain portion of elective learning content.
A learner might need to complete a minimum of 40 points across both Mandatory and Elective learning to finish the plan.
CPD and catalogue items
To give users a way to achieve their points, link catalogue items to CPD tags.
Link CPD tags and points to a catalogue item
- Select Manage Learning > Manage Catalogue.
- Search for and open the catalogue item.
-
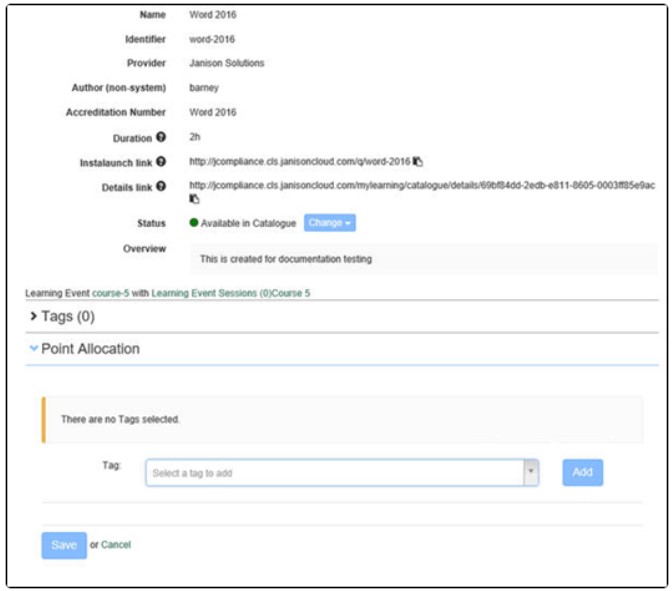
Select the Edit icon in the Point Allocation section.
-
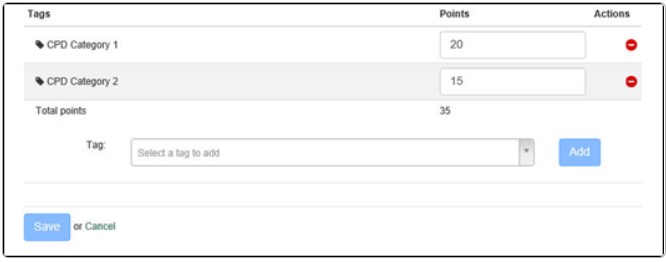
Select a tag from the dropdown.
- Select Add.
- Assign points for the tag. Total points updates automatically.
-
Add as many tags and points as needed.
-
Select Save.
Note
- If no tags appear in the dropdown, the tag type isn't recorded in Settings > Points Settings.
- You don't have to include all tags from your tag type in every catalogue item.
- Fractional points (e.g. 0.5) are allowed.
Allow users to record their own CPD points
Many professionals complete learning outside the Academy. They might attend a seminar or workshop, collaborate on a paper, or complete a course at another organisation.
Two features let users record their own CPD points:
Other Learning
Set points on Other Learning
See Other Learning for adding an Other Learning asset.
- Go to Manage Learning > Manage Learning Assets.
- Search for and select the required Other Learning asset.
- Select Edit Other Learning.
- Expand General Settings.
- Select Requires Points.
- Optionally restrict the tags learners can assign points against.
- Select one or more tags.
- Select Save Other Learning.
Catalogue item for Other Learning
As with all learning assets, Other Learning needs a catalogue item to enrol in.
Important
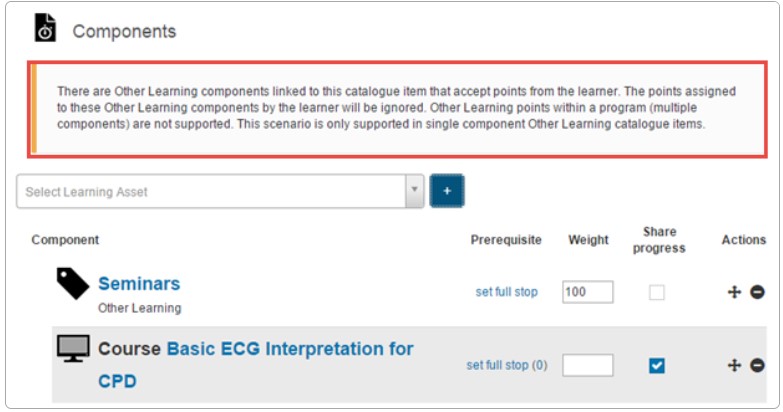
- The catalogue item must only contain a single Other Learning component. If more than one component is added, points assigned by the learner are ignored — a warning displays.
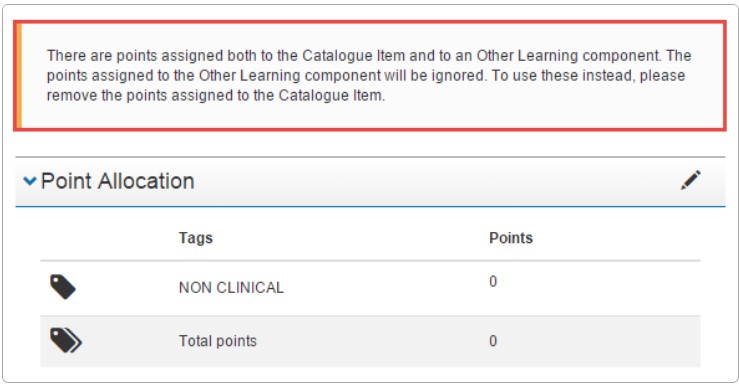
- Don't add points to the catalogue item containing Other Learning — points applied to the Other Learning are ignored if you do.
Record points as an enrolled user
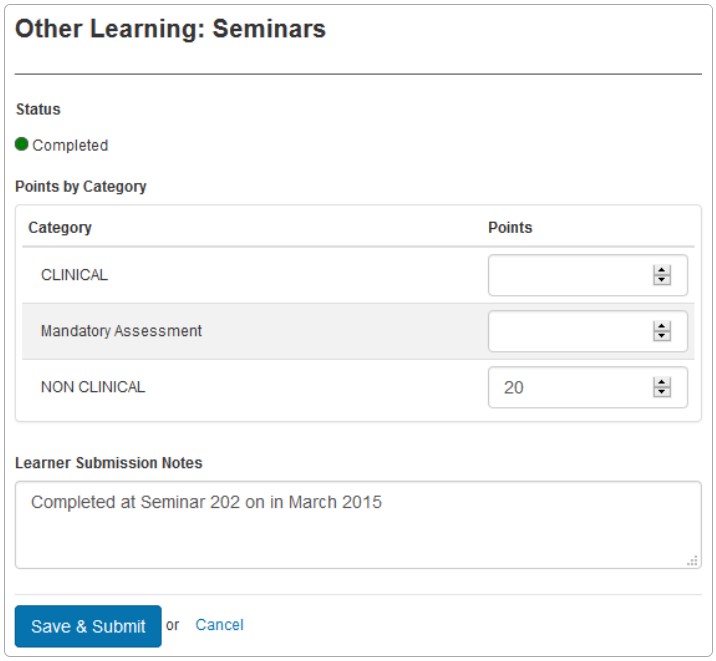
- Launch the Other Learning asset.
- Enter information about the learning.
-
Populate points against any category.
-
Select Save & Submit.
Learning Plans
If the user is enrolled in a Learning Plan that allows external learning, the Log external learning option opens the same UI for recording points. See Learning plans.
How CPD looks for the user
See how many points a catalogue item awards
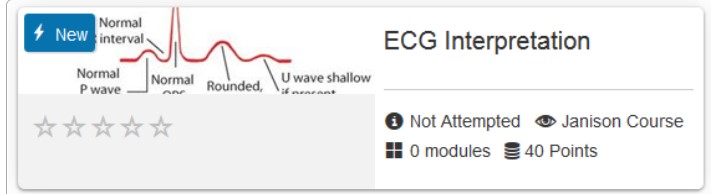
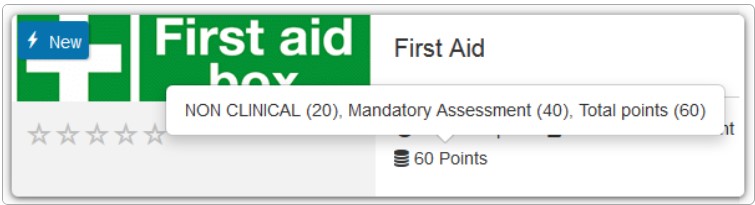
Each catalogue item with points shows the total on the Browse Learning tile.
Hovering over the points icon shows the breakdown by tag.
My Learning
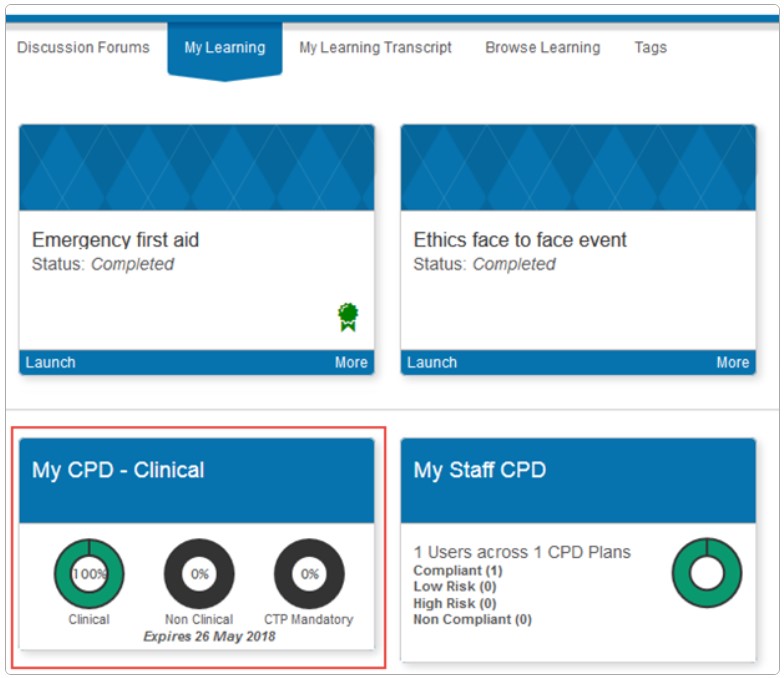
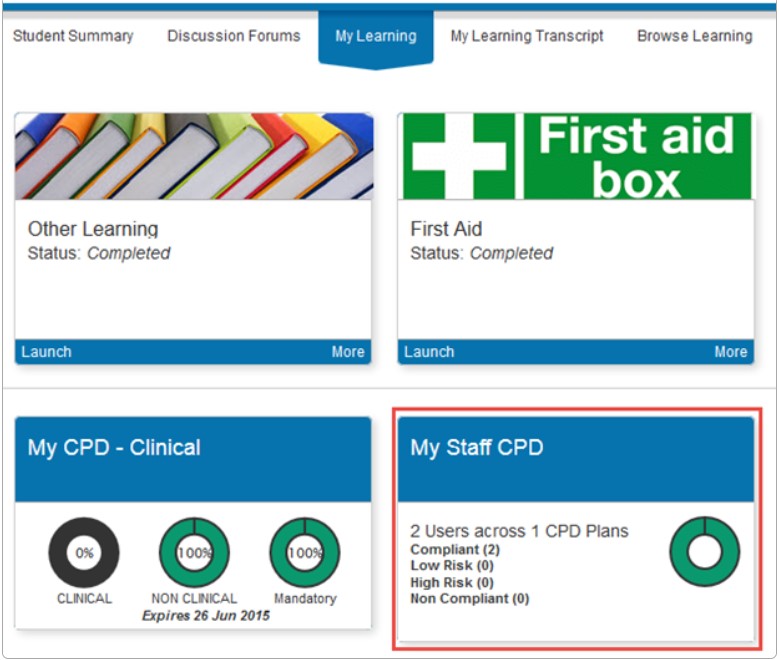
When CPD is enabled, My Learning splits into two areas — the normal learning tiles and an Other tiles area with one or two CPD tiles.
Note
Smart Dashboard must be enabled at the global level for the tiles to display. Contact your Janison account manager or support team.
My CPD tile
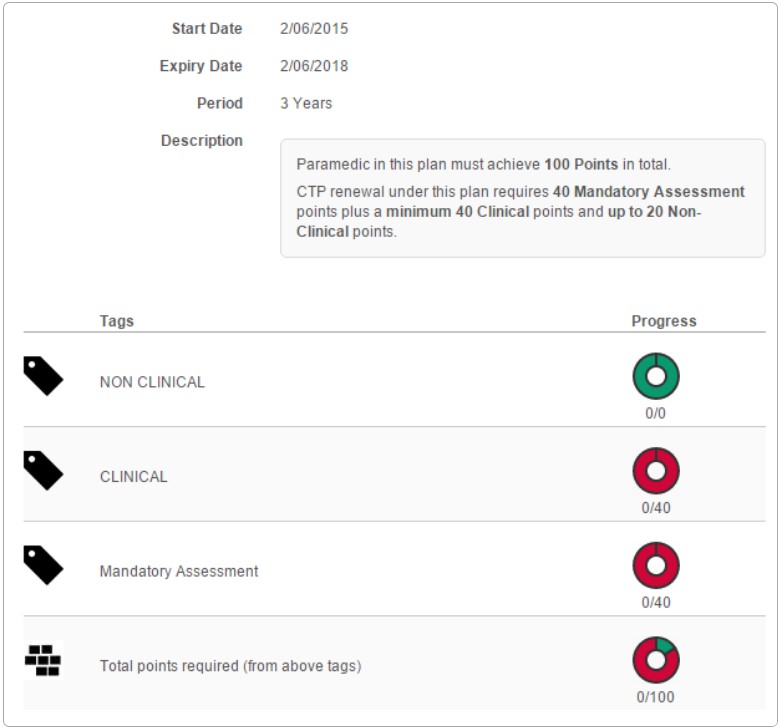
Shows for users with a CPD plan. Circular graphs display CPD status — selecting the tile takes the user to view their plan in detail.
My Staff CPD tile
Visible to user managers. Shows managed users' CPD details. Selecting the tile takes you to manage their CPD — a shortcut to Manage Learning > Manage CPD progress.
Enrolment in CPD catalogue items
Users can be manually enrolled in CPD catalogue items, or items can be listed under Browse Learning for self-enrolment.
Adjusting CPD points per enrolment
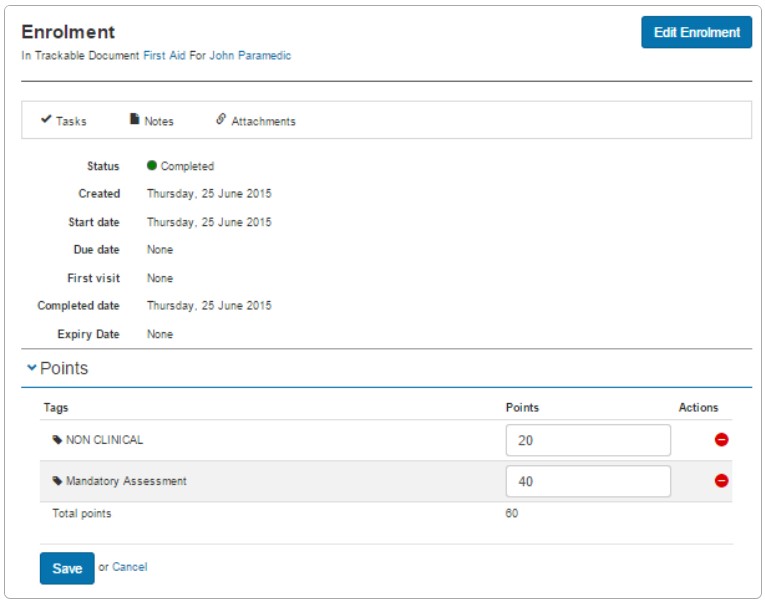
If an administrator needs to adjust the points a user earned or self-assigned, do it through Enrolments.
- Go to Manage Learning > Enrolments.
- Search for the enrolment.
- Select View More.
-
In the Points section, select the Edit icon.
-
Adjust the points.
- Select Save Enrolment.
Manage CPD Progress
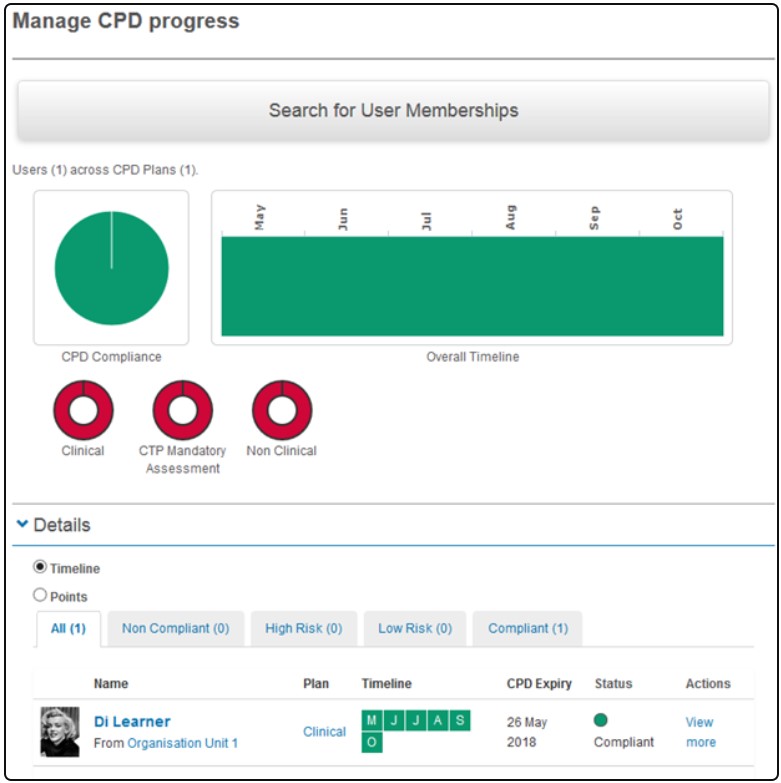
The Manage CPD Progress screen contains graphs of overall CPD progress — the same screen accessed from the My Staff CPD tile.
Browse to Manage Learning > Manage CPD progress.
The top section is a summary dashboard of all users in the CPD plan.
The Detail section shows individual learners. Two views are available — Timeline and Points.
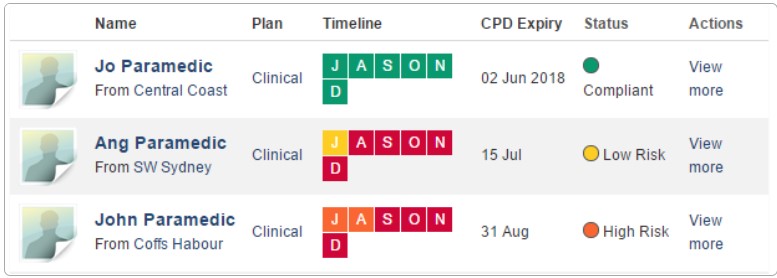
Timeline view shows users with a monthly status breakdown.
Points view shows users with a tag breakdown of points.
CPD progress filters
Both views have filter tabs:
- All
- Non Compliant
- High Risk
- Low Risk
- Compliant
Select View More next to a user to inspect their plan membership.
My Learning Transcript and CPD points
CPD points can appear on the user's learning transcript. Configure via Settings > My Learning Transcript Settings.
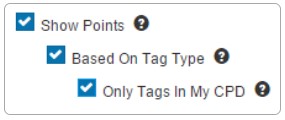
Three options:
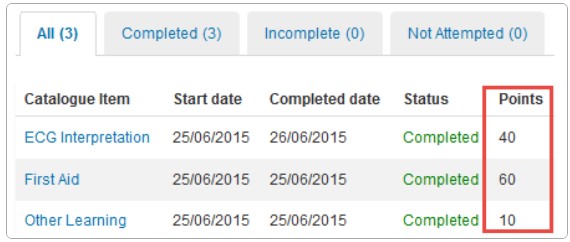
Show Points — shows points achieved in a single column.
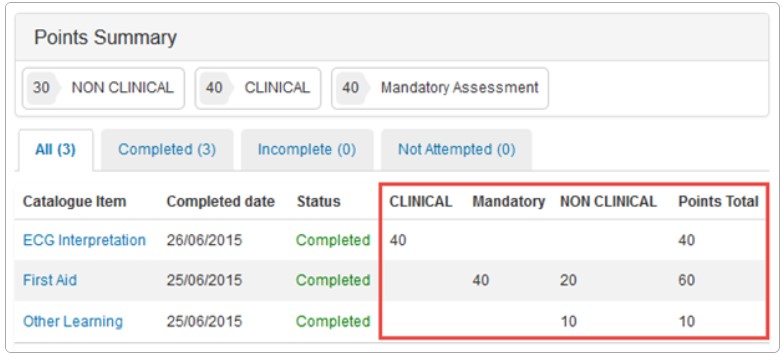
Based On Tag Type — overrides the single column with a column per tag type. A Points Summary section displays at the top of the transcript.
Only Tags In My CPD — only shows columns for tags in the user's CPD plan, hiding empty columns. Only appears when Based on Tag Type is selected.
Settings
Several platform settings affect CPD.
Administrators can configure the following settings:
CPD Points Settings (Settings > CPD Points Settings) — enable Use Points and Enable Tag Type, and select the tag type used for CPD points.
Tenant Settings (Settings > Tenant Settings > Miscellaneous) — enable RPL to allow recognition of prior learning.
My Learning Transcript Settings (Settings > My Learning Transcript Settings) — configure Show Points, Based On Tag Type, and Only Tags In My CPD on the transcript.
Smart Dashboard plugin — must be enabled at the global level for the My CPD and My Staff CPD tiles. Contact Janison.