Learning Events
A Learning Event is training that takes place when a learner attends a venue, including a virtual venue (webinar). The CLS supports these event types:
- Face to face
- Conference
- Informal Session
- Lecture
- Mentoring
- Webinar
- Workshop
A Learning Event is made up of one or more Sessions. The learner attends a Session, which has a date, time, location, capacity, facilitator, and specific instructions. Details can change from session to session within one Learning Event.
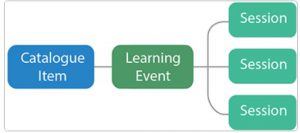
In general the process for the learner is:
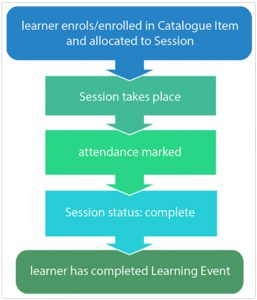
How the first step works depends on:
- Catalogue item enrolment settings (which depend on Settings > Self-Enrolment in the CLS)
- Capacity of a session
- Learning Event enrolment settings
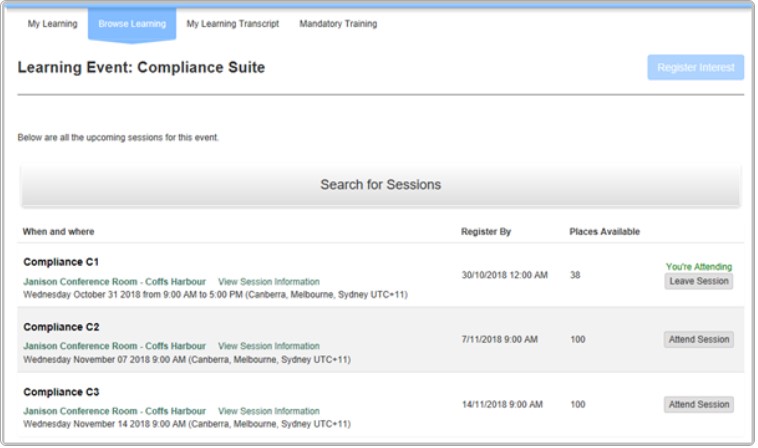
When a learner goes to Browse Learning and selects the catalogue item containing the Learning Event, they see a list of all the sessions and their details, including whether they've reached capacity.
| Catalogue item doesn't allow self-enrolment | Catalogue item allows self-enrolment (free) | |
|---|---|---|
| Learning Event doesn't allow Register Interest | Learner is enrolled in the catalogue item (various methods). Learner joins the waitlist for the Learning Event. Event Facilitator allocates learner to a session. | Learner can: 1. Select Attend Session to join an available session, or 2. Select Join Session Waitlist / Leave Waitlist for a session that's full. |
| Learning Event set to Allow users to register interest and Add interested users to the event waitlist | Learner can select Register Interest; they're enrolled and receive a notification when new sessions become available. Learner joins the event waitlist. Event Facilitator allocates learner to a session. | In addition to Attend Session or Join Session Waitlist, the learner can also select Register Interest to receive notifications when new sessions become available. |
Learners are notified that they've been added to a session or a waitlist through the CLS using message templates. If the catalogue item's self-enrolment method requires approval, the approvals process applies — see Self-enrolment settings.
A Learning Event can consist of a single session, multiple sessions, or multiple sessions in various locations. A user enrols in one session in a Learning Event. If a session runs over more than one day, the user attends all of that time to complete it. One session can't run just in the morning for several days — for that pattern, create a separate event for each morning session.
Sessions are added after the Learning Event is created. Each session has its own summary page in the CLS, including detailed instructions, a map, and downloadable files.
A Learning Event without sessions can be used for registering interest or waitlisting users, with sessions created later when training or interest is confirmed.
Roles in the process
There are a number of roles in the process, which can be done by the same or different people:
- Enrolling learners in an event (if necessary)
- Facilitating the entire event
- Facilitating a particular session
- Marking attendance
- Awarding competencies
The User Extra Role of Event Facilitator manages and administers Learning Events and has access to Mark Session, Manage Session, and Learning Event Session details.
Manage Sessions
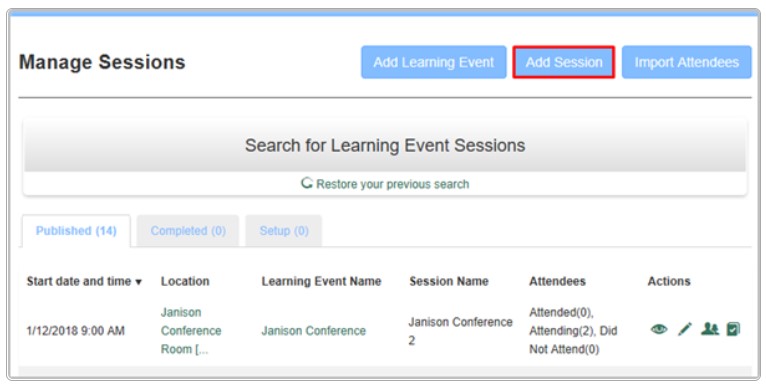
To manage and mark sessions, select Manage Learning > Manage Sessions.
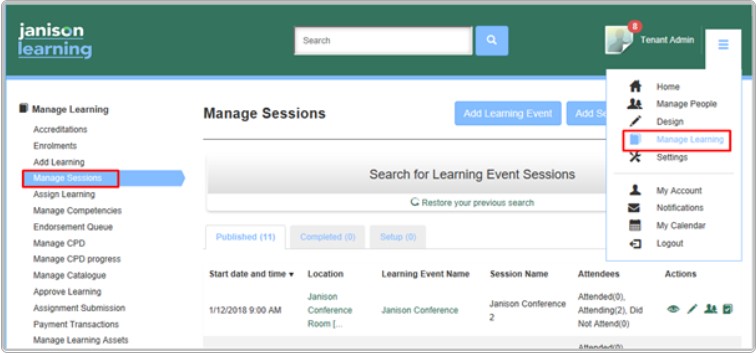
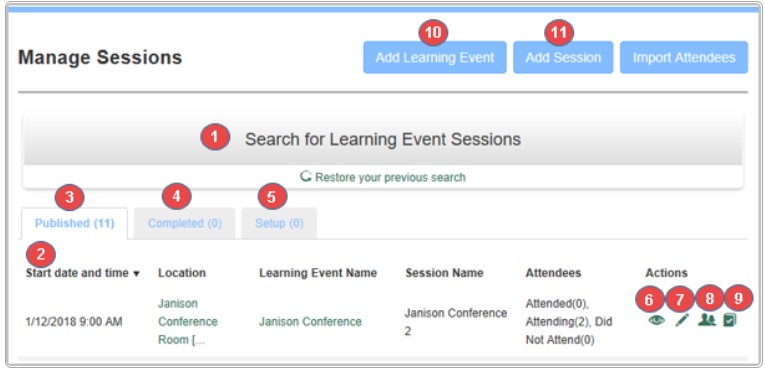
The screen shows all sessions divided into three categories — Published, Completed, and Setup — with the Learning Event name, location, times, and attendee numbers.
-
Select Search for Learning Events Sessions to enter terms (session names, locations, start dates), then select Search.
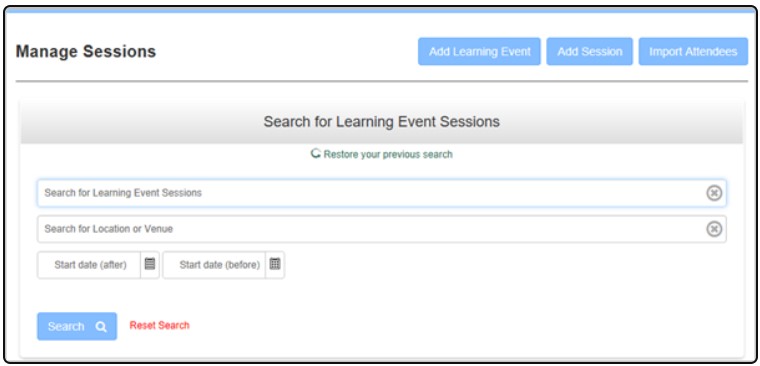
-
Select column headings to sort the list.
- Published holds all sessions published into the catalogue.
- Completed holds all sessions closed off by the administrator after marking.
- Setup holds all sessions still in setup mode.
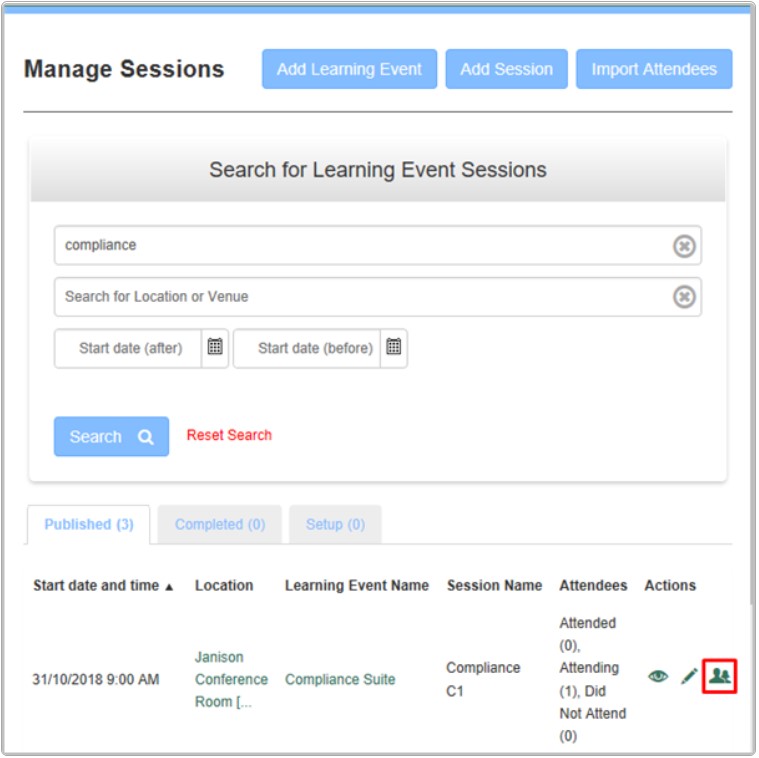
- The eye icon inspects the session in Manage Learning Assets.
- The pencil icon edits the session in Manage Learning Assets.
- The people icon manages the session and moves users to and from waiting lists.
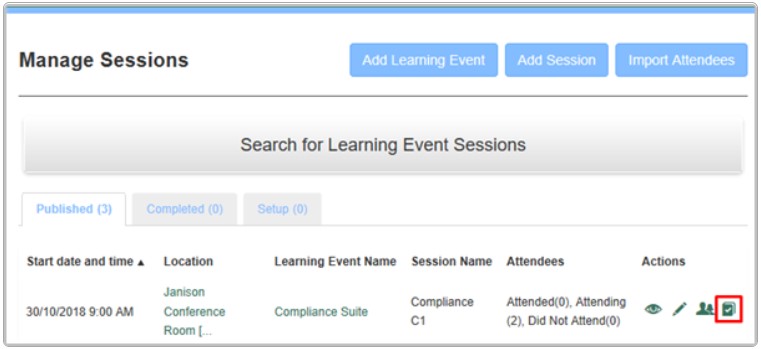
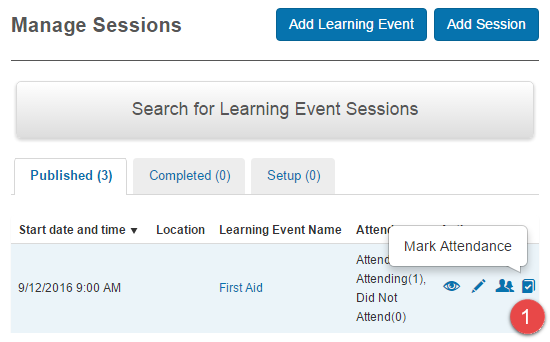
- The tick icon marks users enrolled for the session.
- Add Learning Event adds a new Learning Event in Manage Learning Assets.
-
Add Session adds a new session in Manage Learning Assets.
Add a Learning Event
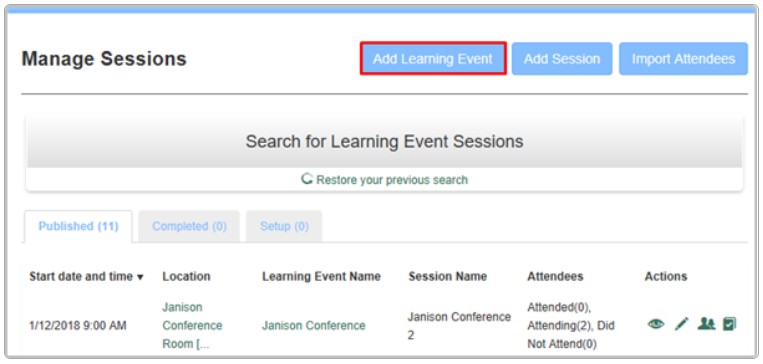
Select Manage Learning > Manage Sessions, then Add Learning Event.
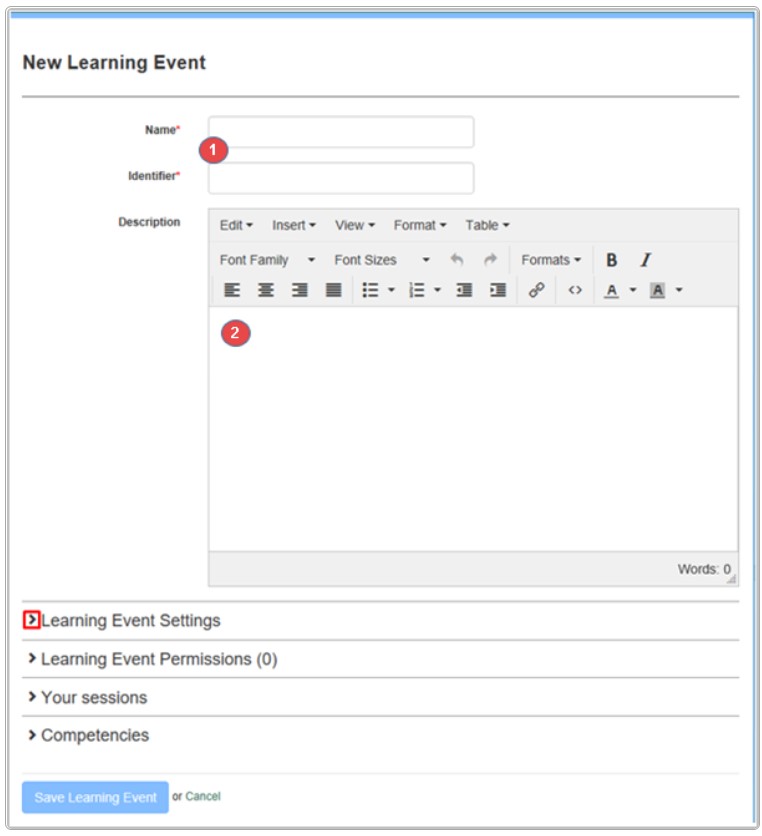
You're taken to Manage Learning Assets to create a new Learning Event.
- Enter a Name and Identifier.
-
Optionally enter a Description.
-
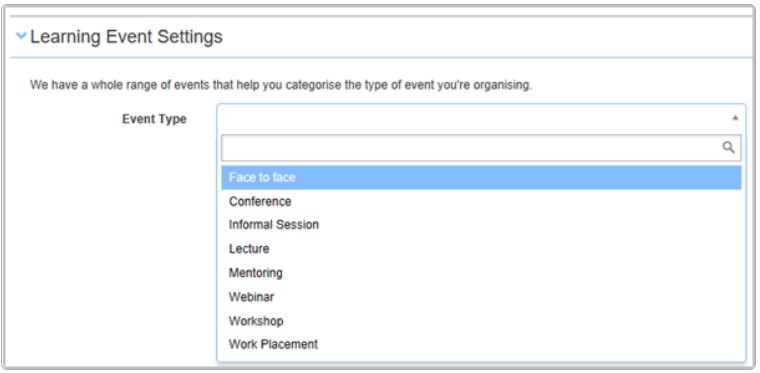
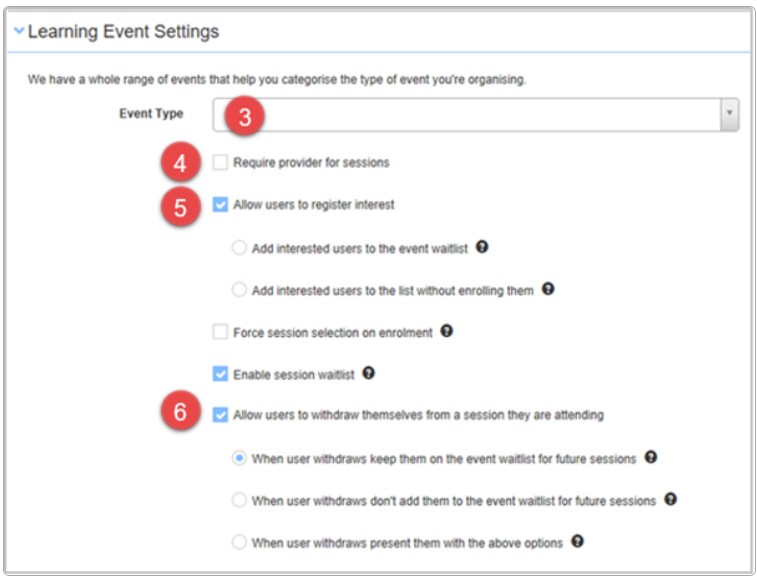
Select the Event Type from the dropdown.
-
Select Require provider for sessions if provider details must be entered for all sessions.
-
If you select Allow users to register interest, two new checkboxes appear and you must select one:
- Add interested users to the event waitlist — enrols users and puts them on the event waiting list. Session management screens show this list and users can be moved into sessions.
- Add interested users to the list without enrolling them — doesn't enrol users. Puts them on the registered-interest list shown at the bottom of the Learning Event inspection screen.

Warning
Choose this option only if you want to gauge user interest for reporting and notification purposes. It frustrates users who want to enrol because enrolment doesn't happen.
-
If you select Allow users to withdraw themselves from a session they are attending, three new checkboxes appear and you must select one:
- When user withdraws keep them on the event waitlist for future sessions
- When user withdraws don't add them to the event waitlist for future sessions (won't cancel enrolment if the user enrolled in a program rather than a catalogue item)
- When user withdraws present them with the above options
-
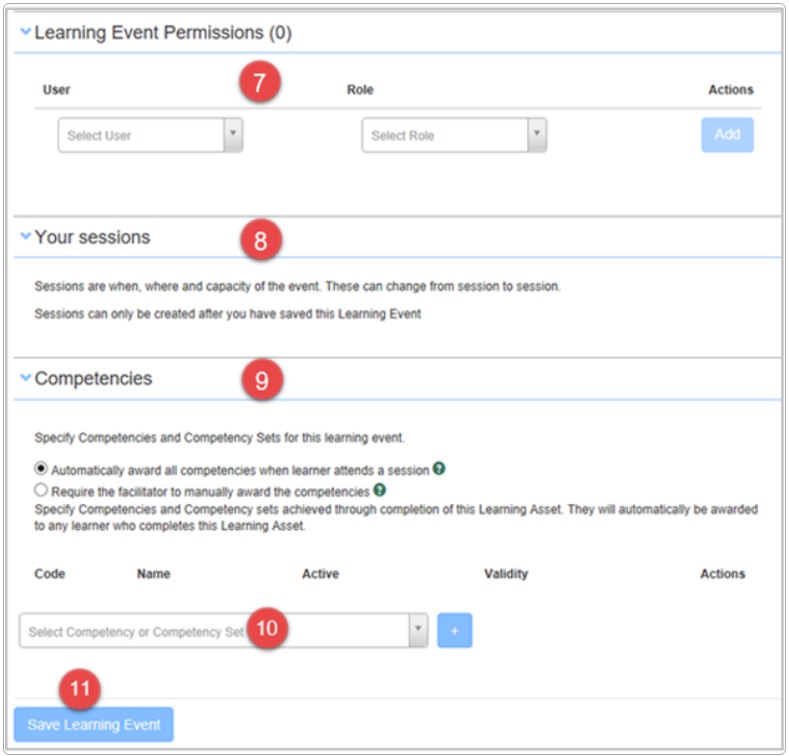
Select the chevron next to Learning Event Permissions and add facilitators for the event.
-
Session details are empty when you create the event. Add them when you edit it.
-
Select the chevron beside Competencies if required. Two checkboxes appear:
- Automatically award all competencies when learner attends a session
- Require the facilitator to manually award the competencies
-
Select a competency or competency set from the dropdown and the plus icon.
-
Select Save Learning Event.
Attendee questions
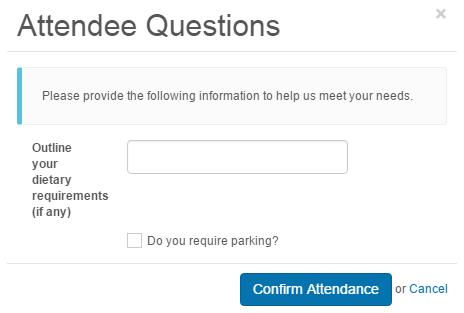
Using a custom attribute set, questions can be added to learning events and presented to users when they enrol. See the document on custom attributes and enrolment question sets.
Inspect a Learning Event
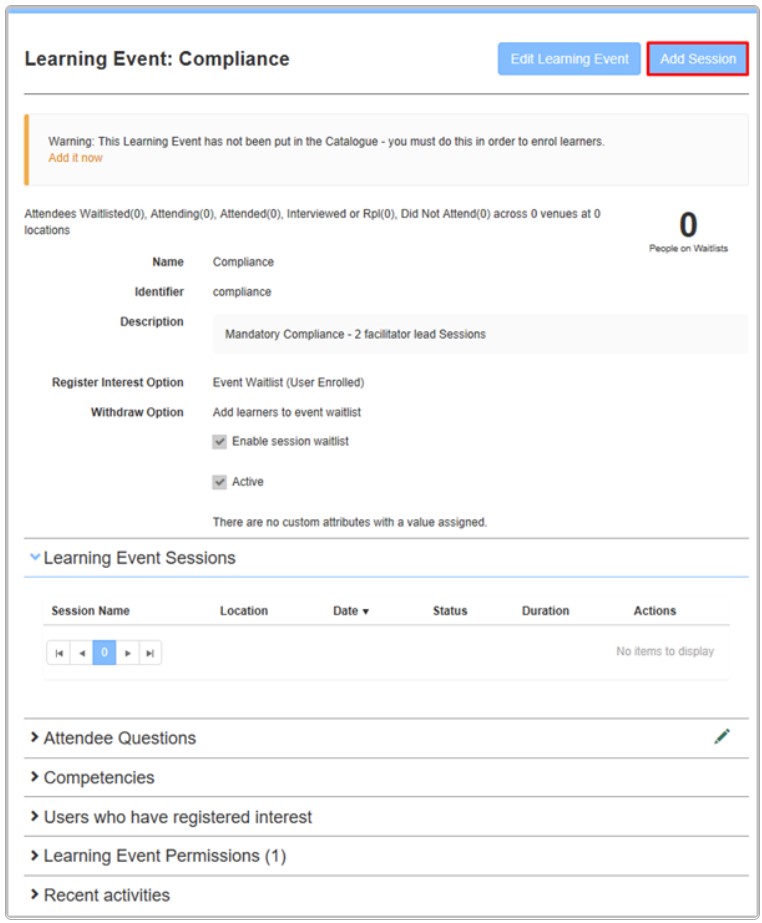
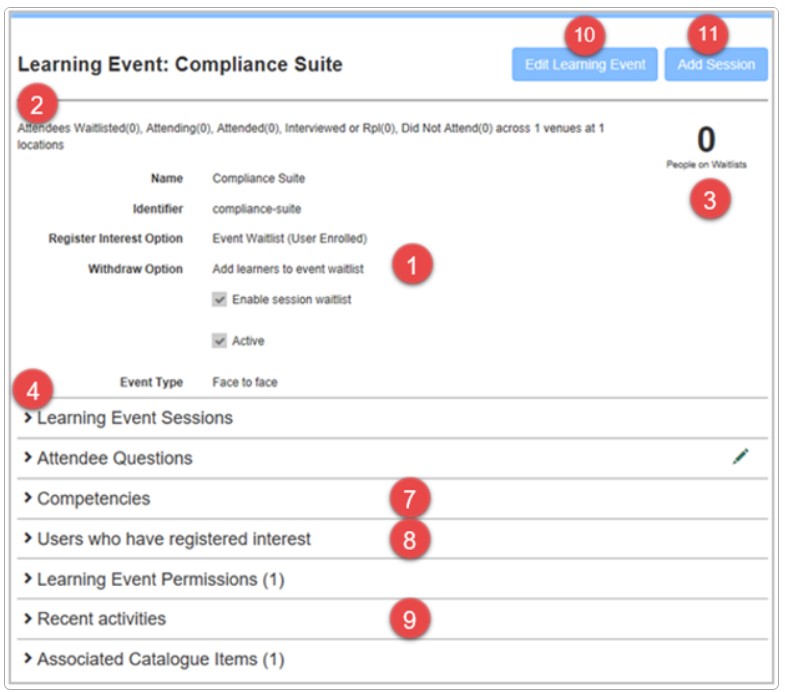
Inspect a Learning Event from Manage Sessions via the link to the event at the top of the Manage a Session and Mark a Session screens.
- Primary characteristics of the event are listed, including options chosen and whether it's active.
- The number of attendees in each category: Waitlisted, Attending, Attended, Interviewed or RPL, Did not attend.
-
The number of people on waitlists.
-
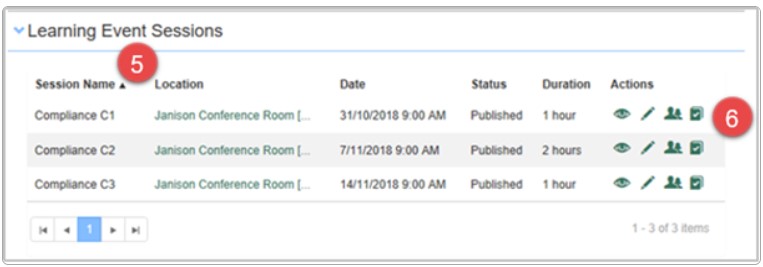
Select the chevron beside Learning Event Sessions to view linked sessions.
-
Each session can be viewed, edited, managed, or marked from the Action column.
- Select Edit Learning Event to edit, or Add Session to add a session.
Add a session
Select Manage Learning > Manage Sessions > Add Session.
Note
Create the Learning Event before creating its sessions.
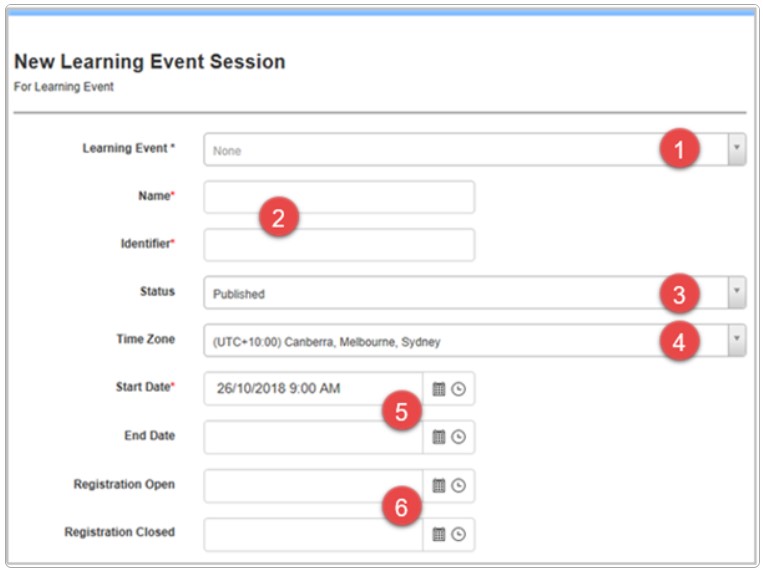
- Select a Learning Event from the dropdown.
- Complete the Name field. Identifier auto-populates.
-
Select the Status:
- Setup — not published to the catalogue
- Published — published to the catalogue
- Archived
- Completed — all attendees marked and the session is complete
- Cancelled
-
Select the Time Zone.
- Use the date and time pickers to set Start and End Dates and times.
-
Use the date and time pickers to set Registration Open and Closed dates and times.
-
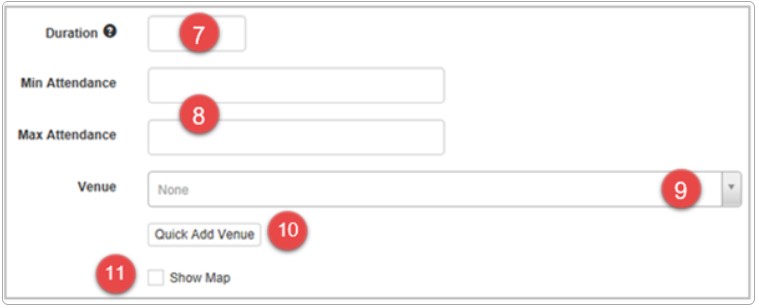
Enter the Duration (h for hours, m for minutes).
- Set the Minimum and Maximum Attendance.
- Select an existing Venue, or
- Select Quick Add Venue to add a new one (the location must have a physical address).
-
Optionally select Show Map.
-
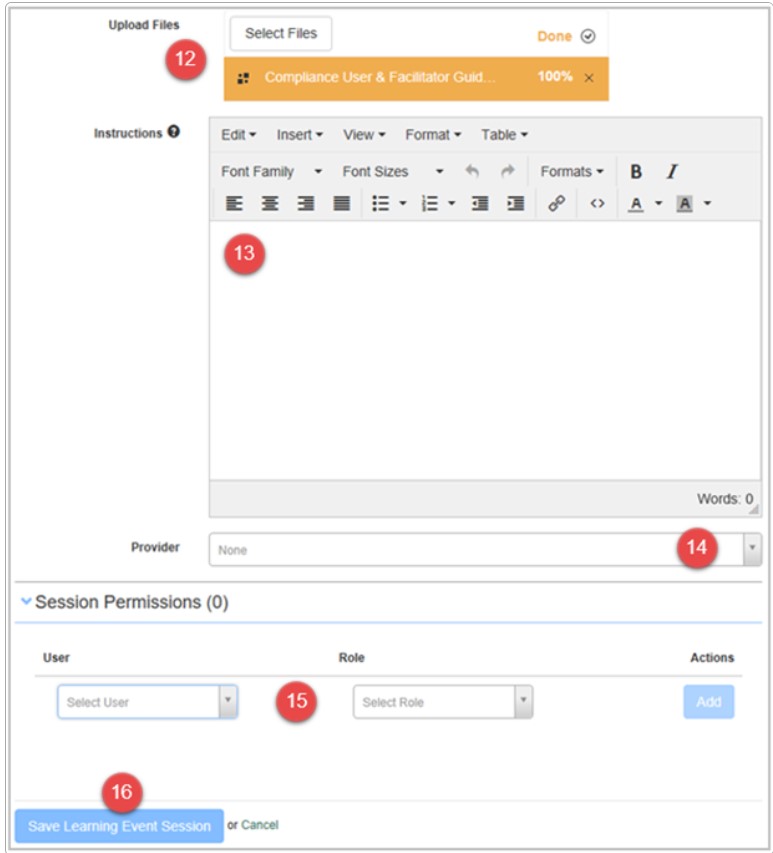
Use Upload Files to include attachments. Select Select Files and browse. Attachments aren't sent directly to attendees — they receive a link in their email/iCAL appointment.
-
Use the rich text editor to provide extra information. This is shown on the session summary screen and in the iCAL email when users are enrolled.
-
Provider is set at the catalogue item level, but you can enter a provider for each session if needed.
-
Select Save Learning Event Session.
View a session
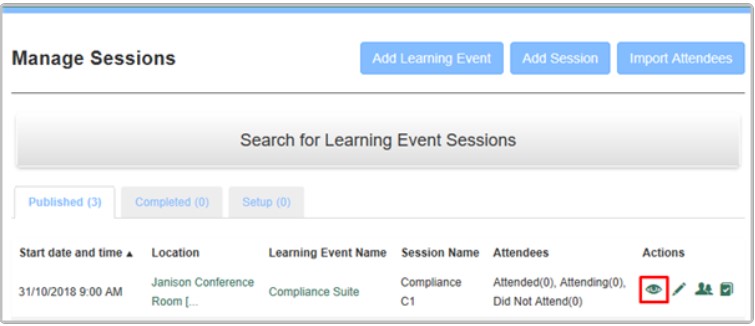
Select Manage Learning > Manage Sessions, locate the session, and select the eye icon.
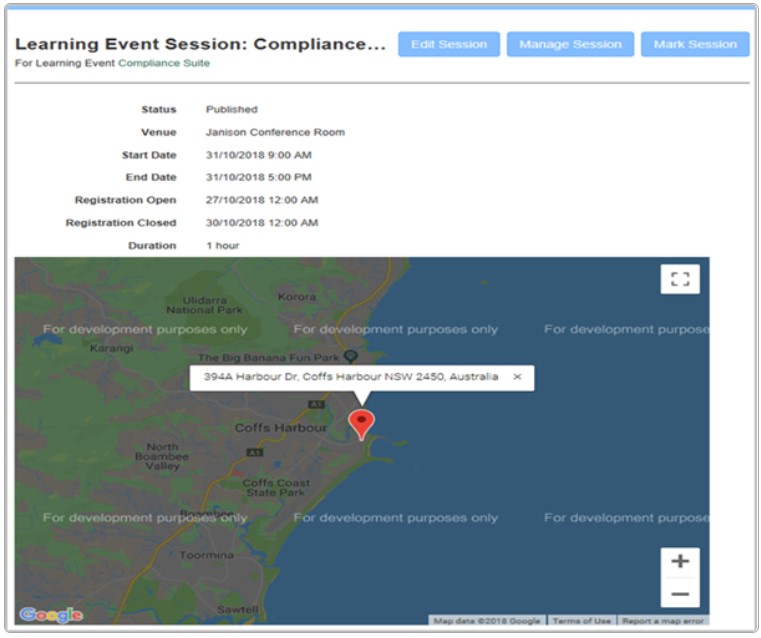
The screen shows basic information and links to editing, managing, and marking.
Edit a session
Select Manage Learning > Manage Sessions and select the pencil icon next to the session.
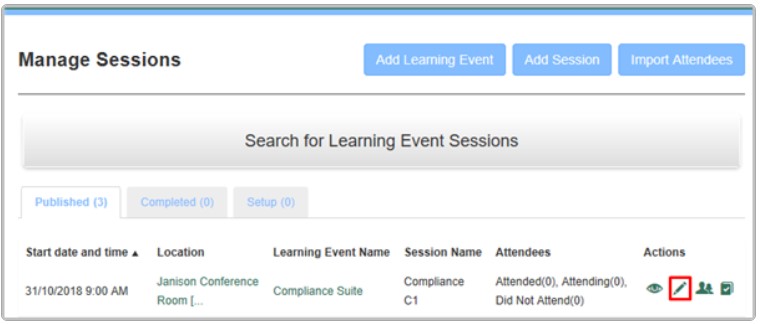
This takes you to the edit screen in Manage Learning Assets.
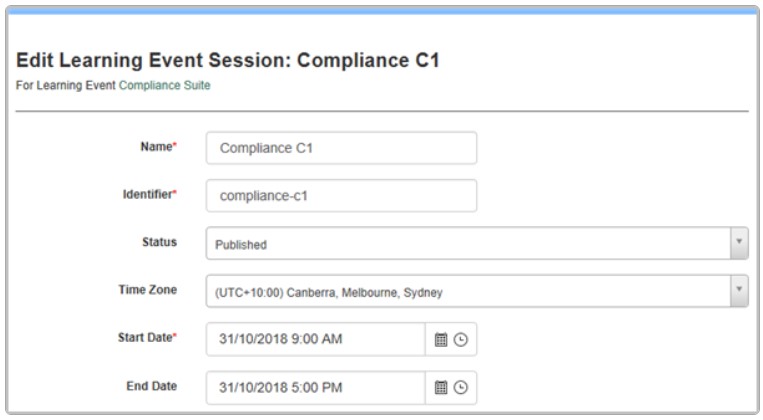
Re-sending information to attendees
When you change any of these and select Save, you're offered the option to re-notify attendees:
- The dates
- The times
- The venue
- The information text
- The attachments
If you select Send notification to attending users and then Notify Users, attendees receive a replacement calendar appointment via email.
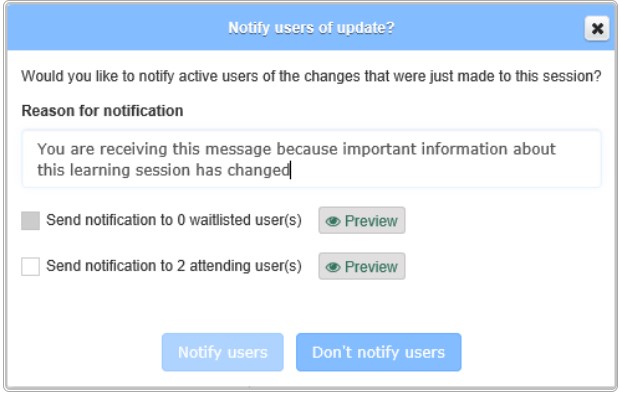
You can also notify waitlisted users by selecting Send notification to waitlisted users.
Session summary screen
Each session has a summary screen learners view in the CLS.
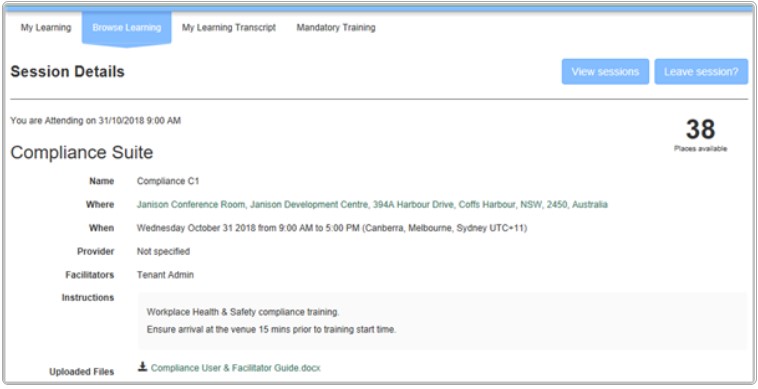
From this page, the user can:
- View session information
- Download attachments
- Choose to attend or withdraw (if permitted)
- See a Google map popup of the venue (if Show Map is checked and the location and venue are set)
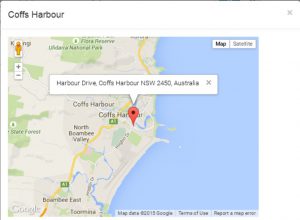
The user can access this screen from the session list shown when first enrolling in the Learning Event, from their My Learning screen, or via a hyperlink the administrator inserts in the email message.
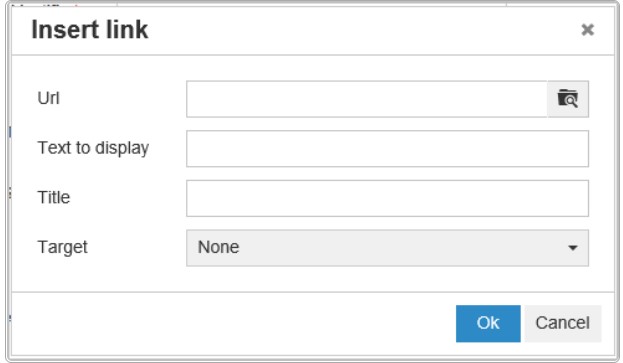
To insert the session details hyperlink in an email message, use the link feature with the URL set to the token [Session.SessionDetailsLink]:

Manage a session and waiting lists
The Manage Session screen lets the session manager examine session details and allocate users.
Select Manage Learning > Manage Sessions, locate the session, and select the manage icon.
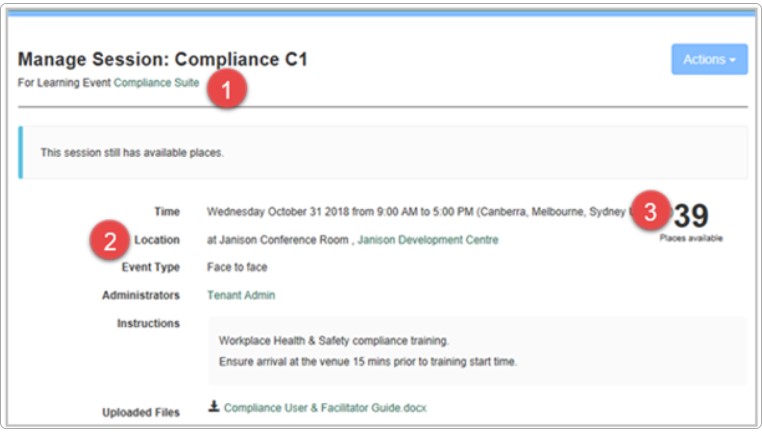
The screen shows:
- The session name and a link to its Learning Event.
- The session details.
-
The number of places available.
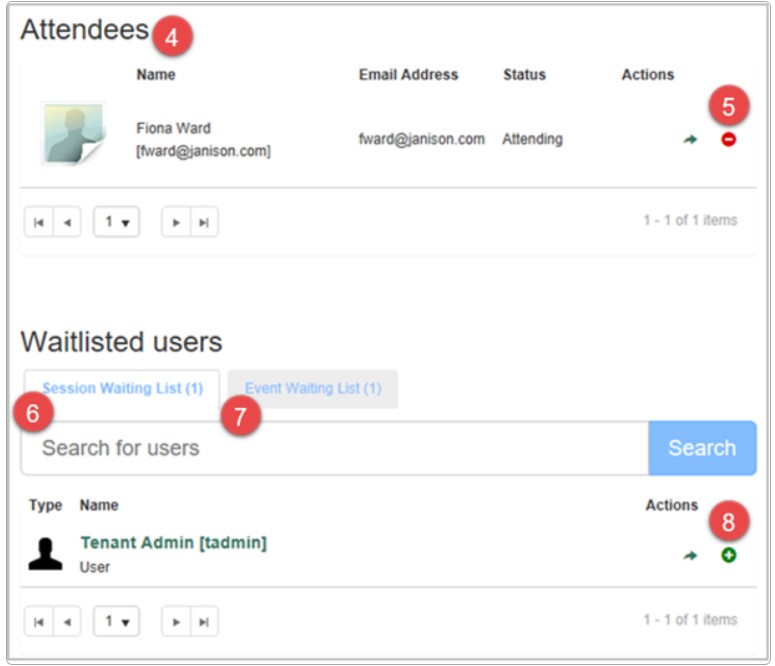
-
The list of enrolled attendees.
- Delete an attendee with the minus icon — they're moved to the session waitlist.
There are two tabs under Waitlisted Users: the session waitlist and the event waitlist. Select a tab to display the list. Both lists can be searched.
- The session waiting list refers to the session you're managing.
- The event waiting list refers to the Learning Event.
-
Select the plus icon on either list to approve a user — they're moved into the attendee list.
Note
You don't need to save this screen for waitlist changes to take effect.
Mark a session
To inspect users in a session and mark whether they attended, select Manage Learning > Manage Sessions and select the Mark icon.
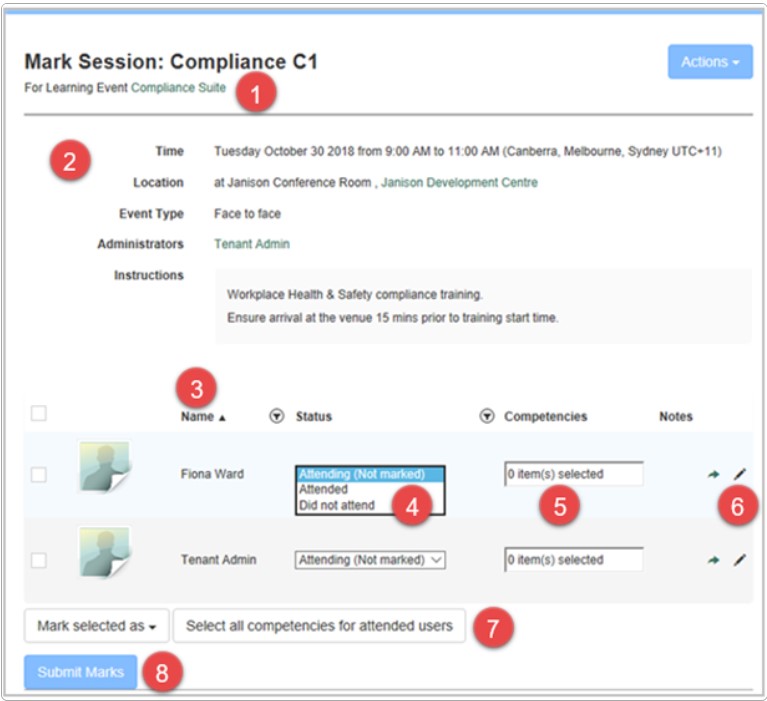
The screen shows:
- The session name and a link to its Learning Event.
- The session details.
- A list of attendees.
- Select the Status dropdown for each user and choose one of four options.
-
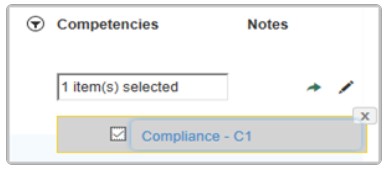
The Competencies column only displays if competencies are assigned. If competencies are awarded manually, select the field and choose competencies to award.
-
Add notes via the edit pencil if needed.
- For bulk marking, select the checkbox to the left of each user and use Mark Selected As and Select all competencies for attended users.
- Select Submit Marks.
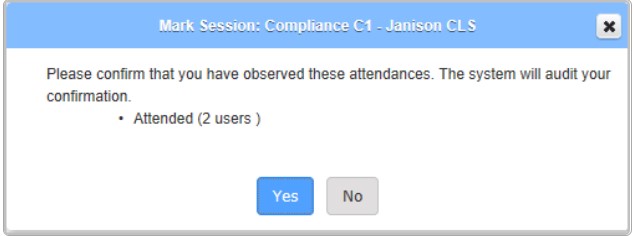
You're asked to confirm:
Note
To modify marks in a completed session, first edit the session and change its status to Published.
Print session details
Session managers can print session details using print templates. Use a default template or create a custom one.
Create a print template
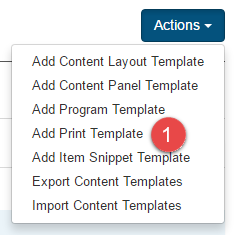
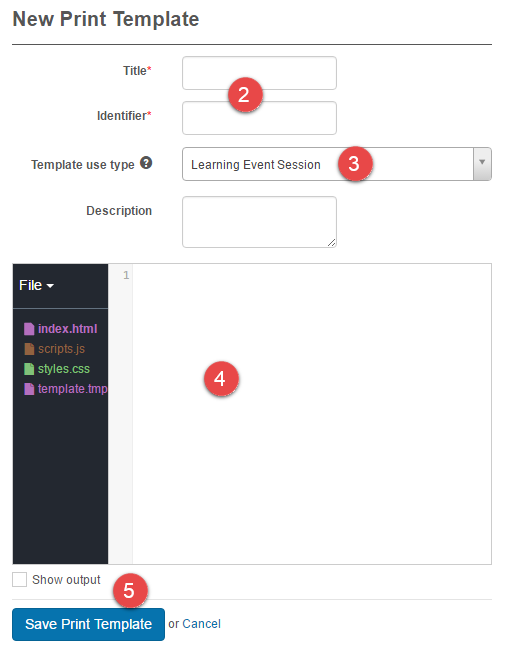
Browse to Design > Templates.
Select Add Print Template.
- Enter a Title and Identifier.
- Select Learning Event Session.
- Enter the code for the template (advanced skills required — contact customer service).
-
Select Save Print Template.
Set allowable print templates
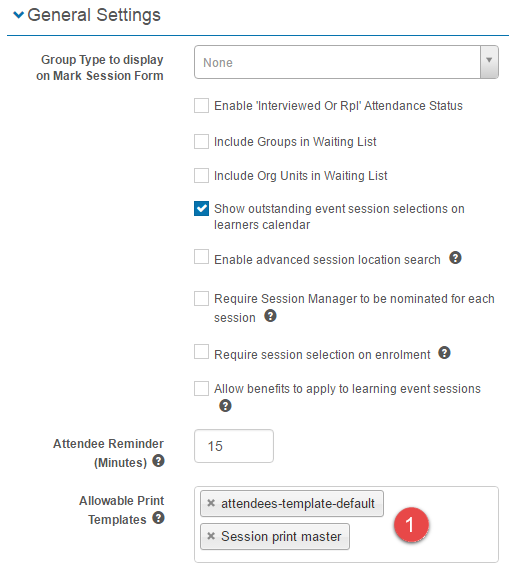
Browse to Settings > Learning Event.
-
Enter the names of the required print templates.
-
Select Save Learning Event Settings.

Print session details
Browse to Manage Learning > Manage Sessions.
-
Select Mark Attendance.
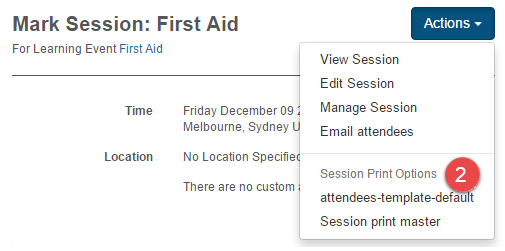
The Mark Session screen is displayed. Templates selected in settings appear at the bottom of the Actions dropdown.
-
Select the required template.
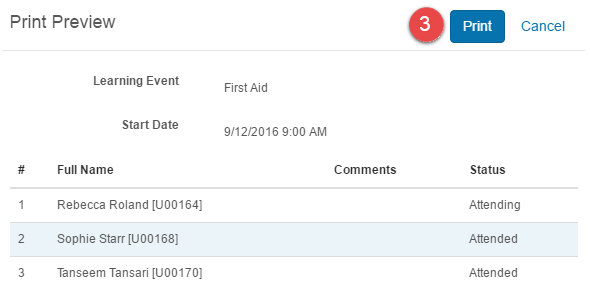
The Print Preview popup appears.
-
Select Print.
Locations, venues, and maps
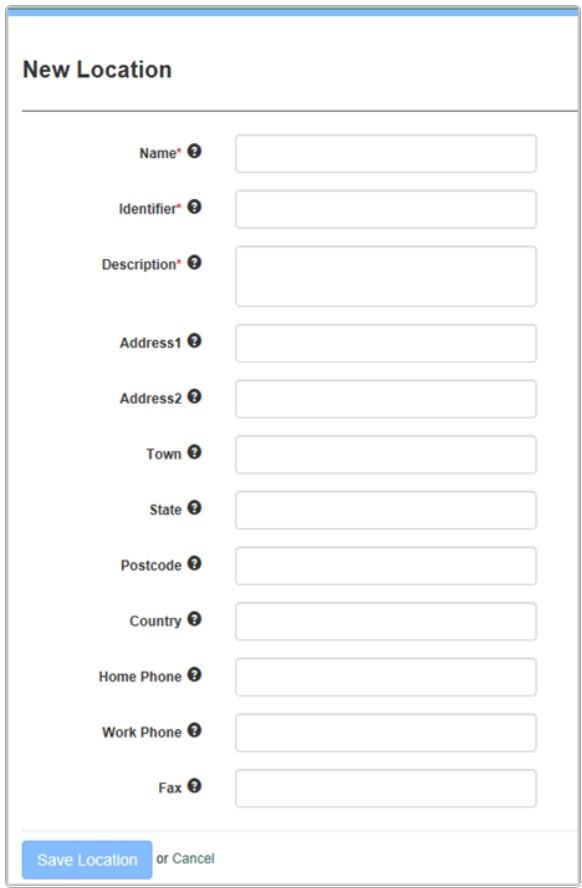
To offer maps for sessions, set the venue when adding or editing the session. The venue must be linked to a location with a physical address.
To add a location, select Settings > Locations > Add Location.
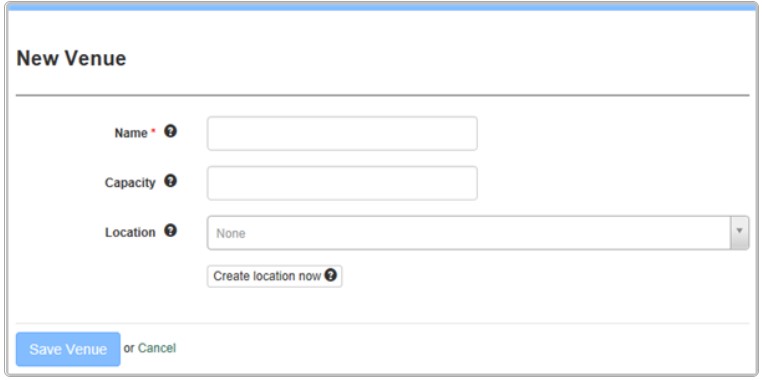
To add a venue, select Settings > Locations > Add Venue and select the location.
Tip
Use Quick Add Venue in the session add/edit screen, ensuring you select a location with a physical address.
Message templates and sessions
Message templates are the templates for automatic email messages sent from the CLS. They're customisable and contain tokens drawn from the CLS database — see Settings > Message Templates.
The following templates are involved in session management:
| Template | Description |
|---|---|
| LearningEvent-AttendeeAdded | Sent to a user after they're successfully enrolled in a session. |
| LearningEvent-InProgram-AttendeeAdded | Sent to a user after enrolment when the Learning Event is in a program. |
| LearningEvent-AttendeeAdded-ManagerNofify | Sent to a user's manager after the user is enrolled in a session. |
| LearningEvent-AttendeePendingApproval | Sent to users who have requested approval into a session. |
| LearningEvent-AttendeeRemoved | Sent to a user after they're removed from a session. |
| LearningEvent-AttendeeSessionCancelled | Sent when a session the user enrolled in is cancelled. |
| LearningEvent-AttendeeWaitlisted | Sent to a user after being waitlisted for a session. |
| LearningEvent-AttendeeWaitlisted-ManagerNofify | Sent to a user's manager after they're waitlisted. |
| LearningEvent-AttendeeWithdrawn-ManagerNofify | Sent to a user's manager after the user withdraws. |
| LearningEvent-NewSessionForRegisteredUsers | Sent to registered users when a new session is available. |
| LearningEvent-NewSessionForWaitlistedUsers | Sent to waitlisted users when a new session is available. |
| LearningEvent-UpdateSessionForRegisteredUsers | Sent to registered users when session details change. |
| LearningEvent-UpdateSessionForWaitlistedUsers | Sent to waitlisted users when session details change. |
| LearningEvent-AttendeeSessionUpdate | Sent to an attending user when session details change. |
| LearningEvent-InProgram-AttendeeSessionUpdate | Sent when session details change for a Learning Event in a program. |
Learning Event settings
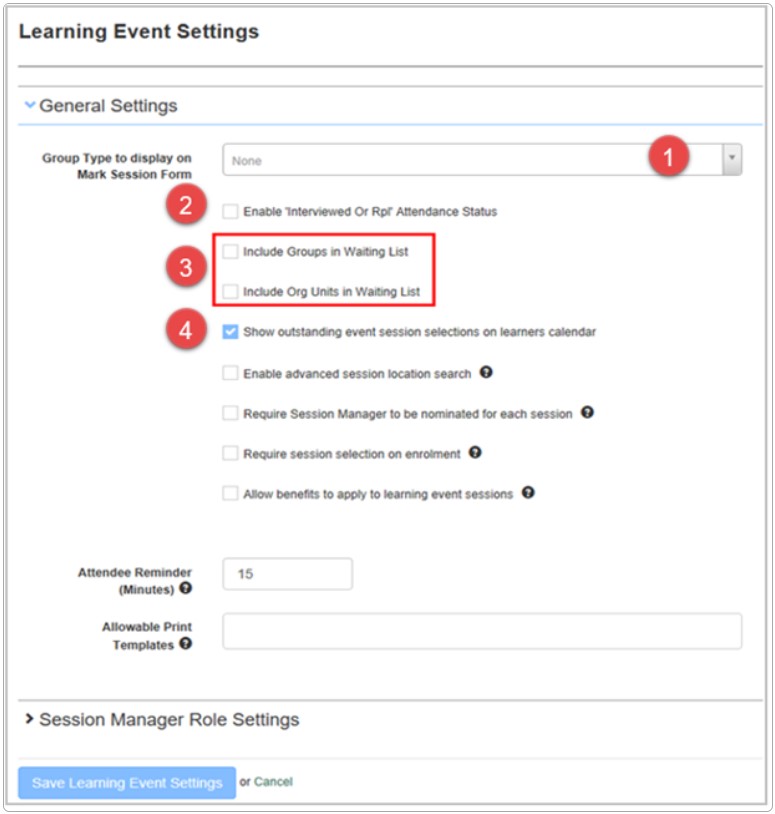
These are configured via Settings > Learning Event.
- Group Type — select a group type.
- Interviewed or RPL — adds this option to those a session marker can choose. Notes are then compulsory.
- Options to enable the movement of whole groups and org units between waiting lists and attendee lists.
-
Show outstanding sessions on the learner's calendar.
Settings
Several platform settings affect Learning Events.
Administrators can configure the following settings:
Learning Event Settings (Settings > Learning Event) — set group type, options for moving groups between waitlists, calendar display, and Interviewed or RPL marking option.
Self-enrolment Settings (Settings > Self-Enrolment) — control whether catalogue items allow self-enrolment, which affects how learners interact with Learning Events.
Message Templates (Settings > Message Templates) — customise the email templates sent during session management.
Locations (Settings > Locations) — define locations and venues used for session maps.
Roles (Settings > Roles) — the Event Facilitator User Extra Role manages and administers Learning Events.