Enrolments
Users can be enrolled in catalogue items by other authorised users using several methods. These methods create a user enrolment in the catalogue item(s). See Enrolment methods below for more.
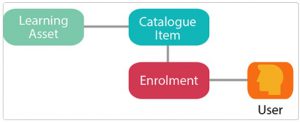
In much of the Enrolments section, authorised users don't add enrolments — they search for, inspect, modify, and delete existing ones.
You can view:
- User details
- The catalogue item the user is enrolled in
- Creation date
- Completion date
- Status
- Attempts
- Progress details (via View More)
Note
A user is enrolled in a catalogue item or program, not in individual learning assets.
Enrolments can be accessed by selecting Manage Learning > Enrolments. All enrolments are listed. Sort by selecting column headers (Name and Username, Catalogue Item, Date Created, Date Completed, Status, Attempt).
Search for a user enrolment
- Go to Manage Learning > Enrolments.
- Expand Search for User by name, email or username.
- Enter the username, email, or name.
- Enter the catalogue item name.
- Select other filters as required.
- Select Search.
Delete a user enrolment
- Go to Manage Learning > Enrolments.
- Search for the user.
- Select the checkbox to the left of the user enrolment.
- Select Delete.
Note
Enrolments using payment gateways can't be deleted.
View more about an enrolment
- Go to Manage Learning > Enrolments.
- Search for the user.
- Select the View More icon in the Attempt column.
The screen shows:
- Enrolment details — Status, Created, Start Date, Due Date, First Visit, Completed Date, Expiry Date, Score, Comments.
- Program Components — lists components and progress status of each item.
Depending on enabled plugins, you may also see:
- CPD Points
- Progress Details
- Enrolment Purchase Details
- Competency Progress
- Extended Information (enrolment custom attributes)
Note
An enrolment that is incomplete or not attempted can have its status changed from this screen.
Edit a user enrolment
- Go to Manage Learning > Enrolments.
- Search for the user.
- Select the View More icon.
- Select Edit Enrolment.
- Change details as required.
- Select Save Enrolment.
Enrolment summary
You can also view enrolment details from the user profile page.
- Go to Manage People > Users.
- Search for and select the user.
- Expand the Enrolments Summary section.
- Select Manage Enrolments — links to the Manage Learning > Enrolments screen.
Enrolment methods
Several methods to enrol a user:
Assign Learning wizard — assign learning to a user, group, organisation, or organisation unit. See Assign Learning.
Import learning history — upload an Excel spreadsheet of enrolment data. This method also lets you set the enrolment status to various values.
User enrolment rules — rules that select specific users and automatically enrol them in specific catalogue items.
Self-enrolment — the user browses the catalogue and selects the enrol button. See the self-enrolment settings document.
Consequent enrolment change — set on catalogue items, this auto-enrols users into selected items on completion of the current enrolment.
Manual enrolment — within a catalogue item, Quick Add Enrolment is available. Usually used for review members or sample students. No notifications are sent.
View more about an enrolment (detail)
Select Manage Learning > Enrolments and select the View More icon.

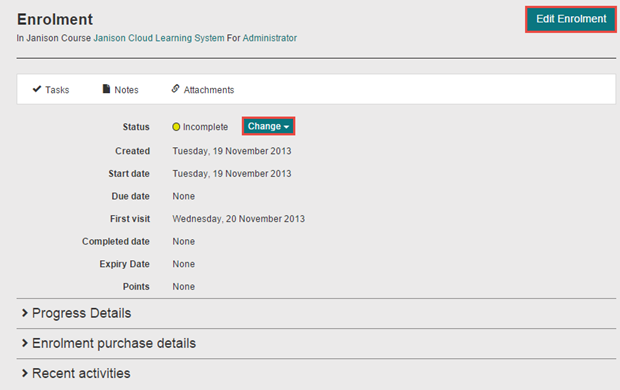
A new screen opens. It shows the enrolment details and lets you view and edit the status.
Note
Not Attempted means the user hasn't started the catalogue item. Incomplete means they've started but not completed.
-
Select Change to change the status. Options:
- Incomplete
- Complete — forces completion of the enrolment only, not the learning asset completion or progress. Test attempts are cancelled and not marked.
- Cancel — cancels the enrolment. In-progress work such as test attempts isn't marked. Learning asset progress is cancelled.
-
Select the chevrons next to Progress Details, Enrolment purchase details, and Recent activities to view those.
- Select Edit Enrolment for more options.
Search user enrolments
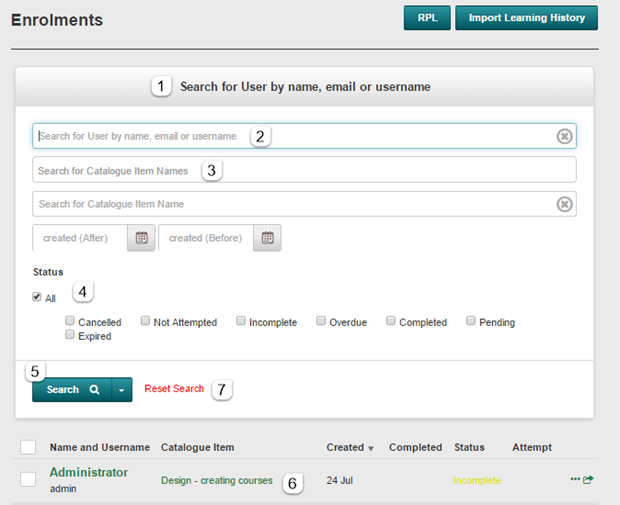
The search feature helps you find a user and their enrolments quickly.
Select Manage Learning > Enrolments.
- Select Search for User by name, email or Username to display the search field.
- Enter a user search word, or
- Enter a catalogue search word (leave blank to return all catalogue items for the user).
- Optionally set Created After or Created Before.
Filter by enrolment status: All, Cancelled, Not Attempted, Incomplete, Overdue, Completed, Pending.
- Select Search.
- Results appear in the Display Name column.
-
To perform another search, select Reset Search.
Edit user enrolment
Sometimes an administrator or staff member needs to delete a user enrolment or edit its details — for example, to check competency progress or add a competency.
Select Manage Learning > Enrolments, locate the enrolment, and select the View More icon.
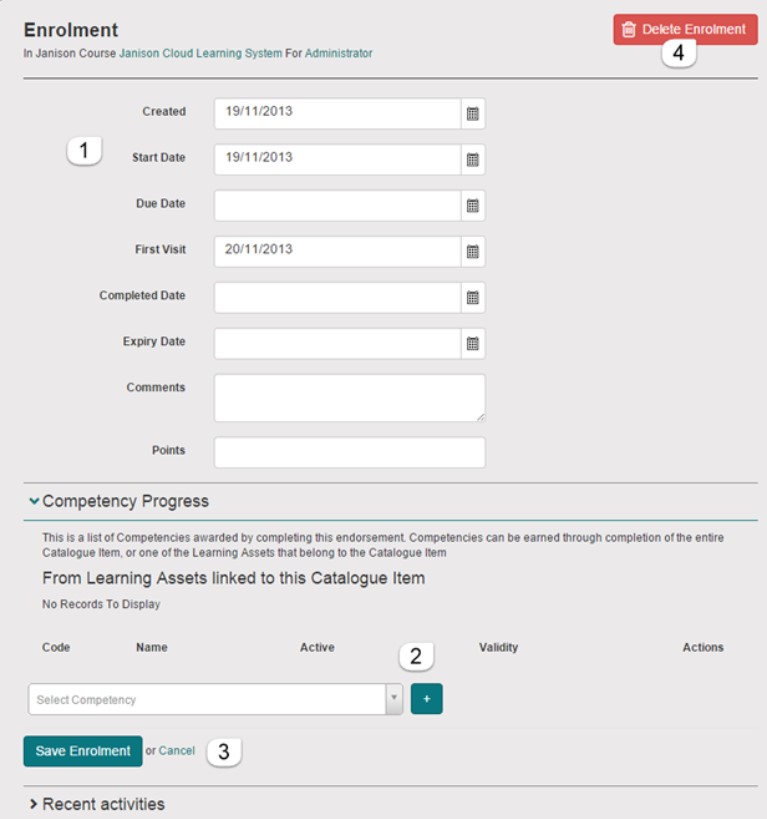
The next screen shows the enrolment details.
- Dates, comments, and points can be edited.
- Competencies can be added — select each and select the plus icon.
- Select Save Enrolment.
-
To delete the entire enrolment, select Delete Enrolment, then Yes. The enrolment is removed and the user's progress for the learning asset is also removed.
Recognition of Prior Learning (RPL)
RPL lets an administrator mark a user as competent or compliant if they've achieved the requirements through an external provider or other means.
Note
RPL isn't enabled by default. Enable it via Settings > Tenant Settings > Miscellaneous > Enable RPL.
Create an RPL record
-
Select Manage Learning > Enrolments.

-
Select RPL.
-
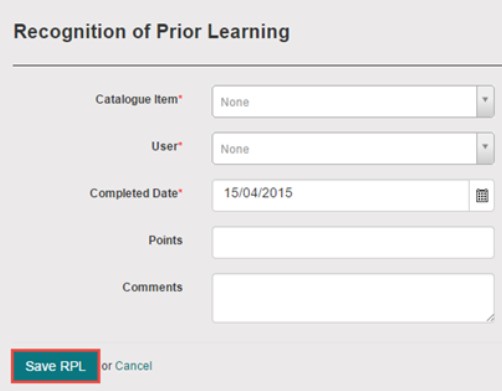
Complete the form:
- Catalogue Item
- User
- Completed Date
- Comments
- Points Allocation
- Optionally Include Consequent Enrolment Expiry
-
Select Save RPL.
Complete enrolments and learning assets
The status of an enrolment can be changed. Changing it impacts the learning assets within the enrolment. Individual asset status can also be changed.
Enrolment status definitions
- Not Attempted — the learner hasn't started.
- Incomplete — the learner has started but not completed.
- Complete — the learner has completed.
Enrolments can be cancelled — cancelled ones are no longer listed on the Enrolments screen.
Impact of changing enrolment status
- Not Attempted to Incomplete — the catalogue item appears as started but not complete.
- Not Attempted or Incomplete to Complete — forces enrolment completion. The item appears complete but course progress isn't changed. Test attempts are cancelled and not marked.
- Not Attempted or Incomplete to Cancelled — both enrolment and course progress are cancelled. Activities in progress are cancelled and not marked.
Change the status of an enrolment
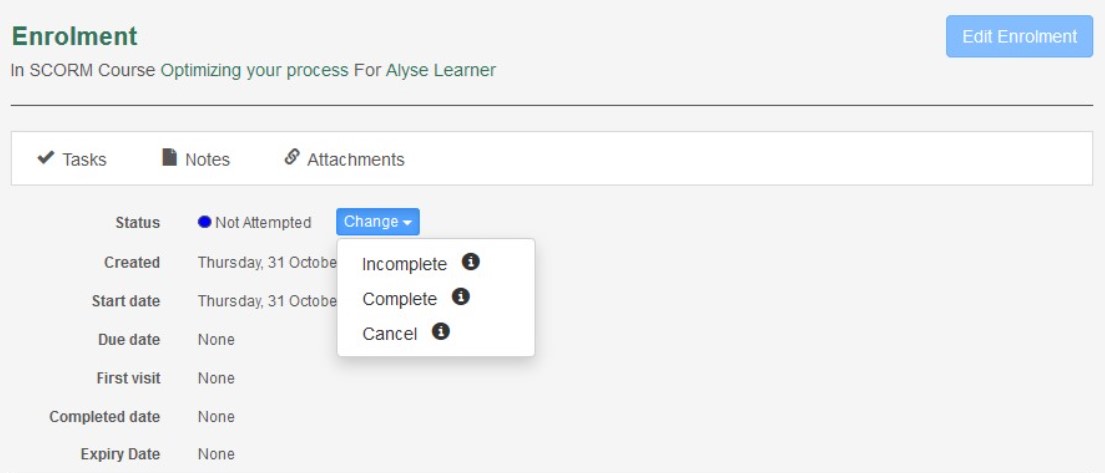
- Navigate to Manage Learning > Enrolments.
- Select the View more icon next to the enrolment.
- The status can be changed if currently Not Attempted or Incomplete; it can't if Completed or Cancelled.
- Select Change and choose the status.
- Review the popup and select Yes to confirm.
Change the status of a learning asset
- Navigate to Manage Learning > Enrolments.
- Select the View more icon.
- Select Program Components to expand the asset list.
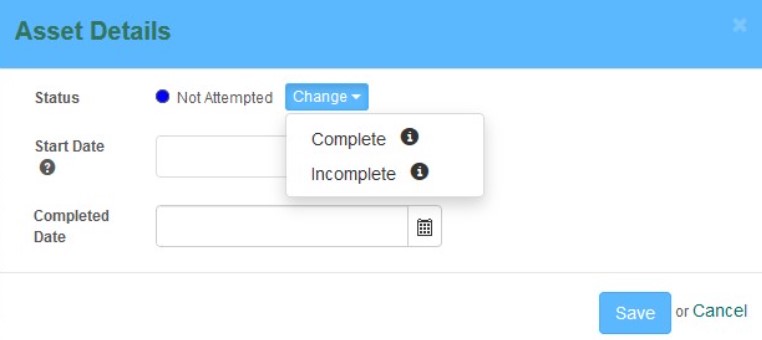
- Select the edit icon next to the required asset.
- The status can be changed if currently Not Attempted or Incomplete.
-
Select Change and choose the status:
- If changing to Completed, enter a Start Date and Completed Date (defaults to today).
- If changing to Incomplete, enter a Start Date and leave Completed Date blank.
-
Enter the dates.
- Review the popup and select Yes to confirm.
Import learning history
User enrolments can be created by uploading data from an Excel spreadsheet.
A template is available. The first page (Data) has headings and example data. The Supported Attributes page describes each field and indicates mandatory ones (OwnerId, User Id, Lesson Status).
Note
To import custom attributes, add them as additional columns to the template.
Note
When importing new records, the system checks for duplicates based on Catalogue ID (OwnerId), User Id, Lesson Status, Date Completed, and Date Created. If a record already exists, it's considered a duplicate and a new record isn't created.
The learning history template
To import, complete the template available from Manage Learning > Enrolments > Import Learning History.
Tip
Do a sample import into a test site before importing to production.
Supported attributes:
| Column | Mandatory | Description |
|---|---|---|
| OwnerId | Yes | The identifier of the catalogue item. |
| ProgramId | No | The identifier of the program the enrolment belongs to. |
| User Id | Yes | Username of the user. |
| Enrolment Guid | No | GUID for the specific enrolment — used to make edits to existing enrolments only. |
| Lesson Status | Yes | NotAttempted, Browsed, Incomplete, Completed, Passed, Failed, Pending, Declined, or Cancelled. |
| Date Last Visited | No | When the user last accessed the item. |
| Date Completed | No | When the user completed the item. Mandatory if Lesson Status is Completed. |
| First Visit | No | When the user first accessed the item. |
| Date Created | No | When the enrolment record was created. |
| Due Date | No | When the enrolment is due to be completed. |
| Start Date | No | When the enrolment is due to start. |
| Expired Date | No | When the enrolment expires. |
| Score | No | The raw score for the enrolment. |
| Comments | No | Comments about the user's enrolment or progress. |
| Certificate Number | No | Certificate number of the user's completion certificate. |
| Token Code | No | Token code used for enrolment. |
| Token Code Id | No | Invoice Number of Token Order for the specified Token Code. |
Note
The order of columns doesn't matter, but column names must match exactly (e.g. User Id, not UserID).
Import steps
-
Select Manage Learning > Enrolments.

-
Select Import Learning History.
- Select Template to download the sample.
- Complete the spreadsheet and save it.
-
Enable optional settings:
- Allow custom attribute list item creation
- Overwrite existing enrolments
-
Enter an email address for results.
- Select Select File and choose your file.
- Select Import and email result.
Settings
Several platform settings affect enrolments.
Administrators can configure the following settings:
Self-enrolment Settings (Settings > Self Enrolment Settings) — control whether catalogue items allow self-enrolment and the approval workflows that apply.
User Enrolment Rules — define rules that automatically enrol selected users in catalogue items.
Tenant Settings (Settings > Tenant Settings > Miscellaneous) — enable RPL to allow Recognition of Prior Learning.
Message Templates (Settings > Message Templates) — customise the enrolment-related emails.
Roles (Settings > Roles) — control who can manage enrolments via their scope.