Positions
One user's experience of a CLS tenant can be totally different from another's because a sophisticated interplay of factors determines what each user can see and do. These factors include the user's:
- Membership of an organisation and org unit
- Role(s), see Settings > Roles
- Membership of group(s)
- Involvement in a Position-to-Position or User-to-User management hierarchy
The CLS supports two kinds of management hierarchies:
- User-to-User — items in the hierarchy are users. For example, User B reports to User A.
- Position-to-Position — items in the hierarchy are positions. For example, the Factory Manager position reports to the CEO position. Users with the Factory Manager position then report to users with the CEO position. A position can have one or more users.
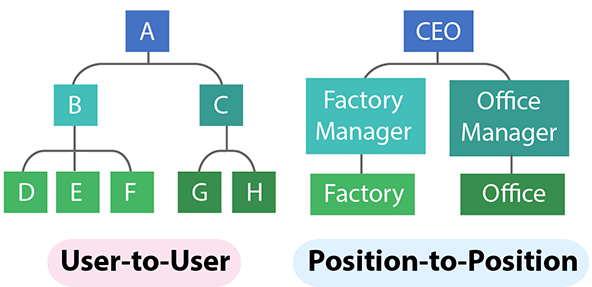
Both options enable reporting hierarchies where one item reports to another item that itself reports to another, and so on. Each item in the structure sees:
- Direct reports — material relating to the items that report to it (lists of users, enrolments, etc.)
- Indirect reports — the item also looks over the shoulders of the items beneath it in the hierarchy, all the way to the bottom
Once users have staff reporting to them via either hierarchy, they become managers and are automatically given the implicit role of User Manager. This is different from an explicit role allocated to an individual user. You can make a user a manager of another user outside of a reporting hierarchy by using explicit roles, but this won't be part of a hierarchy and won't show indirect reports.
Users who become managers through a hierarchy will see:
- A list of users they manage directly and indirectly (including themselves) in Manage People
- Enrolments and related functions (e.g. Approve Learning) for those users in Manage Learning
- Access to customisable reports for those users in Manage Learning
Depending on the plugins installed they may also see continuing professional development (CPD) displays for those users in their own My Learning screens, and access to CPD and Competencies for those users in Manage Learning.
The power of the User Manager role can be extended and fine-tuned by editing it and changing settings for securable areas of the application — see Settings > Roles.
Comparison of management hierarchies
| Aspect | User-to-User | Position-to-Position |
|---|---|---|
| Direct and indirect reports | Yes | Yes |
| Reports to | Another user | Another position |
| Reports to set up for | A user | A position |
| Reports to shown at | User details screen | Position details screen |
| Reports on set up for | Users underneath this user in the hierarchy | Positions underneath this position |
| Reports on shown at | (Not shown) | Position details screen |
| Can a user report to more than one entity? | No — a user can only report to one user | Yes — a position can report to a position held by multiple users (e.g. job share) |
| Can report to another org unit? | Yes | Yes |
Position management
Positions are an optional CLS feature oriented to reporting. Each position belongs to one organisation unit and can report to another position (not necessarily in the same org unit). A user can hold only one position, which must belong to their organisation unit. A position can only report to one other position, although multiple users may hold that position.
The example below illustrates the simple Position-to-Position reporting hierarchy and the users who hold each position.
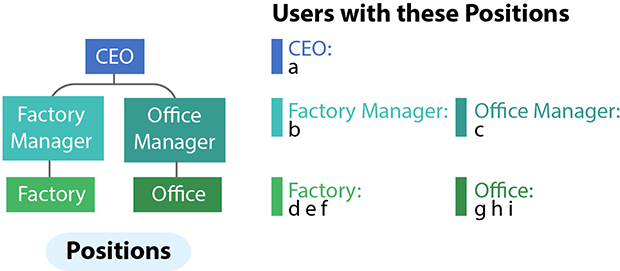
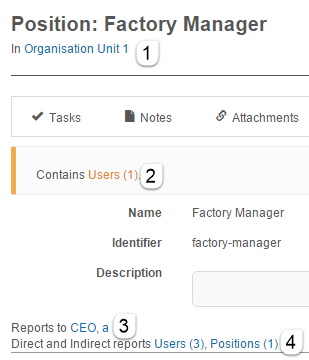
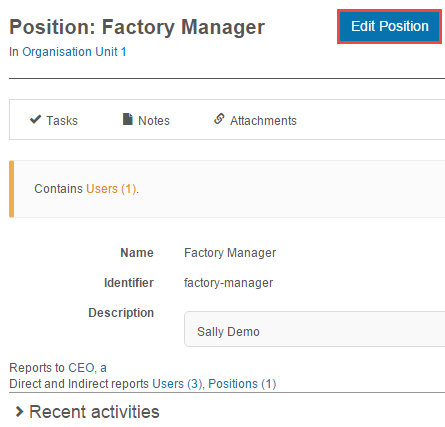
The Factory Manager position inspection screen would show:
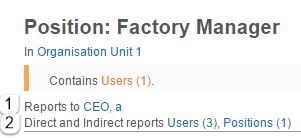
This screen has links to the position the Factory Manager reports to and the user who holds that position, and to the position that reports to Factory Manager and the users who hold that position.
Note
Circular reporting hierarchies are not permitted in the CLS. A position doesn't have to report to another position.
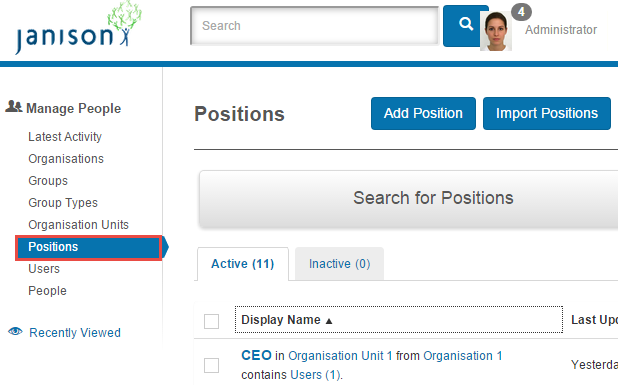
Positions can usually be managed by selecting Manage People > Positions.
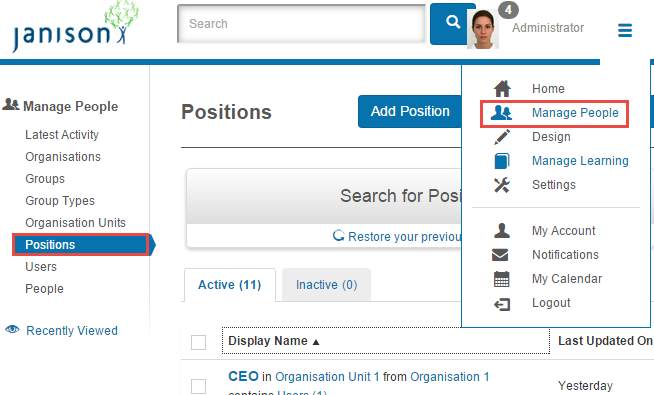
Many users won't see this menu item because of the security system. For authorised users it's visible if positions are enabled in the system and the Relationship Management Type is set to Positions — see Set up management relationships below.
Set up management relationships
Management relationships in the CLS can be run in different ways:
- Position-to-Position — positions are used explicitly for the management hierarchy and the Position function is visible in the Manage People menu.
- User-to-User — the management hierarchy is present but less visible. The Position function isn't in the Manage People menu.
- None — positions are disabled in the system. The rest of this document doesn't apply.
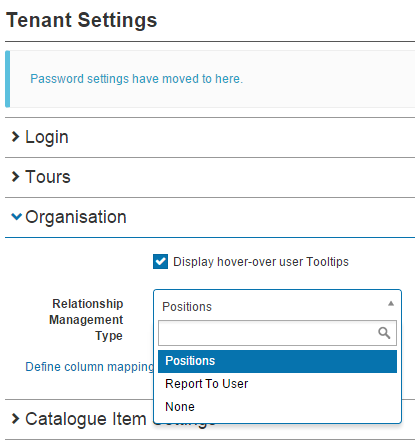
To set up positions, go to Settings > Tenant Settings.
Select the chevron next to Organisation, then select the dropdown next to Relationship Management Type. Choose:
- Positions for Position-to-Position management
- Report to User for User-to-User management
- None
Select Save Settings.
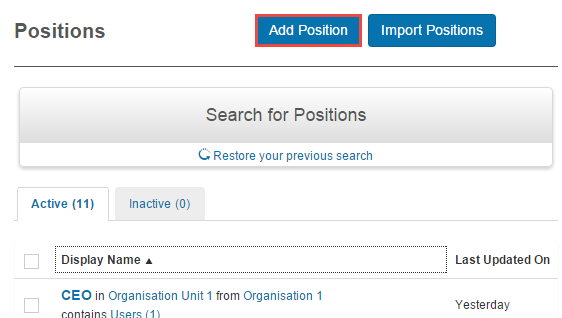
Manually add a position
Select Manage People > Positions > Add Position.
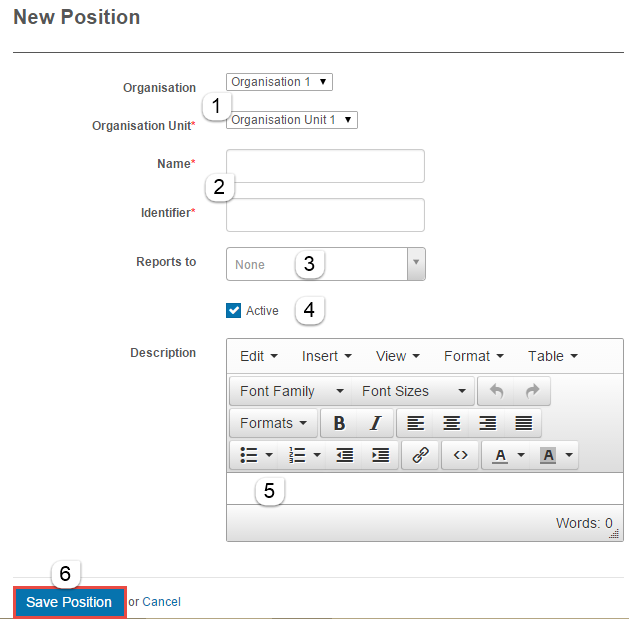
Complete the form:
- Enter an Organisation and Organisation Unit.
- Enter a Name and Identifier.
- Select Reports to and choose a position from the dropdown if desired. The system doesn't list any positions whose selection would result in a circular reporting hierarchy.
- Check the box to make the position Active.
- Optionally enter a Description.
-
Select Save Position.
Note
Custom attributes can be added to positions. If they exist, they appear in edit mode under Extended Information.
Import a position
If you have multiple users and positions to create, the import function is more efficient.
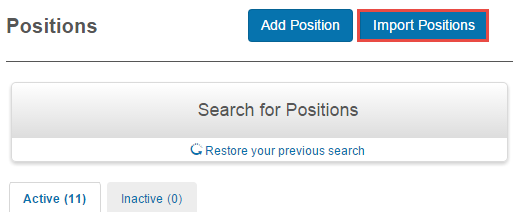
Select Manage People > Positions > Import Positions.
On the next screen, select the link to go to the user import.
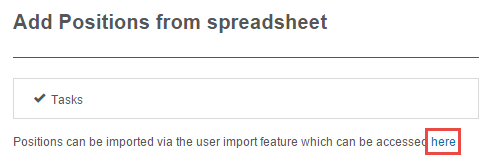
This takes you to Manage People > Users > Add or synchronise users from spreadsheet. Positions can be created at the same time as users — a new position is created when the data entered in the Position columns for a user doesn't already exist.
The data source decision matters:
- Sync data from HR system — the CLS inactivates any users in its system that aren't in the imported spreadsheet (treats the HR system as the master). This doesn't inactivate positions not in the spreadsheet.
- Data Upload — adds users and updates existing ones, but doesn't deactivate users not in the spreadsheet.
Specification for the import
- Download the CLS template.
- Choose the Data Source from the dropdown as described above.
- Select Default Settings to set the default import settings in Settings > Spreadsheet Import.
- Select Define column mappings to examine and change the correlations between the CLS and the client's HR system.
Settings that can be configured via Default Settings include:
- Allow update of existing user records if imported data differs from the CLS.
- Allow creation of any groups specified but not found.
- Inactivate group memberships not specified in the import file (only for group types in the file).
- Allow custom attributes of type list to have list items created during the import.
-
Send new users a welcome email — select View Email to see the current message.
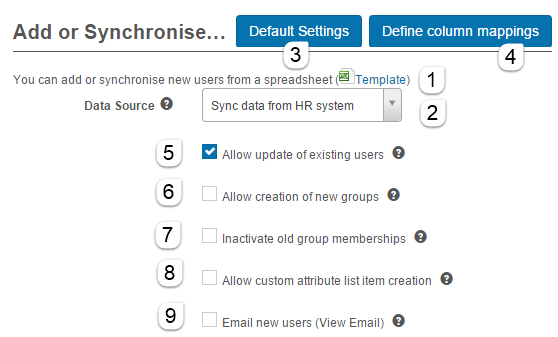
-
Create org units specified in the spreadsheet but not in the CLS. Org units without associated users are deactivated.
- Skip evaluation of an imported password's strength.
- Allow a user's password to be changed to the one in the spreadsheet.
- Enter an email address for results.
- Upload the import file with Select File.
-
Select Import and email result.
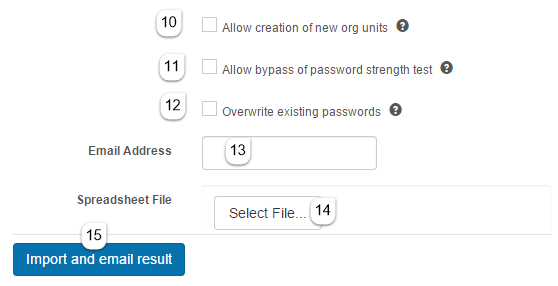
Template for import
The Data page in the template shows an example row. A new position is created through the import if the Position data entered for a user doesn't already exist (positions are in the same org and org unit as the user).
The Supported Attributes page describes the template fields. Fields relevant to positions are highlighted below. Note: Position Classification Id and Position Classification Name aren't used in an import.
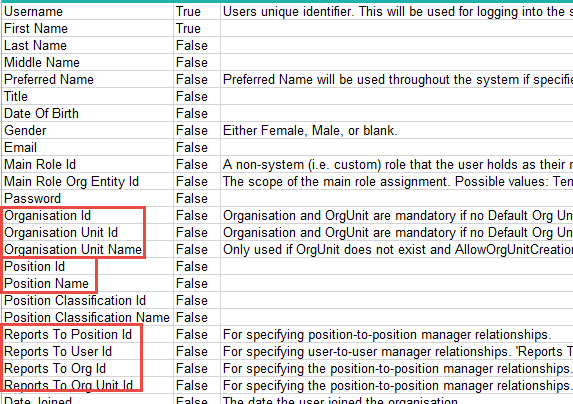
For a Position-to-Position manager relationship, enter data in:
- Reports To Position Id — the position this position reports to
- Reports To Org Id — the org id the Reports To Position belongs to
- Reports To Org Unit Id — the org unit id the Reports To Position belongs to (used with Reports To Org Id)
For a User-to-User manager relationship, only enter data in the Reports To User Id column.
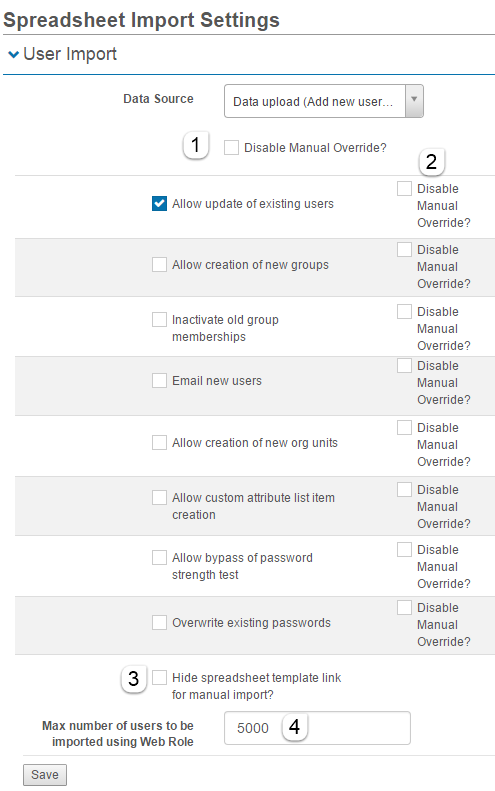
Settings for user import
This screen allows you to set the default specifications for a user import:
- Globally disable manual override so settings can't be customised for a particular import.
- Disable an individual manual override so the setting can't be customised during an import.
- Hide the import template link.
- Set the maximum number of users to be imported using Web Role.
-
Select Save.
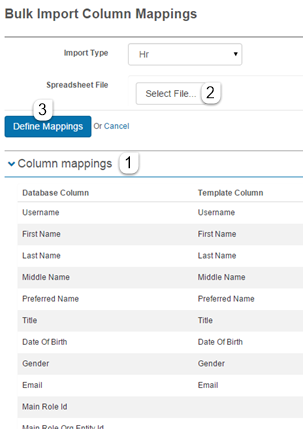
Define column mappings for HR sync
When data from a client's HR system is imported into the CLS, a correlation may be needed between the names the HR system calls each data field and the names the CLS uses.
- The existing mapping is shown on screen.
- Modify the mapping via a spreadsheet — select Select File to read a correlation file and redefine the mappings.
-
Select Define Mappings to save them.
Inspect position details
To inspect a position, navigate to Manage People > Positions and select the name. The details screen shows:
- The organisation unit the position is attached to.
- The number of users who hold the position (a link to those users).
- Who the position reports to, with links to that position and its user(s).
-
Who reports to the position, both directly and indirectly — links to the lists of users and to the position(s).
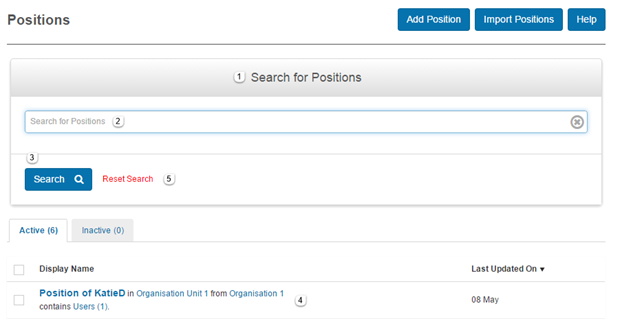
Search for a position
Select Manage People > Positions.
- Select Search for Positions to display the search field.
- Enter search text.
- Select Search. Results appear in the Display Name column.
-
To perform another search select Reset Search.
Edit a position
Navigate to Manage People > Positions and select the position name. Authorised users see the Edit Position button on the details screen.
Edit details as required and select Save Position.
Important
Once a position is saved, you can't change its organisation unit. This restriction prevents data integrity issues. To effectively change the org unit for a position, create a new position and move users into it.
Note
If positions and users are usually imported, don't edit them in the CLS — they may be overwritten on the next import. The master file is typically held in the client's HR system.
Archive a position
Archiving removes the position from the list of active positions. Archived positions can be accessed via the Archived tab.
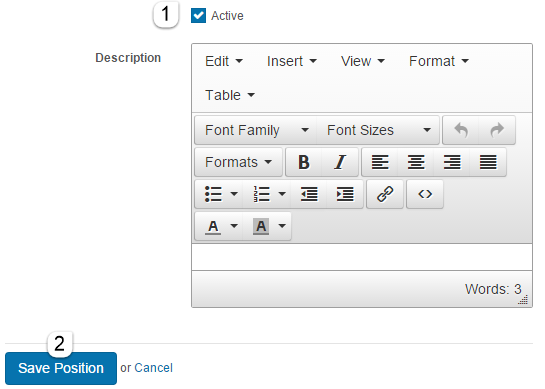
Archive via Edit Position
Locate the position and edit it.
- Uncheck the Active box.
-
Select Save Position.
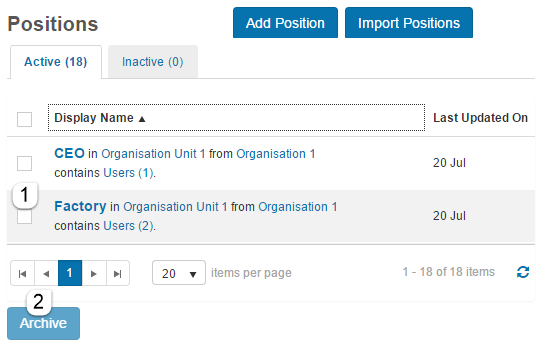
Archive via Position list
Select Manage People > Positions.
- Check the box to the left of the position you want to archive.
-
Select Archive.
Settings
Several platform settings affect positions.
Administrators can configure the following settings:
Tenant Settings (Settings > Tenant Settings) — set the Relationship Management Type to Positions, Report to User, or None. This controls whether the Position menu item is visible and which kind of management hierarchy is used.
Roles (Settings > Roles) — define the implicit User Manager role and other roles applied to people in the reporting hierarchy.
Spreadsheet Import (Settings > Spreadsheet Import) — set defaults for the user/position import process.
Custom Attributes (Settings > Custom Attributes) — link custom attributes to the Position entity so they appear in edit mode under Extended Information.