Customisable Reports
Customisable reports let you create and run detailed reports on key components of Janison Academy.
To create a report:
- Select the entity to report on (e.g. Users).
- Optionally apply a filter (e.g. users with the role of Basic User who are also inactive).
- Select the information to see (e.g. names and email addresses), and optionally change the display order.
- Run the report and view results.
- Optionally name and save the report so you can run it again later.
- Optionally save results as Microsoft Excel, PDF, or CSV.
There's also an option to pause when a report is run to allow a filter value to be entered on the spot.
A report is a compilation of instructions — a set of filters applied to an entity and a selection of information to display.
Note
Not all users are authorised to use Customisable Reports — they won't see the menu item. Reporting is wired into Janison's security framework so users can't see information they're not authorised to see.
Key features:
- Sophisticated filters including custom attributes
- Selection of details to show, including custom attributes
- In-grid view of data
- Export to Microsoft Excel and Adobe PDF
- Save and modify reports for re-use
- Security
- Excel templates to order the data reported
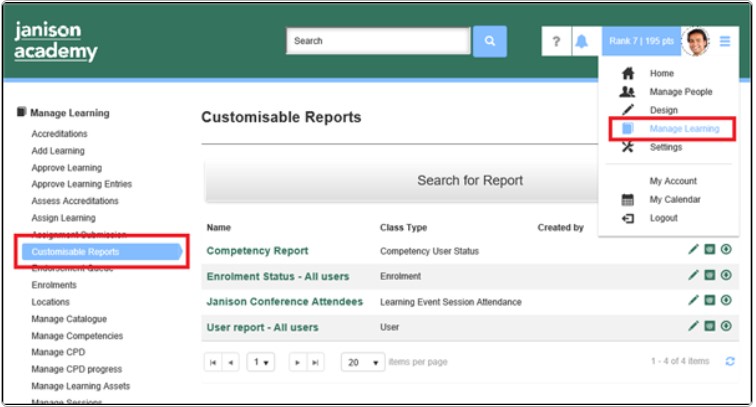
To access, navigate to Manage Learning > Customisable Reports. You see a list of previously saved reports.
Settings
Settings are available on the details view of customisable reports, or from Settings > Reports.
Note
Settings are only available to administrators or authorised users.
Available options
| Option | Description |
|---|---|
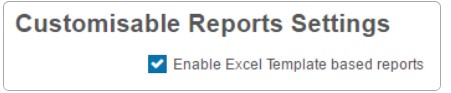
| Enable Excel Template based reports | Makes the template available on the Custom Reports UI. |
| Enable Private Reports | Adds the option to save the scope of the report with Me. |
| Enable selective sharing of reports | Adds the option to save with Me and Others, My Organisation, and My Organisation Unit. |
| Enable ordering of groups for User and Enrolment Entities | Forces the Group column to display in alphabetical order — may introduce a performance hit. |
| Enable Enrolment Question Set reporting for Learning Event Session Attendance entity | Includes question sets applied at enrolment and session level in the Learning Event Session Attendance entity report — may introduce a performance hit. |
| Enable Inactive Custom Attributes in Reports | Lets you report on inactive custom attributes with historic data. |
| Enable Pipe Delimited file format export options | Lets you export with pipe-delimited separations as a .txt file. |
Enabled entity types
This section controls which entity types are available for selection.
Available entity types include Activity Points, Administration Test, Administration Test Section, Answer Marking, Answer, Assignment Submission, Catalogue Item, Catalogue Item Comment, Catalogue Item Learning Asset Link, Collaborative Log, Competency Enrolment Report, Competency Unit Report, Competency User Status, CPD Details Report, CPD Summary Report, Discussion, Document with Tags, Failed Login, Group Report, Learning Asset Comment, Learning Event Session, Learning Event Session Attendance, Learning Event Waitlist, Learning Usage, Resource, Organisation, Other Learning, Enrolment, Progress Course, Progress Trackable Document, Progress, Question, Question Comment, Question with Interactions, Question Stimuli, Log-on Session, Stimulus, Test, Test Attempt, Test Attempt Section, Test Comment, Test Section, Test Section Comment, Test Section Question, User, User Document Activity, User Extra Role, User Public Profile, User Recommended.
Mandatory filters
Three fields can be made mandatory:
- Answer
- Test Attempt
- Test Attempt Section
Create a custom report
You can create a report from scratch or refine an existing report and save it as a copy.
Create from scratch
-
From Customisable Reports, select Create a Report.
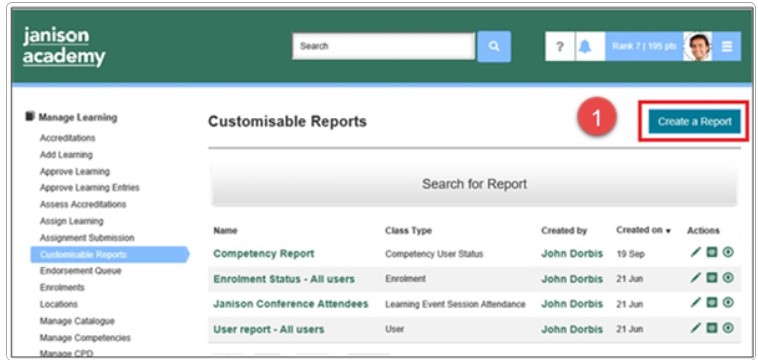
The New Report (Unsaved) screen displays.
-
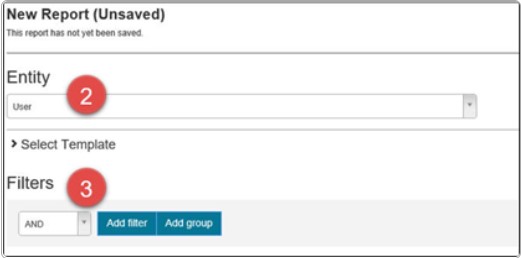
Select an Entity from the dropdown. Only one entity at a time.
- Build filters to apply (see Building filters below).
-
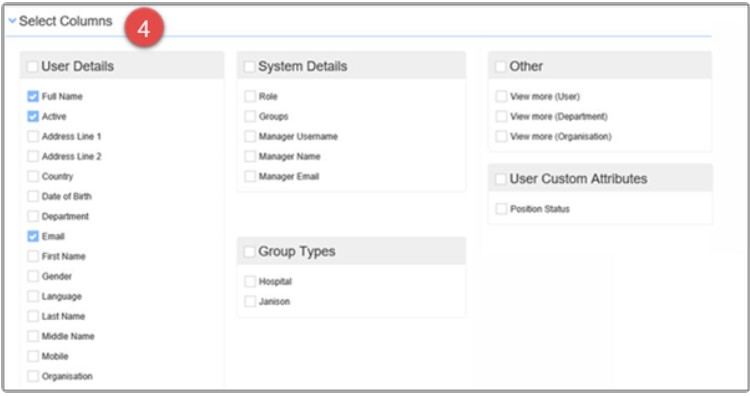
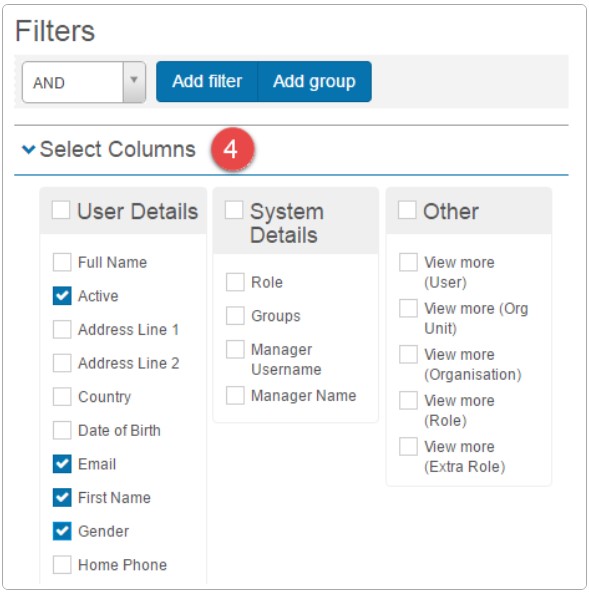
In Select Columns, choose the columns to include.
-
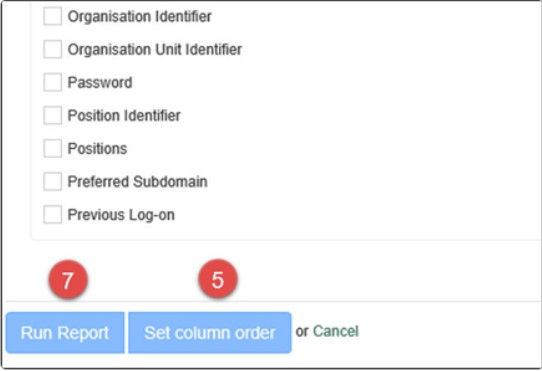
To customise the order, select Set column order.
-
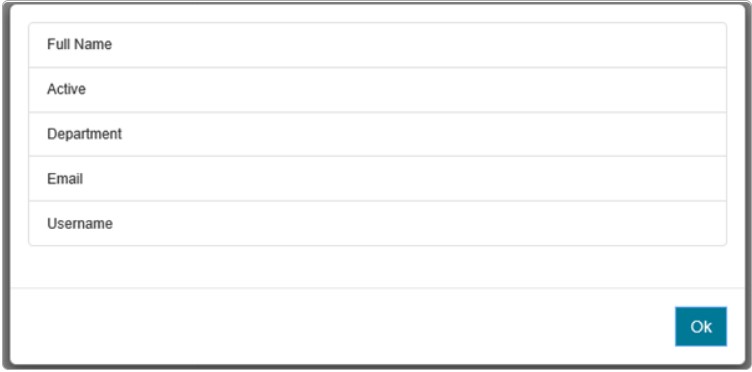
Drag rows up or down to reorder.
-
Select OK.
- Select Run Report to generate.
Notes on building filters
You can set up rules to define parts of an entity to report on. Rules can be quite targeted and combined using Boolean logic.
Tip
If technical expertise isn't available, exporting results to Excel lets you do further filtering in an application most people know.
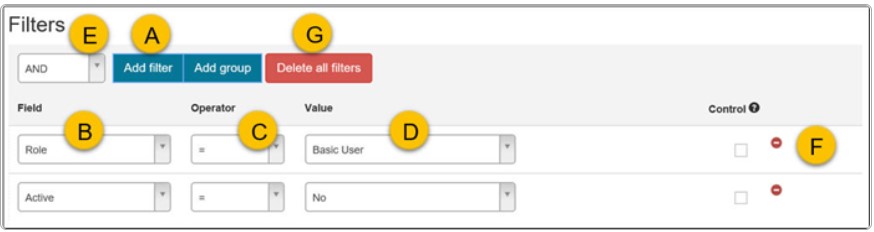
The basic process:
- Select Add filter to set up a rule.
- Select a Field from the dropdown.
- Select an Operator from the dropdown.
-
Select a Value.
In some cases an additional field appears. Select either Const (a specific value) or Param (a characteristic — e.g. your own org unit).
-
Add additional rules to the top-level group with Add filter. The dropdown selector at the top combines rules with AND or OR.
- Delete a single rule with the minus icon.
-
Delete all rules with Delete all filters.
-
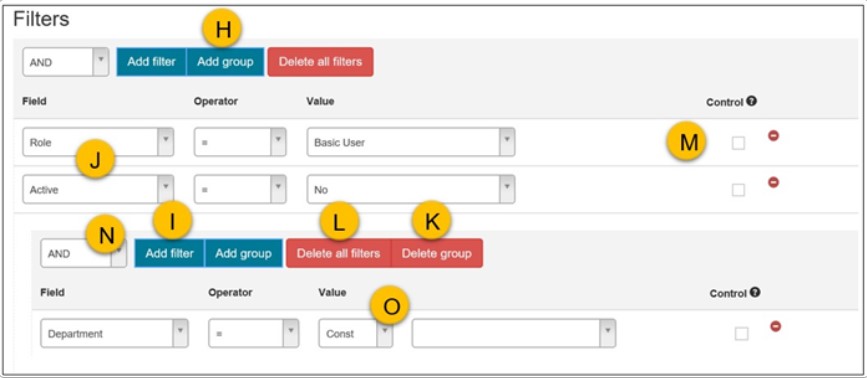
Combine new rules into sub-groups by selecting Add group.
- Within a group, select Add filter to add rules to the new group.
- The outcome of a rule group combines with rules at the same level.
- Delete a group with Delete Group.
- Delete all filters in a group with Delete all filters.
- Check Control to pause the report on run for the user to enter the value.
Filter items — properties
A filter item takes a property (field), an operand (operator), and a value to compare with.
- Organisation — select the organisation name.
- Org Unit — select the org unit name.
- Role — select the role name.
- Last logged on, Last Active, Created — select a date.
- Custom Attributes — filters can target Boolean, string, and other value types.
Operands
Depending on the data type, different operands are available:
=— Equals!=— Does not equalLess than,Greater than— alphabetical/numerical orderContains,Doesn't containStart with,End withIs null,Is not nullAfter(same as Greater than for date types)Before(same as Less than for date types)
Value to compare with
The value input changes by data type — calendar for dates, text box for strings.
Parameters
Some data types support parametric comparison values. For example, instead of a hard date, select "during the last week". At time of writing, parametric comparison is only available for Date Type properties:
- Today
- This Week
- This Month
- This Year
- Yesterday
- Last Week
- Last Month
- Last Year
- Days from now
- Weeks from now
- Months from now
- Years from now
Security filtering
The system appends further filters based on security roles, so customisable reporting can be opened to a wider range of users without granting more permissions than they already have.
Schedule a report
Two scheduling options:
- Schedule to email
- Schedule to file
Schedule to email
Go to Manage Learning > Customisable Reports.
-
Select the schedule icon next to the report.
- Ensure the schedule is enabled.
- Job Type is system-generated.
-
Select a Report Name.
- Enter an Email address (separate multiple with a semicolon).
- Select a file format — CSV, PDF, or Excel.
- Select a Run From date and time.
- Optionally set a Run To date and time.
- Select a Schedule Type — At a regular interval or At scheduled times.
At a regular interval
- Run Indefinitely — if selected, the run count field becomes inactive.
- Run Count — the number of instances to run.
- Select a Unit — minute, hour, day, or week.
- Select a Frequency — determines how often the task runs.
At scheduled times
- Select a Time Zone.
- Select the Time of Day.
- Select a Frequency — every day, Monday to Friday, Monday to Saturday, or specific day.
Schedule to file
Schedule reports to be placed at a network location — used for third-party systems such as HR systems.
Selecting the schedule-to-file icon directs you to the Schedule a Job screen with Export custom report to file selected.
Contact a customer support representative to set up access to this location.
Using custom report templates
To upload a custom report template, enable Excel Template based reports in Settings > Reports.
Use an Excel template to sort, count, total, or average data and add charts. Excel skills required.
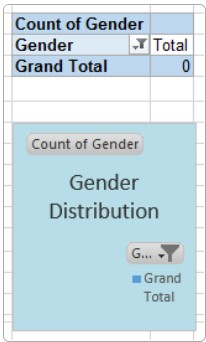
The sample template in the system uses a chart to display a count of genders.
Prepare your template
Three tabs require input — data template, raw data, and chart.
Data template
Input the data to be on your report.
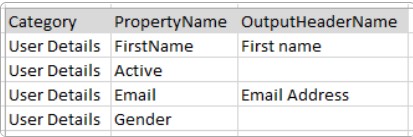
- Category — column header. Options: User Details, System Details, Other.
-
PropertyName — column fields. Remove spaces (e.g. FirstName).
-
OutputHeaderName — optionally customise the value of the PropertyName.
Raw Data
Populated with data when the report runs. Columns are the PropertyNames from the data template.
Chart
Add pivot tables and charts based on the raw data.
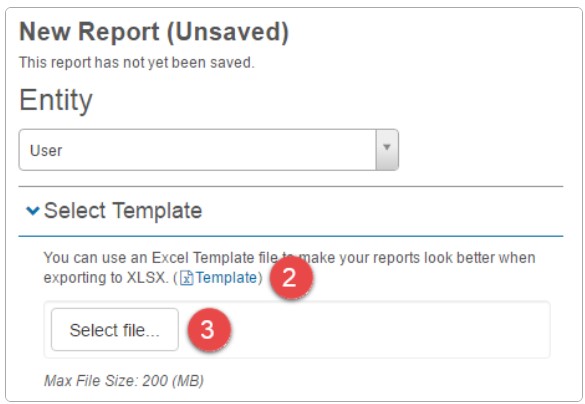
Create a report with a template
-
Select Create Report. The New Report screen displays.
-
Download the template and populate it.
-
Select your file to upload the template.
-
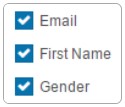
Select the required columns.
-
Select Run Report. Results display on-screen.
-
Select Export.
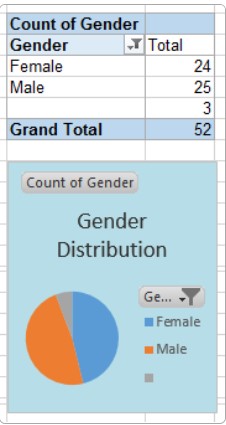
An Excel file downloads with the raw data and chart populated.
Report APIs
Administrators can create an API for a customisable report. The custom report must exist before the report API can be created.
Create a report API
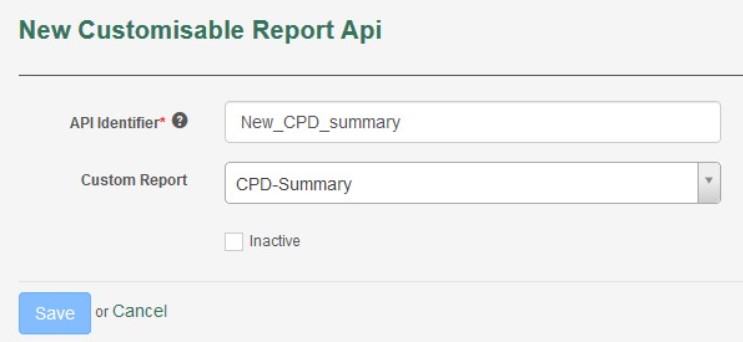
- Navigate to Manage Learning > Report APIs.
- Select Add Customisable Report Api.
- Enter an API identifier (alphanumeric, hyphens, underscores — becomes the filename).
- Select the required custom report.
- Leave Inactive blank.
- Select Save.
View or edit a report API
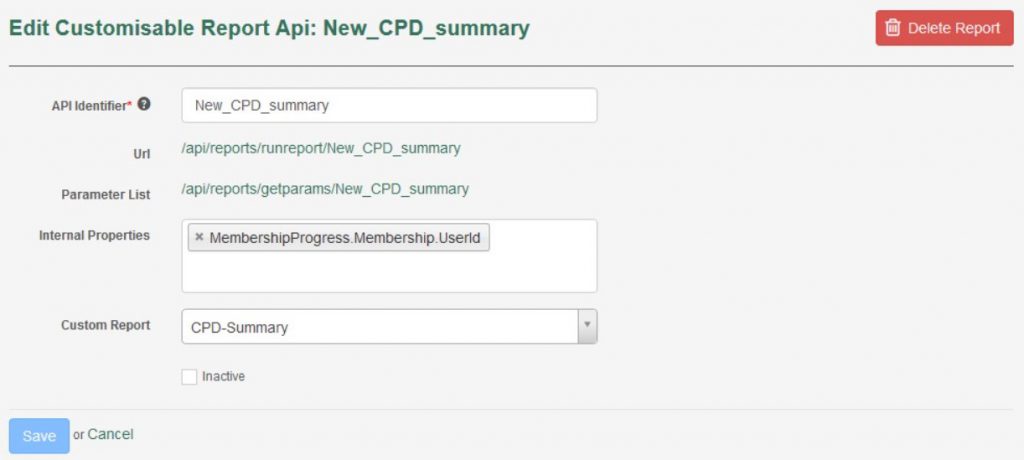
- On the Customisable Report Apis screen, select the report API.
-
The screen contains:
- API Identifier — name and filename.
- Url — endpoint URL.
- Parameter List — parameters that can be included.
- Internal Properties — required additional properties.
- Custom Report — the report this API is based on.
- Inactive checkbox — deactivate but retain.
- Delete Report — final deletion. Consider deactivating instead if it may be needed later.
-
Select Save or Cancel.
Settings
Several platform settings affect customisable reports.
Administrators can configure the following settings:
Reports (Settings > Reports) — enable Excel templates, private reports, selective sharing, group ordering, inactive custom attributes, and pipe-delimited export. Manage the list of enabled entity types and mandatory filters.
Custom Attributes (Settings > Custom Attributes) — define custom attributes that can be reported on.
Roles (Settings > Roles) — control which users can use Customisable Reports via their scope.
Scheduling (Settings > Scheduling) — schedule reports to email or to a network file location.