Building filters
You can set up rules to precisely define parts of a CLS entity. These rules are called filters in the CLS. They can very precisely select members of an entity because they're combined using Boolean logic, which can also be nested.
This is best understood by someone comfortable with:
- Boolean operations (AND, OR, NOT).
- Their notation (for example,
!means NOT). - How nesting limits scope.
If you understand these, go straight to Filter building. Otherwise start with Concepts.
Concepts
Easier introduction to filters
Consider a group of items with different colours and labels:
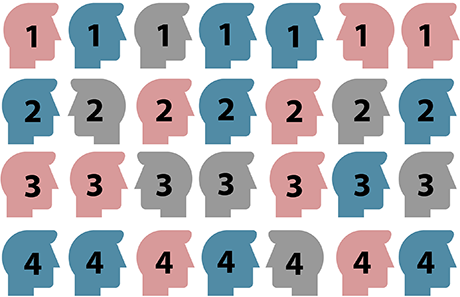
If we select all the items that have the number 2 we'd only see:

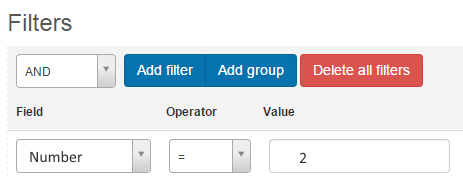
The CLS expresses this kind of selection as a filter — another name for a logic rule. The screenshot below shows a rule of Number = 2 at the bottom.
Filter building
Filters can be applied to CLS entities in many contexts. This explanation uses the example of reporting on the Users entity — building a set of rules and combining them logically to select certain users.
Simple filters
To build a filter:
- Select Add filter to create a rule.
- Choose a Field (for example, Full Name, Active) from the dropdown. The fields available change depending on the entity being filtered.
- Choose an Operator from the middle dropdown.
- Type a value in the right-hand box.
- Add another rule to this top-level group by selecting Add filter again. The new rule lines up with the first. Depending on what's selected at the top, you're now specifying users for whom both rules are true (AND) or either rule is true (OR).
- Delete a single rule by selecting the minus icon at its right.
-
Delete all rules by selecting Delete all filters.
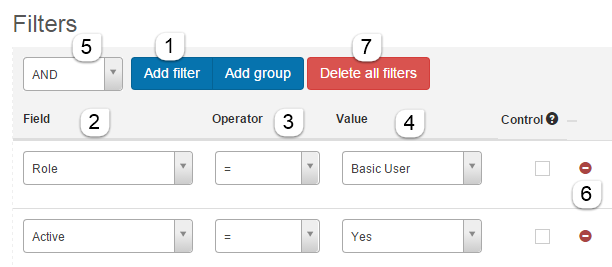
The screenshot above selects users who:
- Have a Basic User role, AND
- Are active (Active = Yes).
Extra note on values. When you specify Active =, you get dropdown choices (yes / no). When you specify Org Unit =, an additional dropdown appears with Const and Param choices:
- Const — the box displays actual org units to select.
- Param — you can choose a relationship (for example, your own Org Unit).
Rule groups
You can make rule groups by selecting Add group. This lets you logically build a complex set of filters.
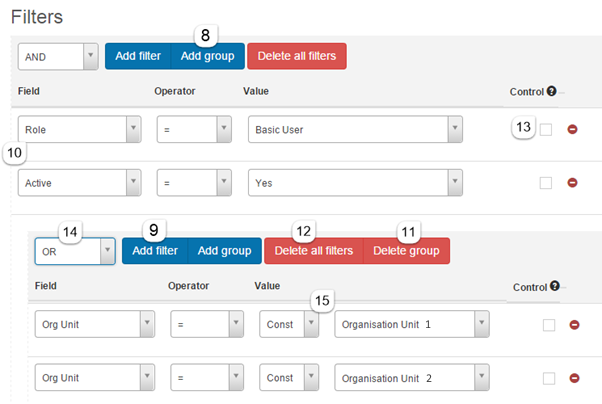
After selecting Add group, new fields and buttons appear. Select the local Add filter to start creating rules for the group. Rules in the group are logically combined together (typically with AND). The outcome of the rule group is then logically combined with the other rules at the same level.
Rules can be nested in rules that are nested in rules — leading to highly detailed specifications. These are best set up by people who can design the nested logic required.
- Delete a group of rules by selecting Delete Group.
- Delete all rules in a group by selecting Delete all filters.
- Select the Control checkbox next to a rule if you want a customisable report to pause when running to allow the value to be entered. Only applicable to customisable reports.
The screenshot above selects users who:
- Have a Basic User role, AND
- Are active, AND
- Are in either Organisation Unit 1 OR Organisation Unit 2.
For another example:
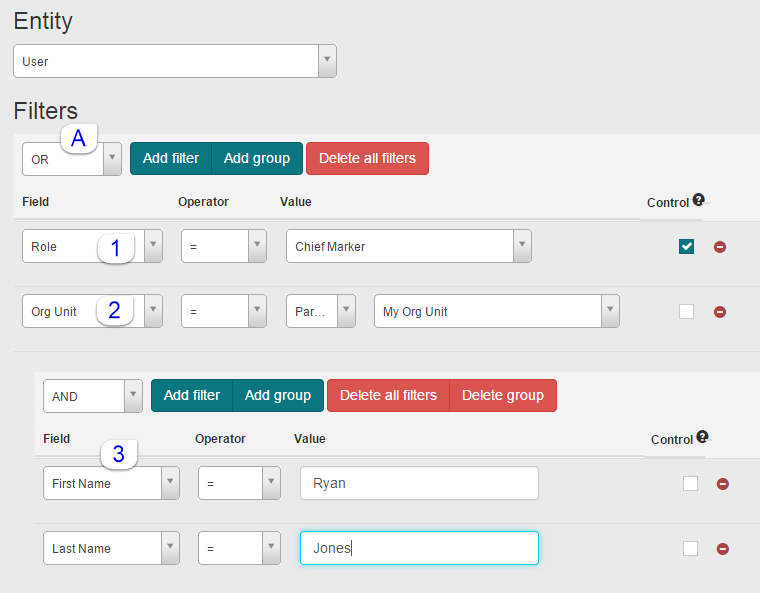
This selects users who:
- Have a role of Chief Marker, OR
- Are in the org unit of the user requesting the report, OR
- Have the first name Ryan AND the last name Jones.
Note
If the top-level field was set to AND instead of OR, the only users selected would have a role of Chief Marker, AND be in the requestor's org unit, AND be named Ryan Jones.
More details
Filter items
A filter item takes a Property, an Operand, and a Value to compare with. The property is either a built-in property on the entity (for example, user's last name) or a Custom Attribute.
Properties available for filtering at the user level (standard built-in properties aside) include:
- Organisation — select from dropdown or match on organisation name.
- Organisation Unit — select from dropdown or match on organisation unit name.
- Main Role — select from dropdown or match on main role name.
- Last logged on, Last Active, Created — date fields related to the user's account and activity.
- Custom Attributes — filter against custom attributes, including Boolean values, string values, and so on. Makes it possible to create reports targeted at specific demographics.
Operands
Operands are the logical operations. Different operands are available depending on the data type of the filter property. For example, contains can't operate on a date type, but it can on a text string.
- = — equals (all data types).
- != — does not equal (all data types).
- > — greater than (string alphabetical order and numerical types).
- < — less than (string alphabetical order and numerical types).
- Contains — text string data type only.
- After — same as greater than for date types.
- Before — same as less than for date types.
Value to compare with
The value appears in the third column and changes its input control depending on the data type. For date types it's a date picker; for text it's a text box.
Parameters
Some data types support parametric comparison values rather than explicit values. For example, to run a report of users that logged on during the last week, rather than selecting a hard date you can select a parameter — during the last week. Parametric comparison values are currently only available for date type properties:
- Today
- Yesterday
- This Month
- This Year
- Last Month
- Last Year
Security filtering
In addition to the filters specified, the system appends further filters based on the security roles of the logged-in user.
Settings
There are no platform settings that affect filter building directly. Filters are configured in context — for example, when building a Customisable Report, when defining a Catalogue Access Rule, or when targeting a Bulk Action.