Branching tests
A branching test presents different test sections to test-takers depending on how they score. Each test-taker takes one of several possible routes through the test, so the test adapts to their performance and presents items that match their achievement level.
You build a branching test out of nodes. A node is a point in the test that holds one or more test sections, and each node names the nodes a test-taker can go to next. A path is one complete route through those nodes, from the first to the last.
Nodes are the structure you build; test sections are what test-takers actually sit. Where a node holds more than one test section, test-takers on the same path can sit different sections — so one path can produce several different test experiences, and each of those is called a parallel test.
In the example below, all test-takers start at node A. Each then takes one of four possible paths: ABD, ABE, ACF or ACG. ABD is the most difficult path and ACG the least difficult.
Note how the two are named separately. The nodes are lettered A to G, and the test sections they hold are numbered 1 to 7. A path is written as a sequence of node letters, so ABD means nodes A, B and D — which delivers test sections 1, 2 and 4.
Each place a node splits is a branching point. The decision is made at the end of a node, once the test-taker has finished its test section and there's a score to compare — so this example has two branching points, one at the end of node A and one at the end of node B or C. That's the moment a Branching Point Message appears, if you've set one.
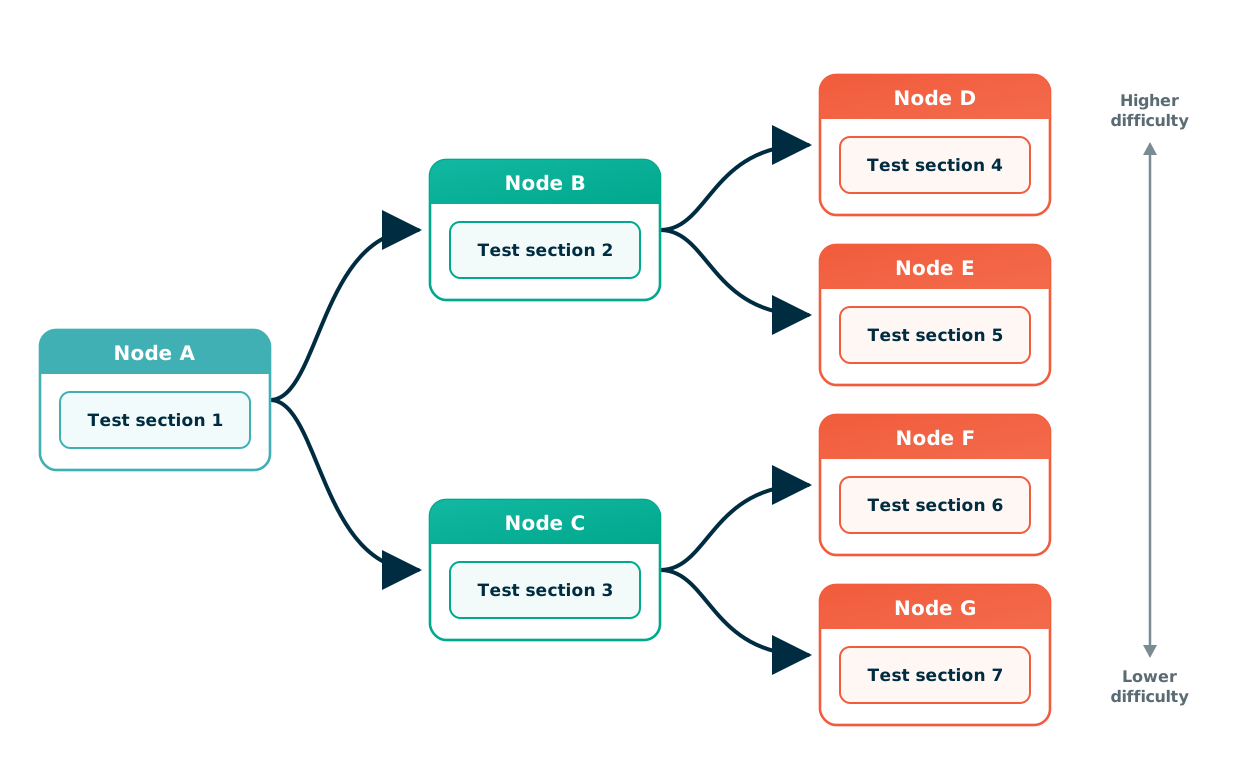
Branching rules decide which way each test-taker goes. You set a score range on each route out of a node, and the test-taker's score at the end of the node picks the match.
Benefits of branching tests
Measurement of test-taker performance is more precise. By covering a wider range of item difficulty, you can differentiate between test-takers without making the test longer for any individual.
Branching also reduces discouragement. Test-takers who struggle early get items that better match their performance, while high-achieving test-takers get more challenging items.
Branching test types
Insights has three branching test types. All three use the nodes, rules and validation described on this page, and the walkthrough below works for any of them.
- Branching — branches on the test-taker's running score across the attempt. This page describes it as standard.
- Branching with Parallel Paths — also branches on score, but lets you target a rule at test-takers who arrived by a particular parallel test rather than at everyone leaving the node. It's the only type that offers Source Parallel Paths, Branching Node Count, Lock Previous Test Sections, Branching Point Message and Validate for all pathways. See extra node options and the extra rules column.
- Branching with item adaptive sections — branches on the test-taker's theta at the end of each test section, rather than on their score. Theta estimates ability by weighting each answer against the difficulty of the item answered, so it distinguishes test-takers who got the same number of items right but not the same ones. Rule bounds hold theta rather than marks, every test section must be an Item Adaptive section, and every item in them needs a Difficulty. See What theta is.
Where an option below is marked as Branching with Parallel Paths only, it won't appear on the other two types.
Your administrator controls which of these three types you can create. See Settings.
Important
A fourth type, Item adaptive test, may also appear in the Actions menu. Despite the similar name, it is not a branching test and nothing on this page applies to it — it adapts by choosing each item within a section, and it has no nodes, rules or branching validation. Take care not to confuse it with Branching with item adaptive sections, which is a branching test.
Create a branching test
First create the test sections and items you need — see Test sections and Introduction to items.
Note
The following example uses a simple branching structure. Branching tests can be far more complex than this.
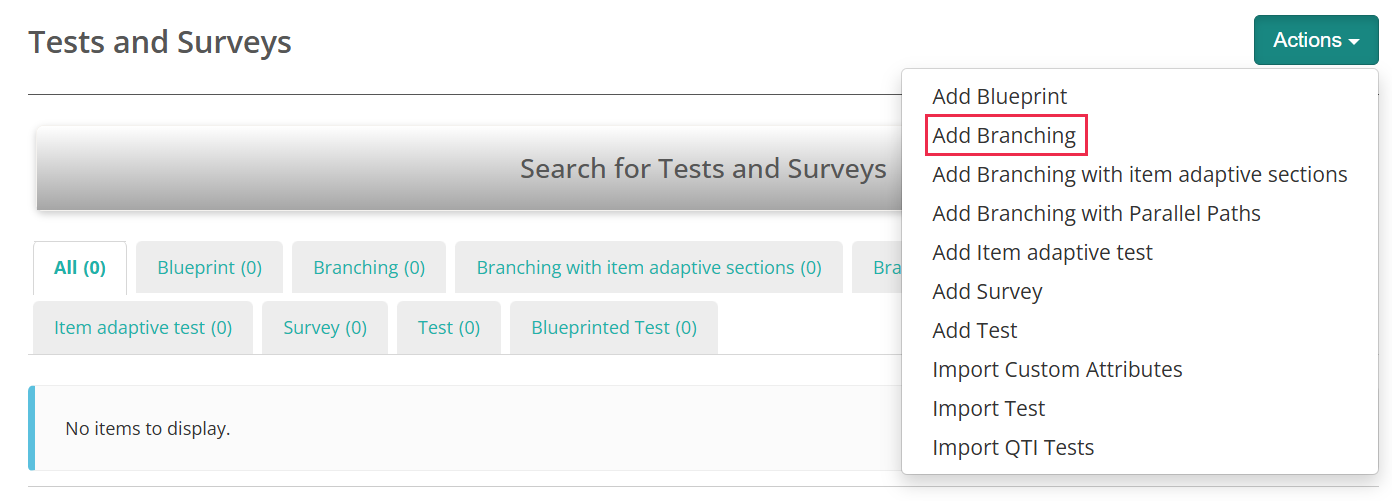
Go to Author > Tests and Surveys and select Add Branching from the Actions menu.
Important
The Actions menu lists one entry per available test type, so the menu on your site may show fewer entries than the one above. If Add Branching isn't there at all, an administrator needs to make the test type available first — see Settings.
The menu entry and the form title both carry the name of the test type, so choosing Add Branching with Parallel Paths opens a New Branching with Parallel Paths form. Nothing else on the form changes between the branching types — the steps below are the same whichever you pick.
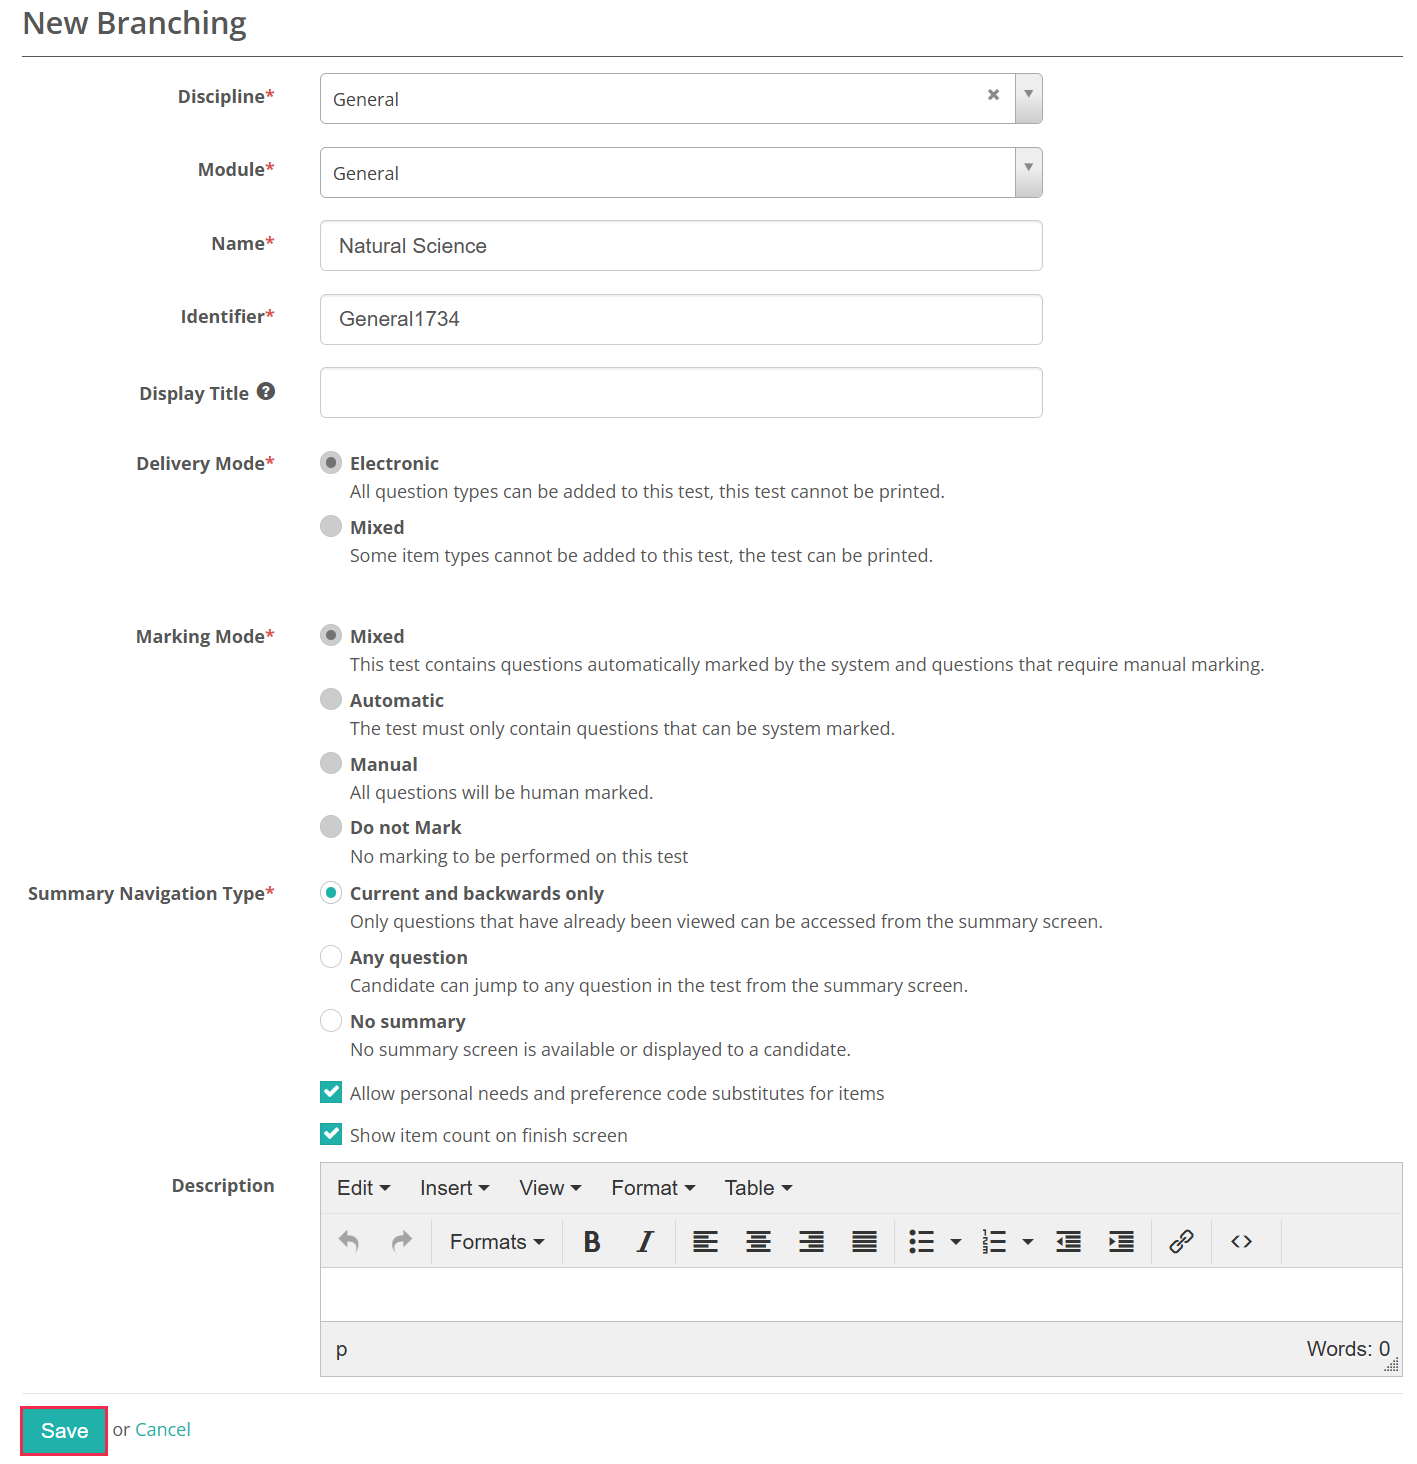
Complete the form. Most fields are the same as for a standard test, with these differences:
- Delivery Mode is locked to Electronic — you can't print a branching test. This field only appears if your tenant has paper-based tests enabled.
- Marking Mode is locked to Mixed on Branching and Branching with Parallel Paths tests, and to Automatic on Branching with item adaptive sections tests.
- Dashboard Type, Set a pass/fail outcome and Pass-mark, % don't appear on a branching test.
- Branching with item adaptive sections tests add two required fields no other branching type has: Ability Estimation Method and Confidence Level.
Select Save.
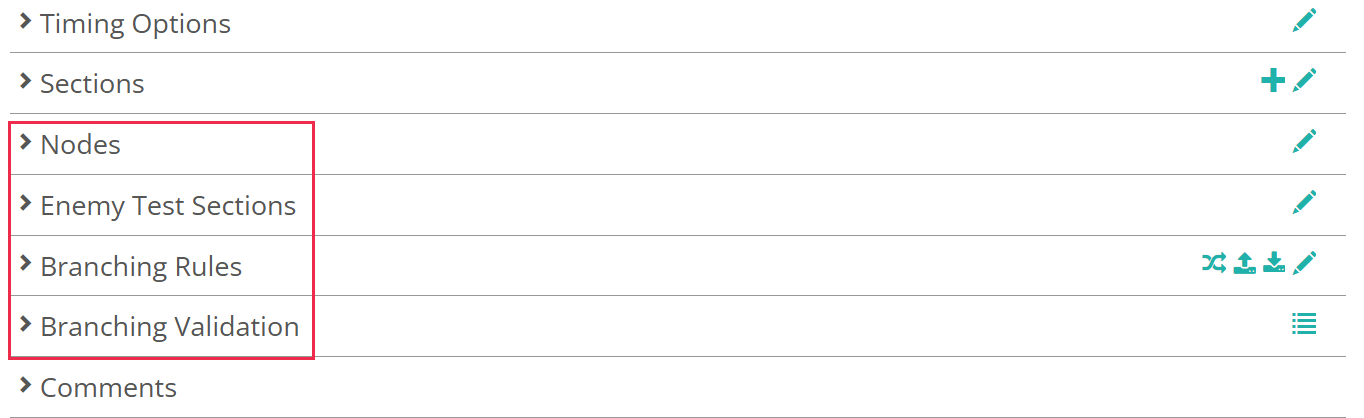
Once saved, the test gains four sections below Sections, in this order: Nodes, Enemy Test Sections, Branching Rules and Branching Validation. This page covers only those four. For general options such as timing, see Create a test.
Add sections to the test
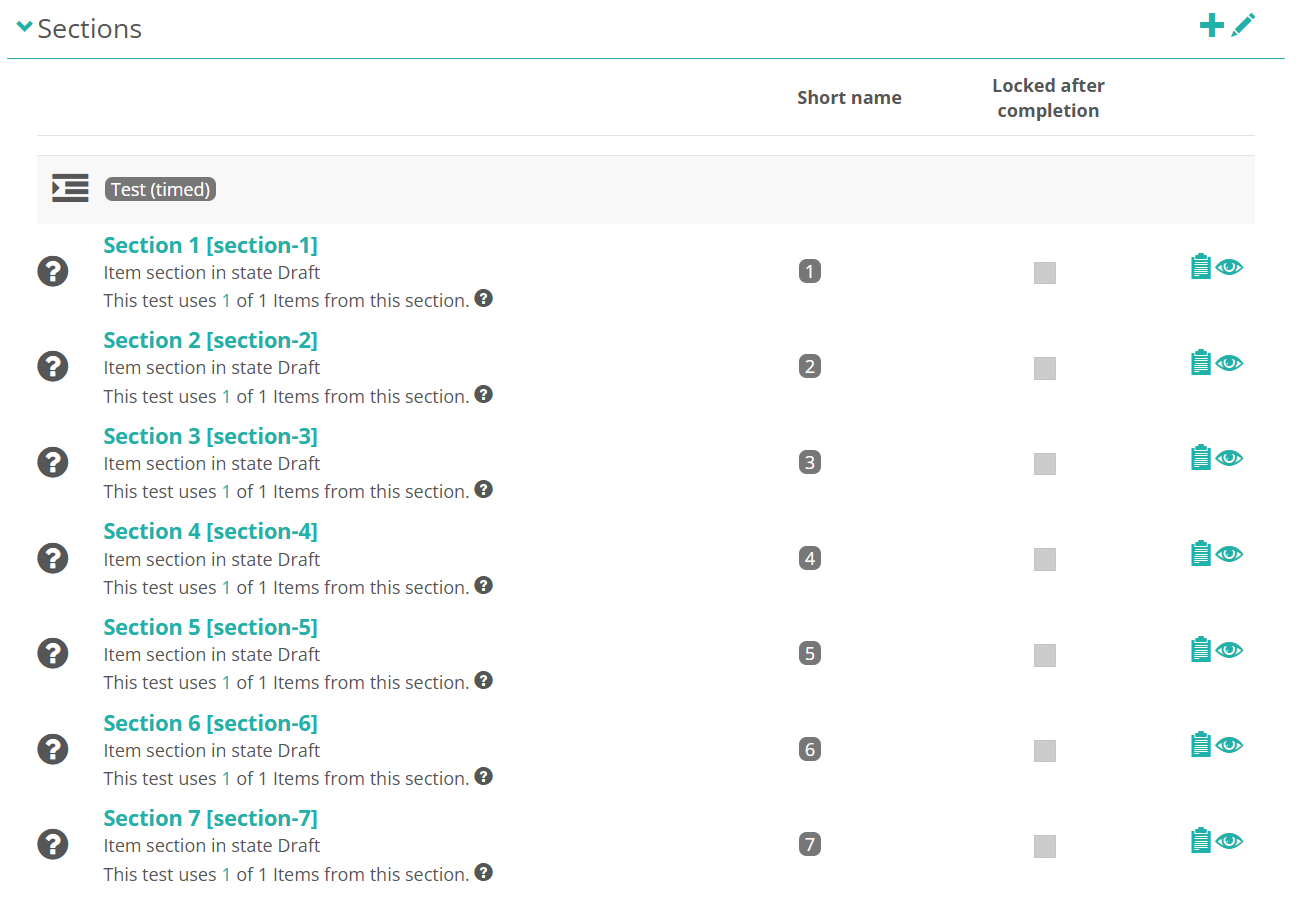
Add test sections as you would to any other test. You select sections for your nodes by their Short name, so set one on each section — edit the section to make the field editable.
On a Branching with item adaptive sections test, every section in a node must be an Item Adaptive section, and each one carries its own exit conditions and starting ability range. You set those on the section, not here — see Item adaptive sections for the full field list and what selecting the type does to the section form.
Every item in those sections also needs a Difficulty value. You set it on each item, not on the test or the section. It appears on every item form regardless of test type, and it isn't required, so it's easy to pass over.
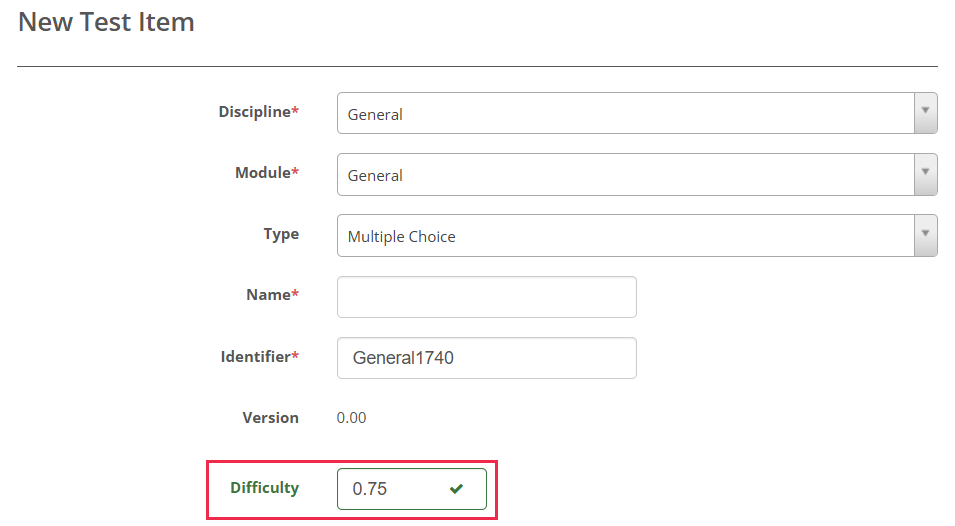
Difficulty places the item on the same theta scale as the test-taker's ability, so 0 is average, negative values are easier and positive values harder — conventionally between −4 and +4. It's how the section chooses which item to serve next, and how branching validation checks your rule bounds against the difficulty range the sections can actually deliver. The value should come from psychometric analysis of real response data, not from a judgement about how hard the item feels.
Enter a whole number or up to two decimal places. A decimal needs its leading zero: 0.75 is accepted.
Adaptive sections use a different item picker from other section types, with a Difficulty column you can check and filter on — see Add items to the section.
Warning
Nothing enforces Difficulty. The field accepts any number to two decimal places with no range check, and it can be left empty.
Blanks are then excluded from the highest-and-lowest calculation that branching validation checks your rule bounds against. Leave every item in a section blank and those checks don't run at all, so validation looks clean while testing nothing. Leave only some blank and they do run — but against a narrower range than the section can actually produce, which is harder to spot. Set Difficulty on every item before you rely on branching validation.
How the branching structure works
Once the test has sections, you set up the structure of nodes and branching rules. In the diagram at the top of this page the nodes are the letters A to G, and test-takers start at node A.
There are three parts to setting up the structure:
- Define the nodes — give each one an identifier, the test sections it holds, and its destination nodes. In the diagram, node A's destination nodes are B and C.
- Create the branching rules — set the scores that send a test-taker from a node to one of its destination nodes. At node A, test-takers scoring at or above a set value go to node B; those scoring below it go to node C. A node can have different rules for different test sections.
- Validate the branching — check the structure for errors before you deliver the test.
When a node holds more than one section: parallel tests
If a node holds two test sections, the same path produces two different routes through it — one per section. Each route is called a parallel test.
In the structure below, node B holds sections 2a and 2b, and node C holds sections 3a and 3b. Every other node holds one section, as before.
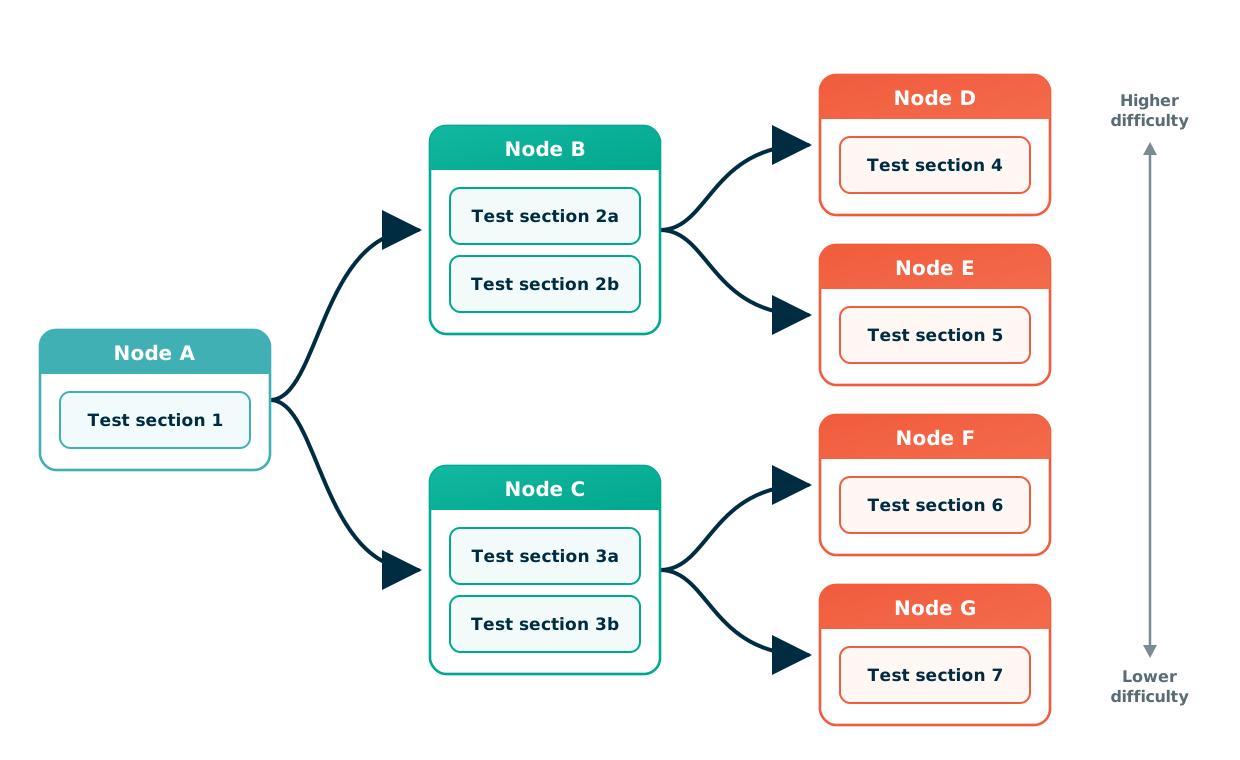
Take path ABD. Two test-takers can follow it and still sit different tests:
- One sits sections 1, 2a and 4.
- The other sits sections 1, 2b and 4.
Both took path ABD, but they sat different parallel tests.
The four paths haven't changed — they're still ABD, ABE, ACF and ACG. But each one can now be sat two ways, so the test has eight parallel tests rather than four.
Multiply that out as you add sections: two sections in every node of a three-node path would give eight parallel tests on that path alone. Branching Validation reports the count per path, so you can check the number you're actually generating — see Validate branching.
Which section a test-taker gets
Nothing about the test-taker decides this. Their score chose the node; the section within it is handed out by rotation.
Within a test session the platform works through the node's sections in turn, so consecutive test-takers get different ones. Outside a session — a preview, or an attempt with no session — it picks at random. Any section ruled out by enemy test sections is excluded first.
That's why the sections in a node have to be interchangeable, and why validation rejects a node whose sections don't share the same minimum and maximum marks. Test-takers are being dealt equivalent content, so which one they happen to get must not affect their score or the branching decision that follows.
Tip
Use several sections in a node when you want test-takers sitting side by side to see different content. It limits copying, and it spreads each item across a fraction of the cohort rather than all of it — useful where over-exposed items would compromise the item bank. Build the sections to be equal in difficulty and marks, and vary difficulty between nodes instead.
How long a path can be
Paths don't have to pass through the same number of nodes. A path that reaches a node with no destination nodes simply ends the test, and validation won't report a shorter path as a dead end.
Warning
All types except item adaptive: give every parallel test the same total number of items. The number of nodes can differ from path to path, but the item totals must match.
Where they don't, the test player can't establish a fixed item total for the test, and navigation at the end of a branched test section stops working reliably — a test-taker can be taken to the end of the test instead of on to their next section. The item count shown to test-takers also grows as they progress rather than holding steady.
Branching Validation doesn't check this, so add the totals up yourself. Branching with item adaptive sections tests are exempt.
Rules that point backwards
Important
A branching rule can point backwards — a rule could send test-takers from node F to node B — and a test section can belong to more than one node. In both cases, take care not to create a path that returns a test-taker to a test section they've already completed. Branching validation reports this as an error.
Define nodes
Select the pencil icon on the Nodes section.

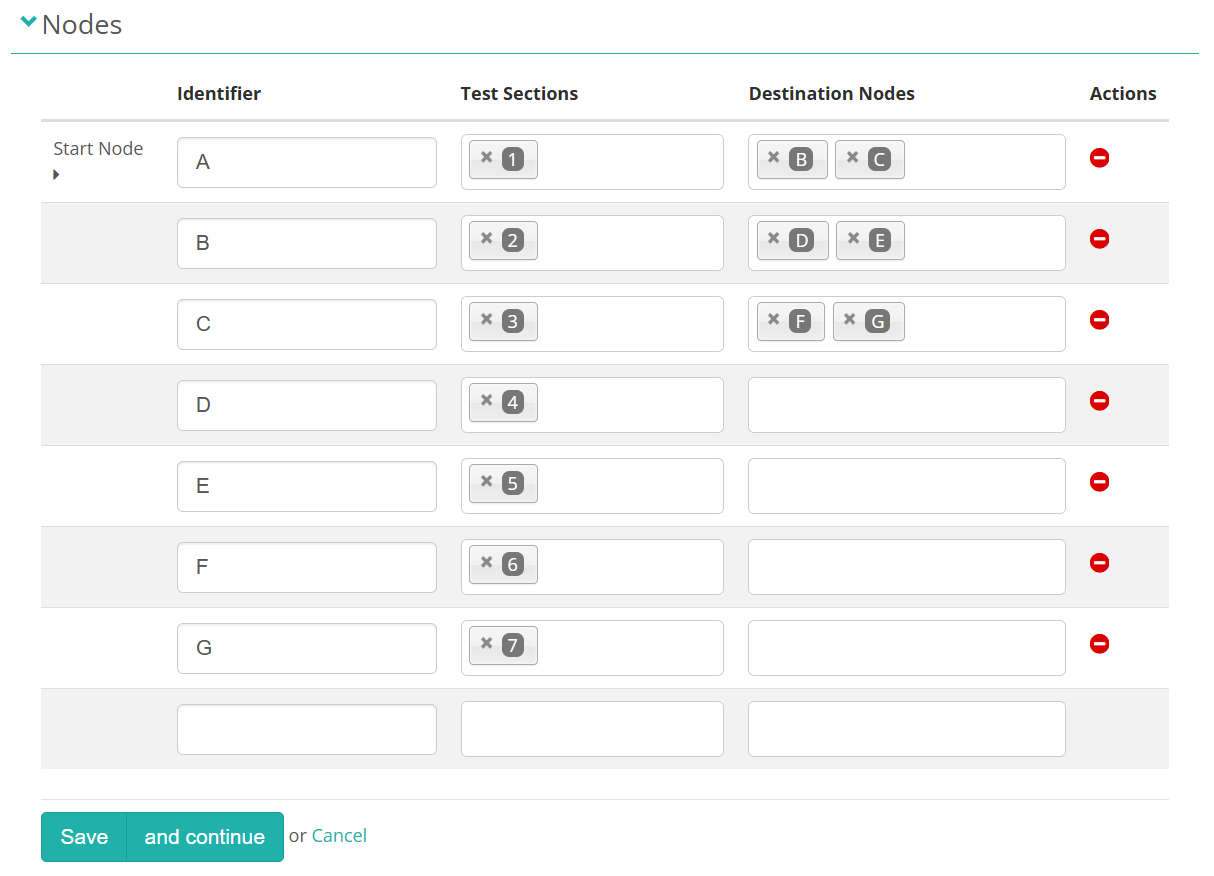
On a Branching test the table has three columns you fill in — Identifier, Test Sections and Destination Nodes — plus Actions.
Enter an Identifier for each node, then select one or more Test Sections. Identifiers must be unique and can contain only letters, numbers, hyphens and underscores.
Then return to the top of the list and select Destination Nodes where appropriate. Nodes at the end of a path — D, E, F and G in this example — don't need destination nodes. The first node is marked Start Node.
Extra node options on Branching with Parallel Paths tests
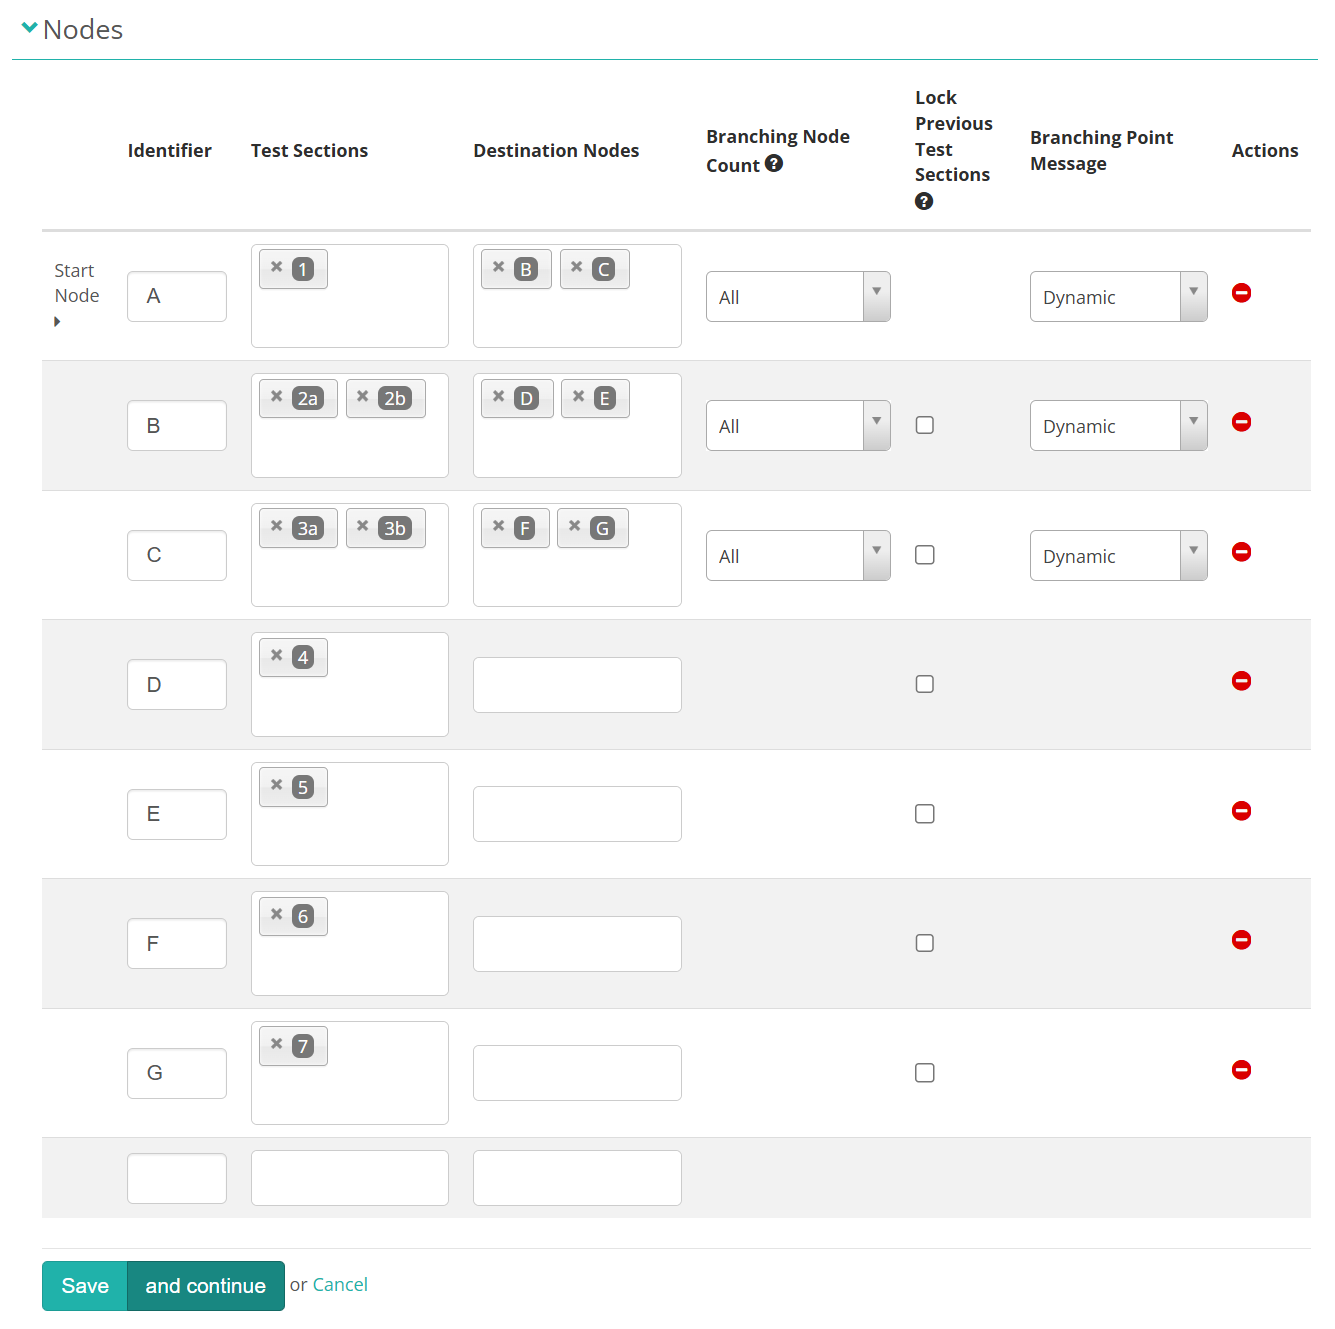
The three columns below appear only when the test type is Branching with Parallel Paths. On a Branching or Branching with item adaptive sections test they aren't there at all.
They also don't apply to every node. In the example below, nodes D to G sit at the end of a path and so have no Branching Node Count or Branching Point Message, and node A is the start node, so it has no Lock Previous Test Sections checkbox:
- Branching Node Count and Branching Point Message appear only on nodes that have destination nodes. Nodes at the end of a path leave both cells empty.
- Lock Previous Test Sections appears only on nodes that another node branches to — so it's absent on the Start Node row.
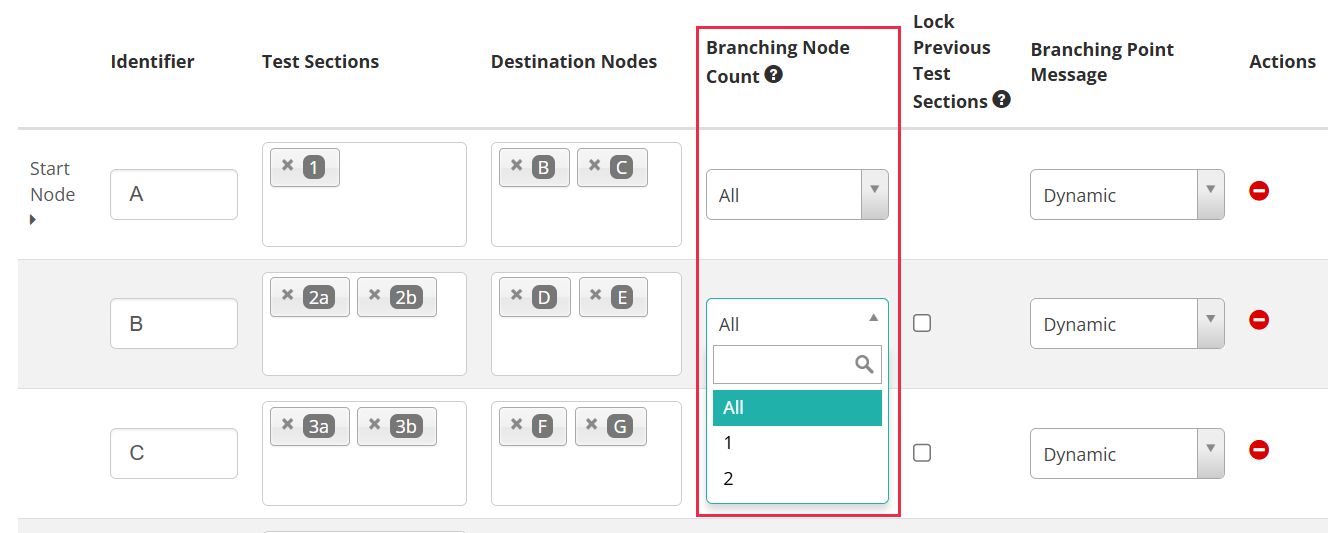
Branching Node Count — the number of previous nodes, including this one, whose scores are counted when branching from this node. This overrides the running total described under Create branching rules. The default is All, and the dropdown offers values up to the length of the longest path that reaches the node.
Important
If some paths reach a node earlier than others, take care with Branching Node Count. On a shorter path there aren't as many preceding test sections as the value you set, so the count falls back to all of them — meaning the same rule adds up a different number of test sections depending on the path the test-taker took. Nothing warns you about this.
Lock Previous Test Sections — locks the current test section and all preceding test sections when a test-taker exits the node.
Branching Point Message — the message a test-taker sees as they leave the node. You set it per node.
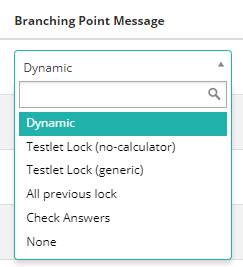
Every option except None opens the same shape of dialogue: a heading, a line or two explaining what happens next, and the buttons No, I want to check my answers. and Yes, I want to start the next section. Only the wording between them differs, and you can change any of it in string resources. The example below is Check Answers.
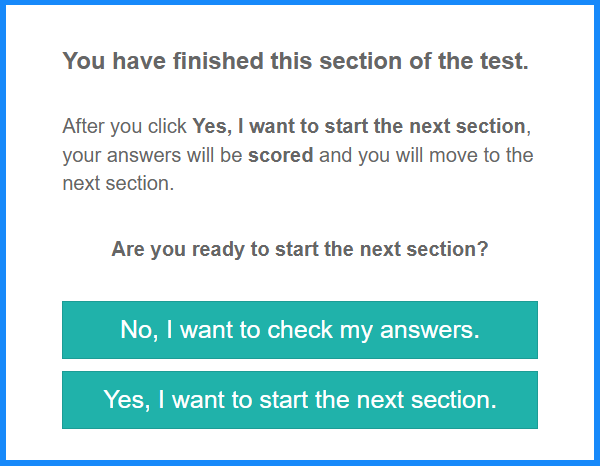
The six options are:
Dynamic — the platform chooses for you from the section's own settings, in this order: All previous lock if the node has Lock Previous Test Sections ticked, Testlet Lock (no-calculator) if the section is locked after completion, Check Answers if it's simply a branching section, and no message at all if none of those apply. Use this unless you have a reason not to, because it keeps the message honest about whether anything is actually being locked.
Check Answers — the lightest of the four that show a dialogue, and the one pictured above. It confirms the section is finished, says that continuing will score their answers and move them on, then asks whether they're ready. No flagged or unanswered counts, and no warning about losing access, because nothing is being locked.
Testlet Lock (generic) — adds the number of flagged and of unanswered items, each shown only when it isn't zero, then warns that after continuing they will not be able to see or change their answers.
Testlet Lock (no-calculator) — the same message, with the heading naming the section as the non-calculator one. Use it only where that's literally true.
All previous lock — word for word identical to Testlet Lock (generic). The two exist as separate options so you can give them different wording in string resources and apply each to different nodes.
None — no message. The test-taker moves straight on to the next section.
Enemy test sections
You can specify that certain test sections must never both be presented to the same test-taker. These are enemy test sections, and they're optional.
Create one or more groups. Only one test section from each group can be given to a test-taker — once they've been allocated one, they can't be allocated any other section in that group.
Select the pencil icon in Enemy Test Sections.
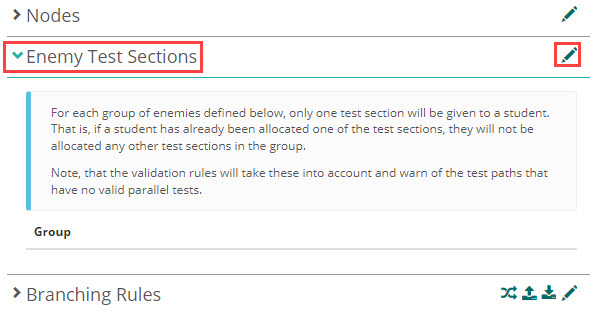
Select at least two test sections, then select Save.
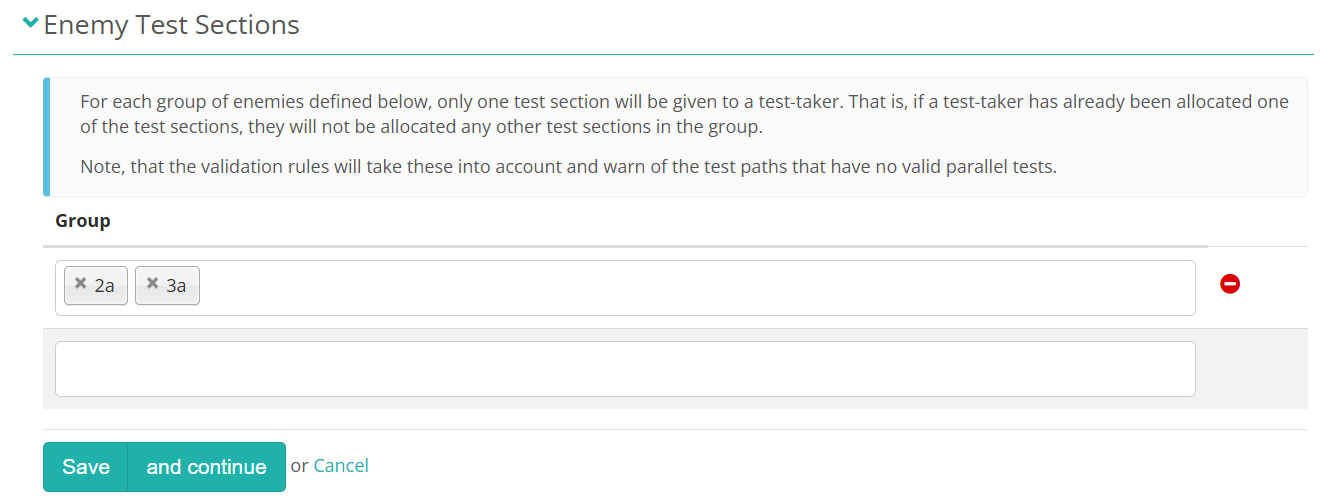
Each row is one group. The empty row below is where you'd add a second.
The sections in a group must sit in at least two different nodes. If they all sit in the same node the save fails with Enemy test sections group should contain test sections assigned to at least two different nodes. You also can't save two groups containing exactly the same test sections.
Important
Two different nodes isn't enough on its own. A group only excludes anything if both its test sections could reach the same test-taker — which means the nodes holding them have to sit on the same path, one after the other. Group two sections from nodes on separate branches and the platform accepts it, but it will never exclude a combination, because no test-taker visits both nodes.
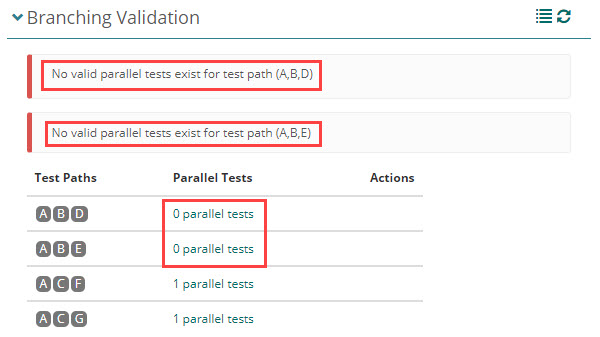
Branching validation takes enemy groups into account. If a group rules out every valid combination of sections for a path, validation reports the error No valid parallel tests exist for test path (…), naming the nodes on that path.
Important
You can't change enemy test sections once the test has attempts in progress. Delete the attempts or create a new version of the test first.
Create branching rules
Branching rules control how test-takers move from one node to another. They compare the test-taker's score at the end of a node against a lower and an upper bound.
Select the pencil icon on the Branching Rules section.

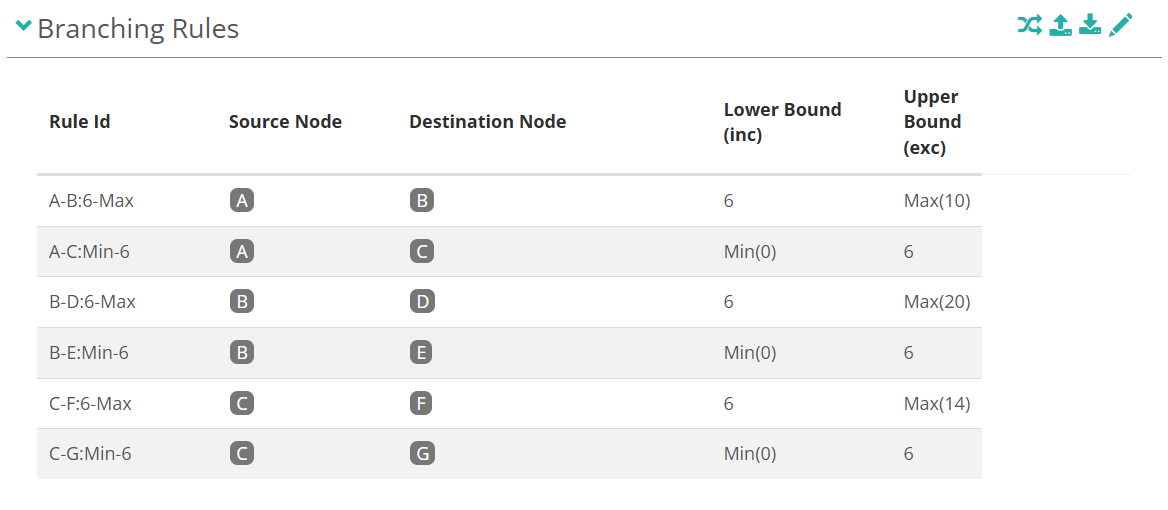
The system generates the Rule Id from the source node, destination node and bounds — for example A-B:6-Max. To set your own, select the generated ID and type a replacement; it must be unique. Press Esc to go back to the generated value.
- Select a Source Node. The rule applies here as an outbound rule. At least one rule must have the start node as its source node.
- Select one of the node's destination nodes in Destination Node.
- Enter the lowest score in Lower Bound (inc). This value is inclusive — a test-taker whose score equals it matches the rule.
- Enter the upper limit in Upper Bound (exc). This value is exclusive.
Each node needs one rule per destination. In the example below, node A has a rule to B for test-takers scoring at or above 6, and a rule to C for those scoring below 6 — and nodes B and C have the same pair each.
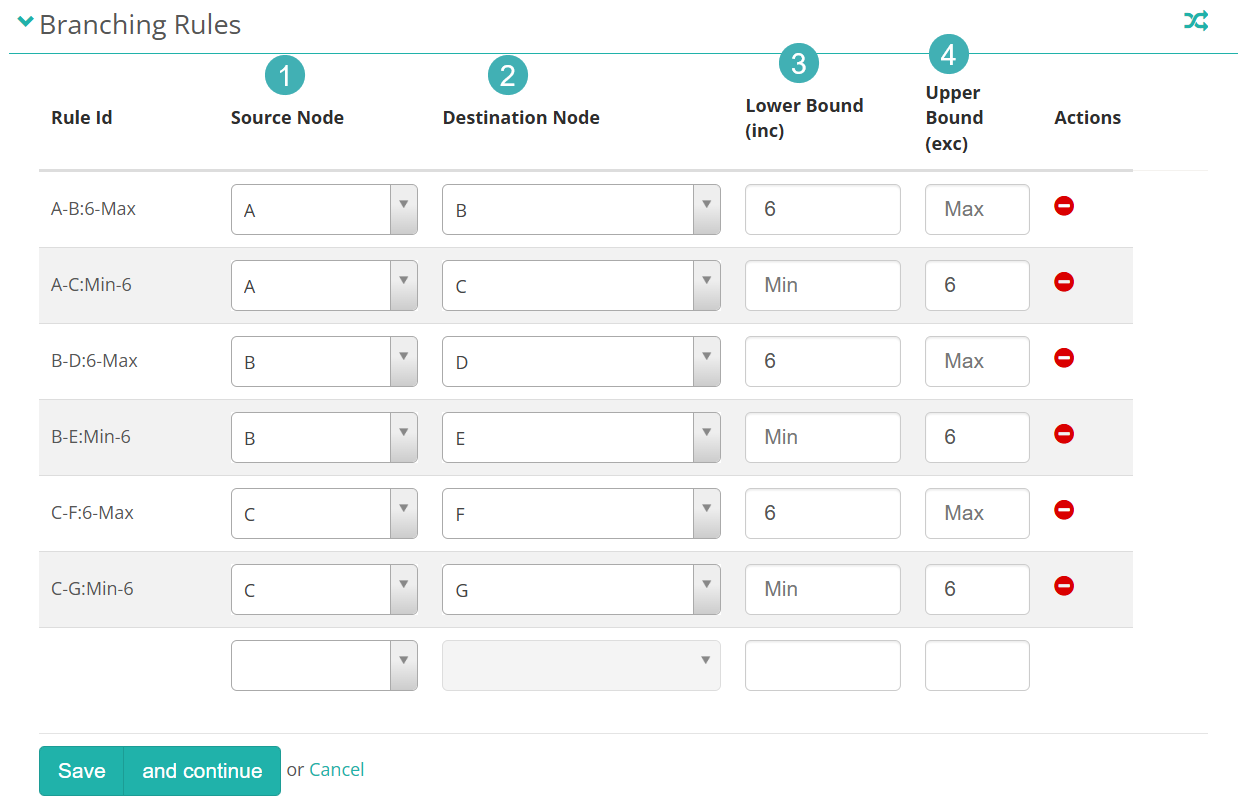
The editor always leaves a blank row at the foot of the table. Fill it in to add another rule; leave it empty and it's discarded when you save.
Select Save, or and continue to keep editing.
Leave a bound empty to make it open-ended — the field shows Min or Max as placeholder text. After you save, the read-only view shows the calculated limit in brackets, such as Min(0) or Max(10), or Min(?) if the platform can't calculate it. The calculated figure differs from rule to rule, because each one reflects the marks reachable on that route.
The extra rules column on Branching with Parallel Paths tests
The screenshot above is a Branching test, so the table runs Rule Id, Source Node, Destination Node, Lower Bound (inc), Upper Bound (exc), Actions.
A Branching with Parallel Paths test adds one more column, Source Parallel Paths, between Source Node and Destination Node. It restricts the rule to test-takers who arrived by particular routes.
Each entry is a whole path of test section short names — not a single test section. Every path runs from the start node up to a section in the source node, so the field stays empty until you've chosen a Source Node. Leave it unset and the rule applies to All parallel paths.
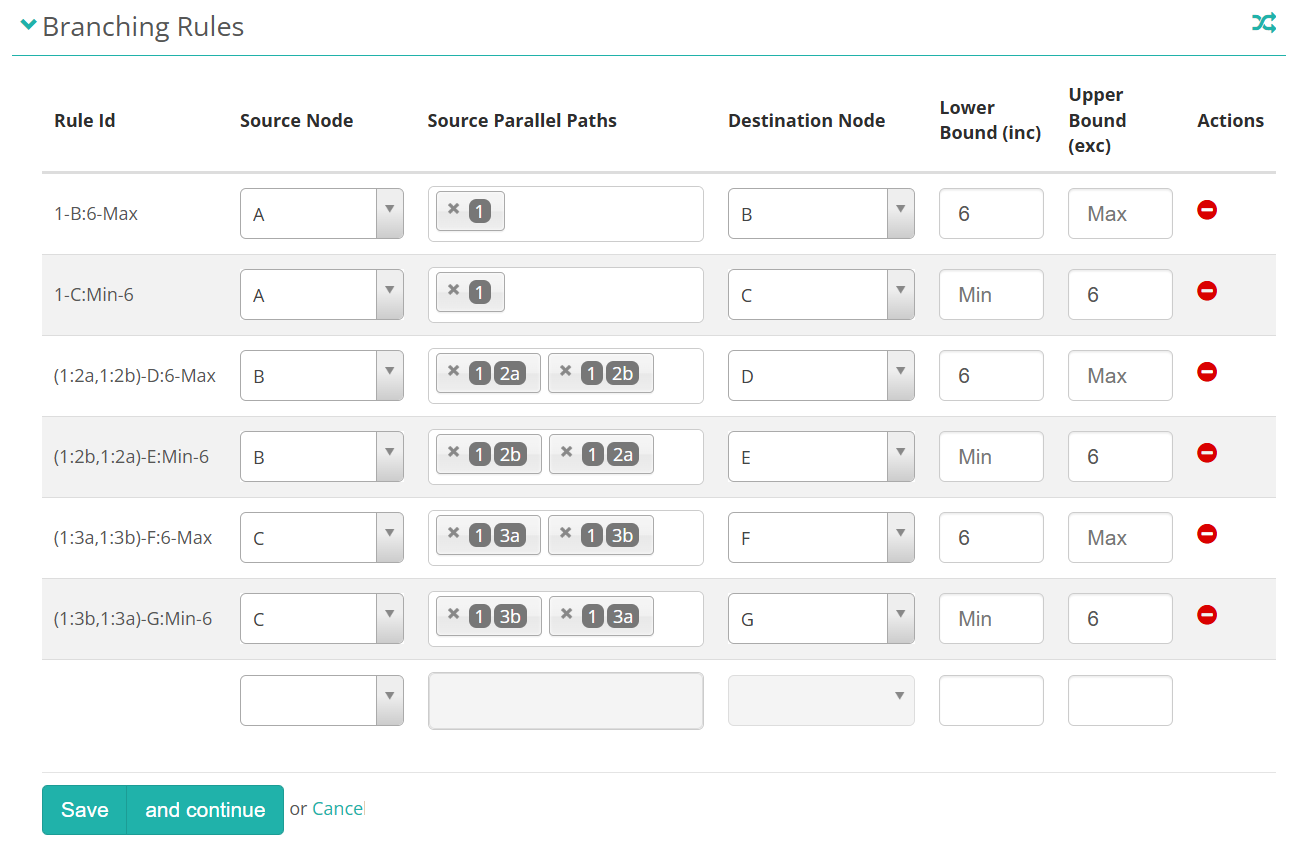
In the example above, node A holds one test section so there's a single path through it — rules out of A can only branch on score. Nodes B and C each hold two sections, so each has two paths, and both paths are selected on both of that node's rules. That's what gives each path a rule at the top of the score range and one at the bottom.
Two further things happen once you use the column:
- The generated Rule Id changes shape. With no paths chosen it looks like A-B:6-Max. Choose paths and the source node is replaced by the paths themselves, bracketed and comma-separated when there's more than one — (1:2a,1:2b)-D:6-Max.
- The saved view collapses your selection behind a {n} parallel paths link, which you select to see the individual paths. An unrestricted rule reads All parallel paths instead.
Important
Each path needs its own rule at both ends of the score range. Give a path a single rule with a bounded score and validation fails, because that path has no rule with a blank Lower Bound (inc) or no rule with a blank Upper Bound (exc). The simplest way to satisfy it is to select every one of the node's paths on each of its rules, as above.
Warning
Changing a rule's Source Node clears any Source Parallel Paths you'd already chosen on that rule, without warning you. Re-check the paths on any rule whose source node you change.
How the score is calculated
What the bounds are compared against depends on your test type, and on whether the node has a Branching Node Count. Find your case below.
All branching types, by default — rules compare the marks the test-taker has been awarded so far across the whole attempt, including previous test sections. Only scorable section types contribute; marks from introduction, exit and survey sections are ignored. Bounds are marks, not percentages or scaled scores, and they accept decimals.
Only if the node has a Branching Node Count — instead of the running total, only that many most recent test sections are counted.
Branching with item adaptive sections only — the bounds aren't marks at all. They're theta values, and what's compared against them is the test-taker's estimated ability at the end of the test section they've just finished, not a running total across the attempt. See What theta is.
Warning
Branching with item adaptive sections only: the column labels don't change. They still read Lower Bound (inc) and Upper Bound (exc), and nothing on screen tells you the values mean theta rather than marks. The inclusive and exclusive behaviour is the same either way.
Important
All types: if a test-taker's score matches no rule, their path simply stops — there is no fallback destination node. If more than one rule matches, the first one wins. This is why branching validation requires the score ranges to cover every possibility without gaps or overlaps.
Visualisation with a Sankey diagram
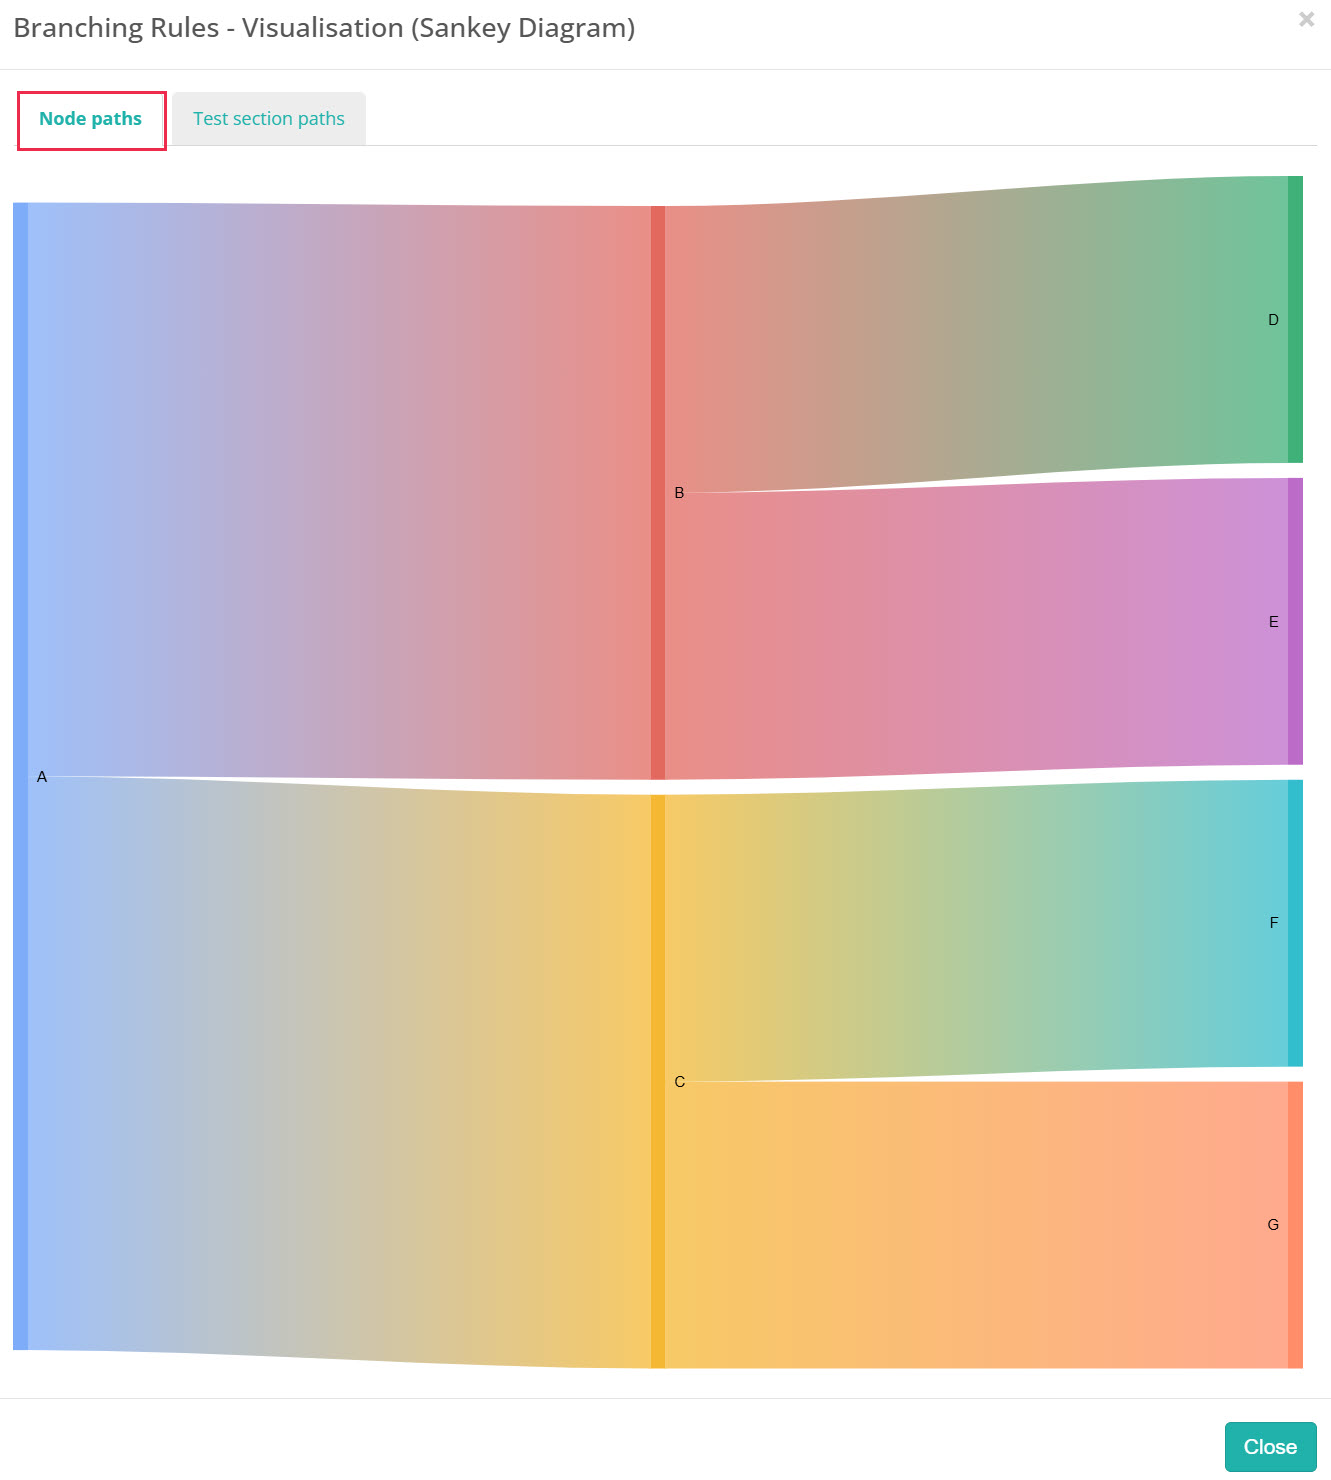
A Sankey diagram shows the flows through the test. Select the Visualisation icon  in the Branching Rules section header to open Branching Rules - Visualisation (Sankey Diagram).
The diagram opens on Node paths, with the flows from node A splitting through B and C to the four end nodes.
Select Test section paths to see the same flows labelled by test section, each shown as node identifier:test section short name. Where each node holds a single test section the shape matches the node paths.
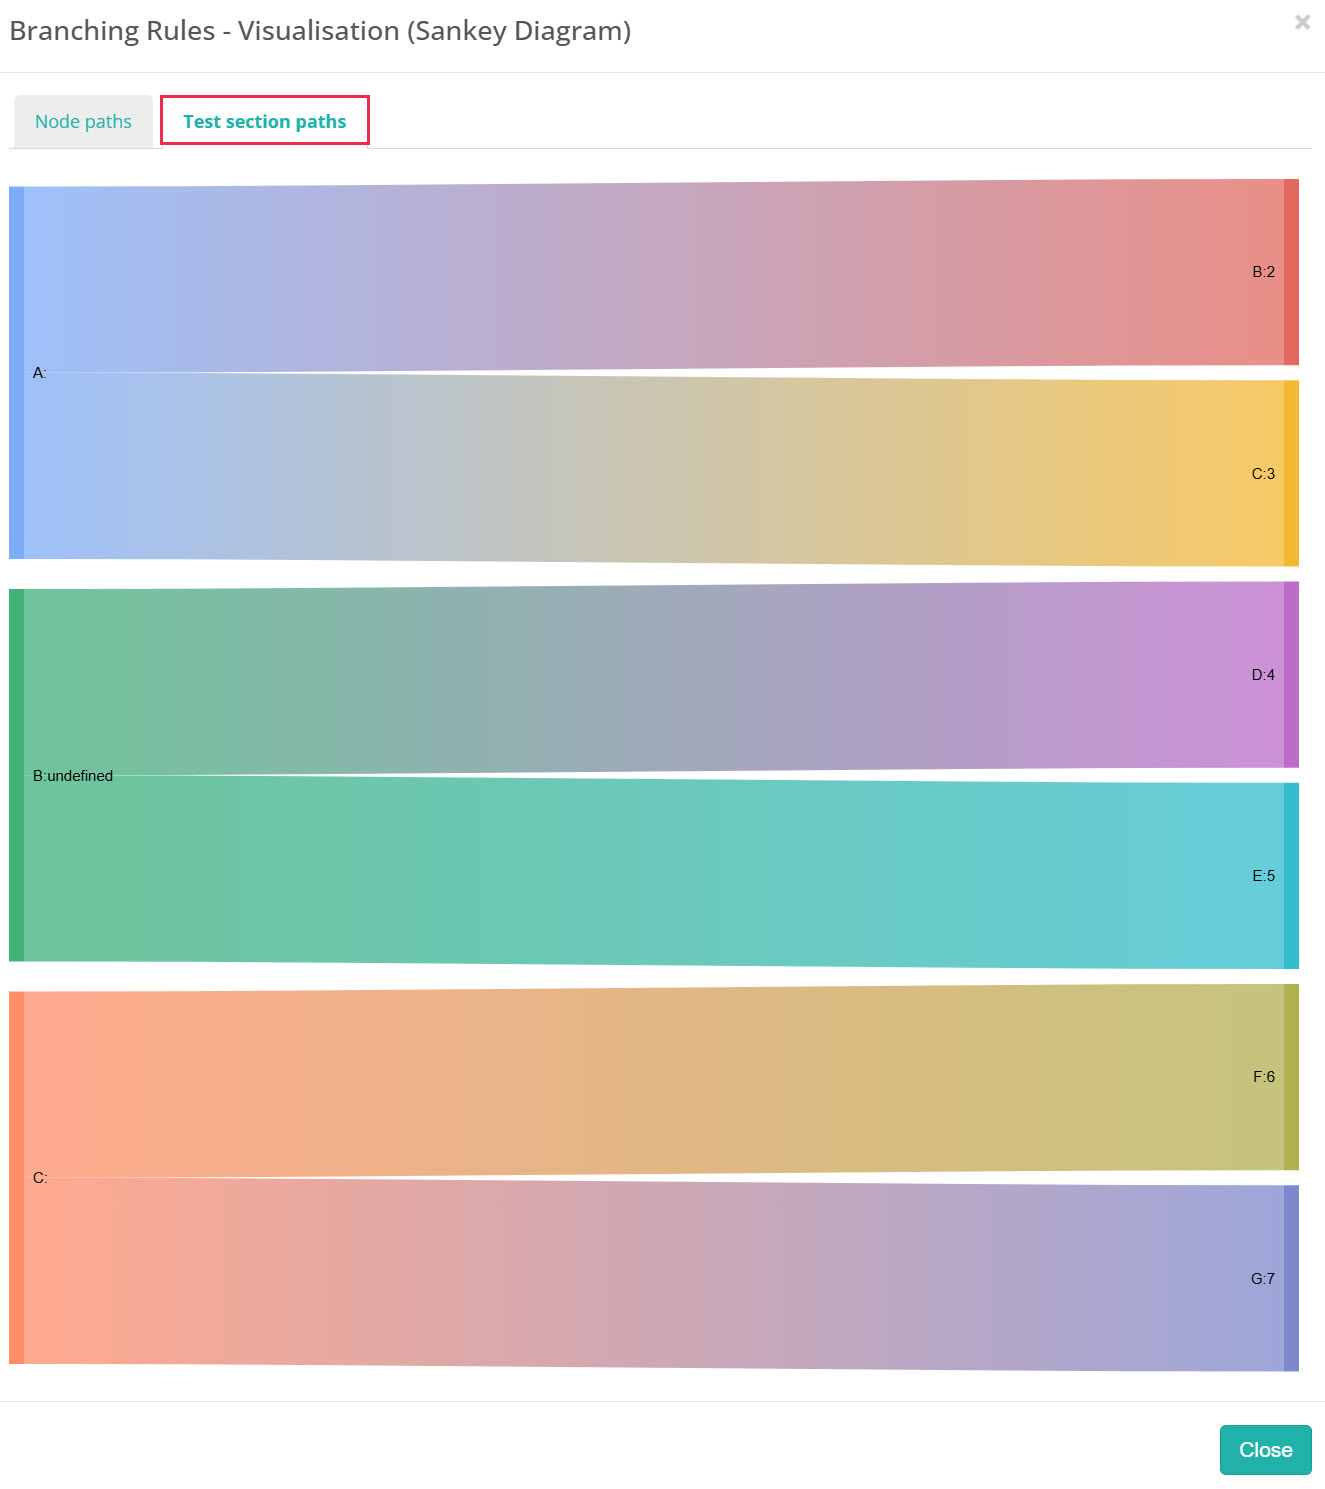
Where a node holds several test sections the two diagrams diverge. Below, node B holds sections 2a and 2b and node C holds 3a and 3b, so the flows out of them cross as test-takers are routed on to different destination sections. Labels on the left of a split show the whole route taken to reach it — B:1:2a is node B by way of sections 1 and 2a.
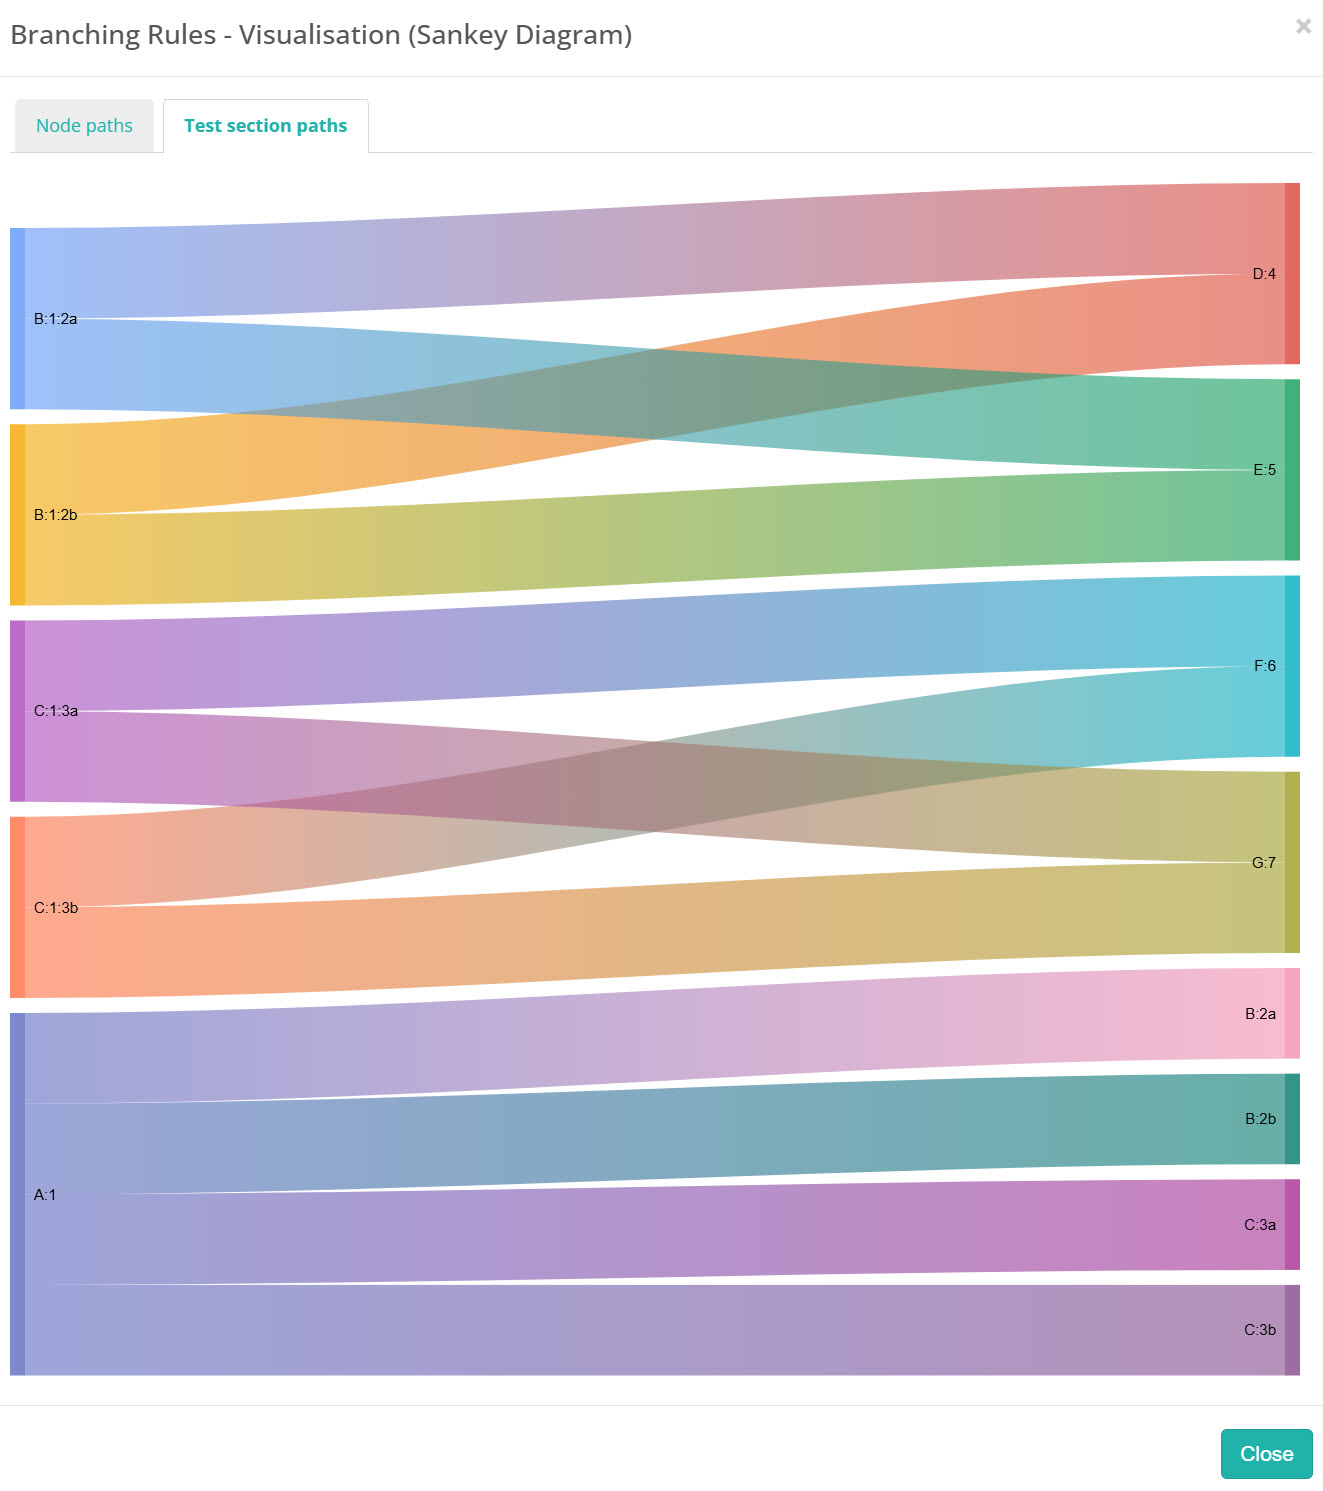
Hover over a flow to see the Rule Id of the branching rule that creates it.
Import and export branching rules
Once you've created branching rules you can export them to Excel and import them back.
Export branching rules
Select the export icon  on the Branching Rules section header. An Excel file downloads with a single sheet holding your rules, one per row.
The columns are Rule Id, Source Node, Source Parallel Paths, Destination Node, Lower Bound (inc) and Upper Bound (exc).
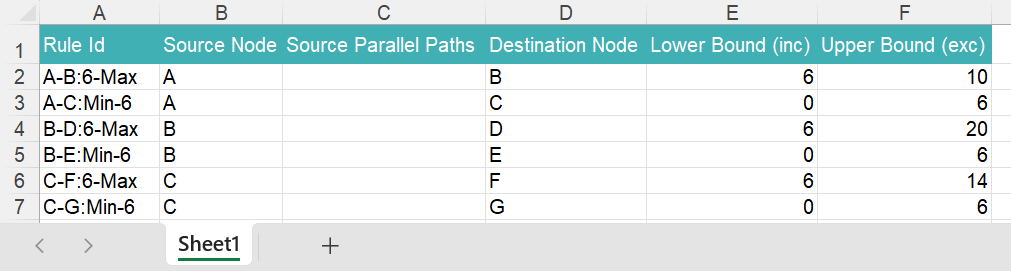
Two things about the exported values are worth knowing before you edit and re-import:
- Source Parallel Paths is always exported, even on a Branching test where the column doesn't exist in the editor. It's simply empty. Leave it that way.
- Where a bound is open-ended, the export writes the calculated limit rather than leaving the cell blank. In the example above, rule A-B:6-Max exports an Upper Bound (exc) of 10 and rule A-C:Min-6 a Lower Bound (inc) of 0. Re-importing those turns open-ended bounds into fixed ones.
Import branching rules
Warning
Importing replaces every existing branching rule on the test. The importer validates the whole spreadsheet first and stops on any error, but if validation passes it deletes all current rules before adding the imported ones.
Select the import icon  on the Branching Rules section header. The icon is hidden while the test has attempts in progress.
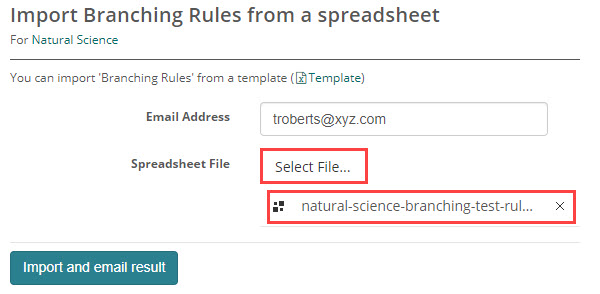
The Import Branching Rules from a spreadsheet page opens. Select Template to download the template.
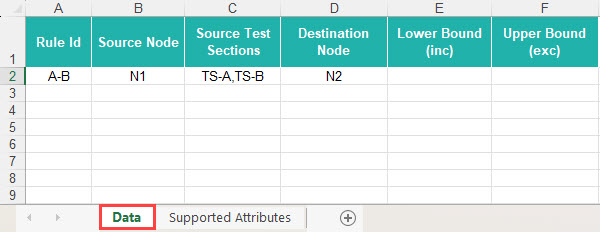
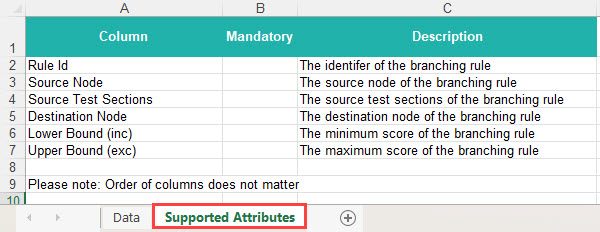
The Supported Attributes tab describes the fields. The Data tab holds sample data — delete it and replace it with your own.
Populate the spreadsheet, then set Email Address to the address that should receive the result, select Select File... to choose your file under Spreadsheet File, and select Import and email result.
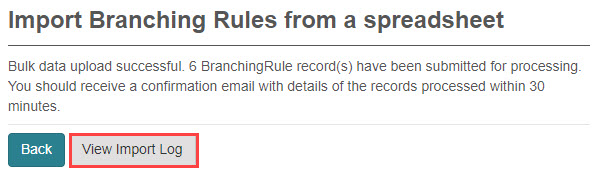
A feedback screen displays with a link to the import log, which is useful for troubleshooting a failed import. The import also runs branching validation, so an import that succeeds can still report branching errors.
Validate branching
Expand the Branching Validation section. The check runs as soon as you expand it — there's no separate button.
Validation reports three states:
- A green message, There are no validation errors., when nothing at all was found.
- Yellow warnings, which don't stop you delivering the test. Only unreachable nodes produce a warning.
- Red errors, which do.
Correct any errors, then select Refresh in the section header to re-run the check. If you've changed nodes or rules in another section, collapse and re-expand Branching Validation so the Test Paths table is rebuilt too.
What validation checks
All types — validation checks the whole structure for:
- Loops, and paths that return a test-taker to a test section they've already done
- Unreachable nodes and test sections
- Dead ends
- Gaps or overlaps in score coverage
- Duplicate items on a path
- Rule bounds that fall outside the achievable score range
It also enforces one strict rule about coverage: every source node must have exactly one rule with a blank Lower Bound (inc) and exactly one with a blank Upper Bound (exc), and the ranges in between must meet exactly, with no gap or overlap.
Branching with item adaptive sections only — the mark-based checks are swapped for difficulty-based ones, and two more are added. See If your test uses item adaptive sections.
Warning
All types: errors block delivery. An assessment event that includes this test can't move to Delivery while any branching error remains — the transition fails with You cannot transition to 'Deployment' until branching rules validate in the attached forms. Warnings don't block it.
Reading the test paths
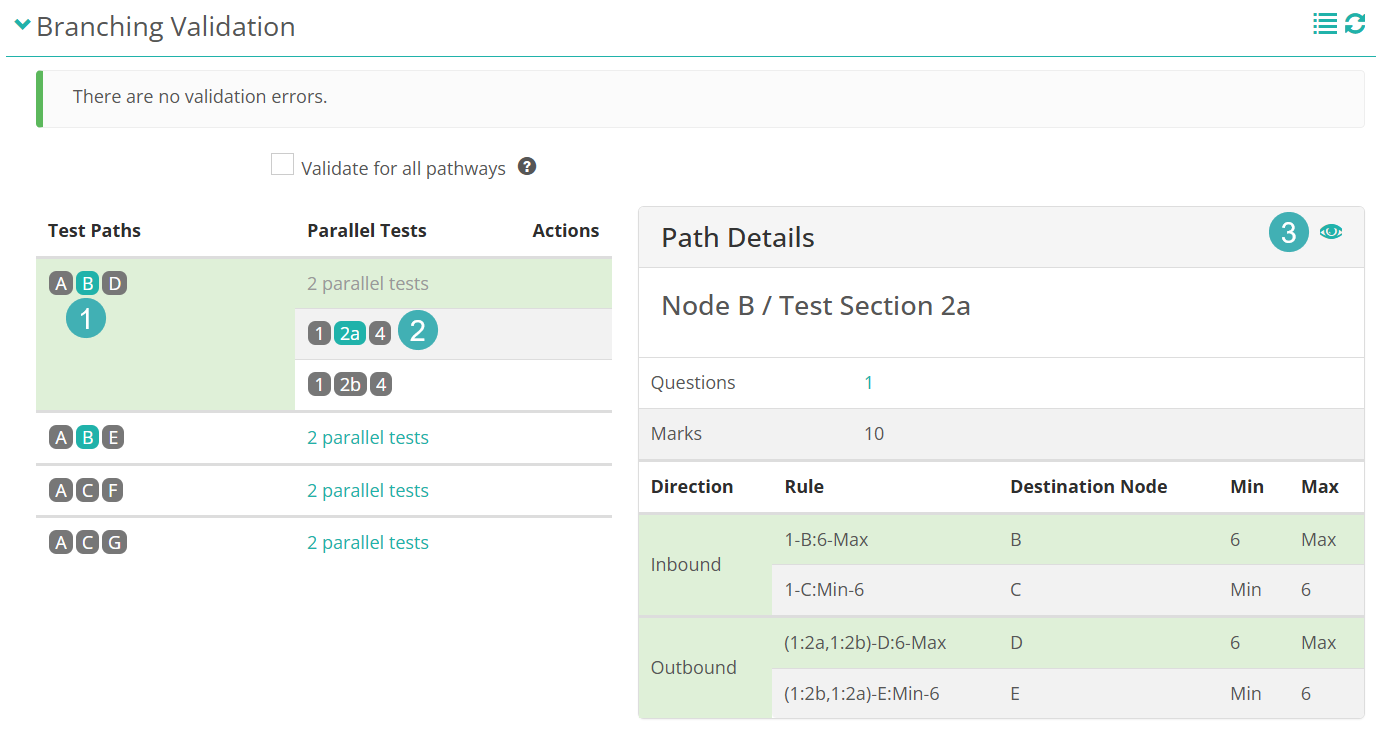
Below the messages, the Test Paths and Parallel Tests created by your rules are listed. In the example below there are four paths, each with two parallel tests, because nodes B and C hold two test sections each — eight parallel tests across the test. Until you select something, Path Details prompts you to choose a node and a test section.
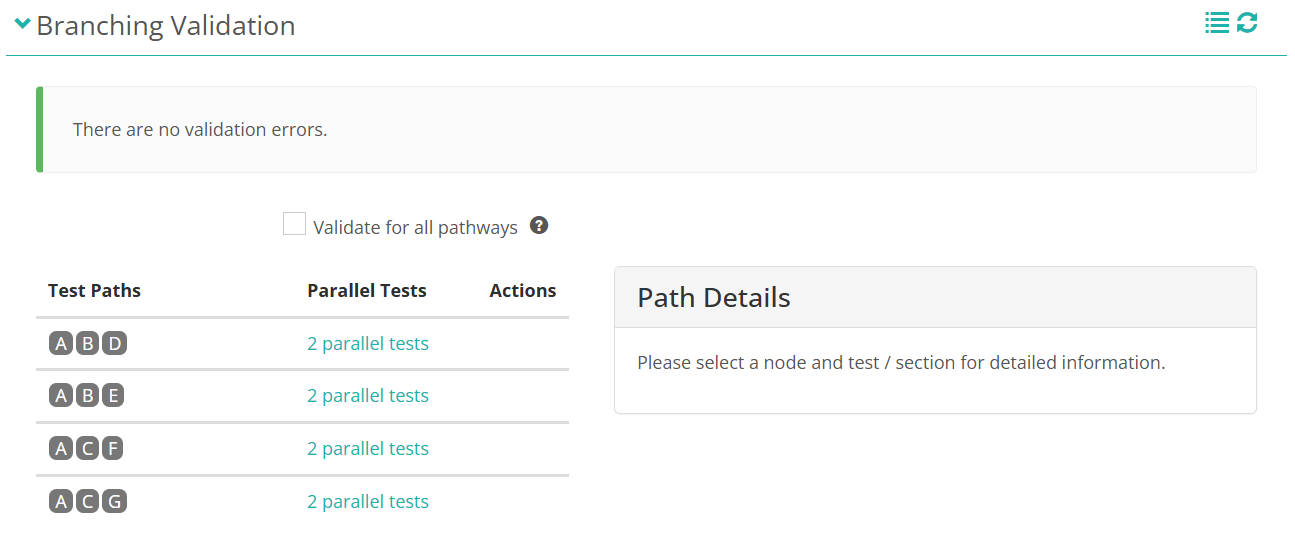
- Select a node to highlight every occurrence of it across the display.
- Select the {n} parallel tests link to expand a path, then select a test section within it to see its details — its item count, marks, and inbound and outbound branching rules.
- Optionally select the eye icon to preview the test section in a new tab.
The Path Details panel only appears once the test has no errors. In the example below, node B and test section 2a are selected, and the panel lists the rules leading into node B and the rules leading out of it.
Two more controls
The two sit in different places, which is easy to miss.
All types — Download Branching Score Table  is an icon in the section header, to the left of Refresh. It exports a spreadsheet listing the destination node for each possible score on each path, which is the clearest way to check your routing. It won't download while any validation message exists.
Branching with Parallel Paths only — Validate for all pathways is a checkbox in the section body, below the validation messages. Tick it to require the rules to cover every combination of test paths and parallel paths. Left unticked, validation only requires at least one rule per test section per node, and that every test section appears in at least one complete path. It's disabled once the test has attempts in progress.
If your test uses item adaptive sections
A Branching with item adaptive sections test is built the same way as any other branching test, but it branches on theta instead of score, and seven things behave differently as a result. They're covered in place above; this is the full list in one spot.
What theta is
Theta is an estimate of a test-taker's ability, and it isn't another word for their score.
A score counts marks: answer five items correctly and you score five, whichever five they were. Theta weights each answer by the Difficulty of the item that was answered. Two test-takers who each get five of ten items right therefore have the same score but different thetas — the one who answered the harder items comes out higher.
That's what makes the test adaptive. It's also why every item needs a Difficulty: it's the weighting, and without it there's nothing to estimate against.
Theta runs on a scale centred on zero, where zero is average ability, positive values are above average and negative values below. You set the starting range on each test section, and Ability Estimation Method on the test chooses the statistical method used to update the estimate as the test-taker answers.
What differs from a standard branching test
Before you start
- Item Adaptive must be available as a test section type, as well as the test type itself — see Settings.
Creating the test
- Marking Mode is locked to Automatic rather than Mixed.
- The form adds two required fields, Ability Estimation Method and Confidence Level.
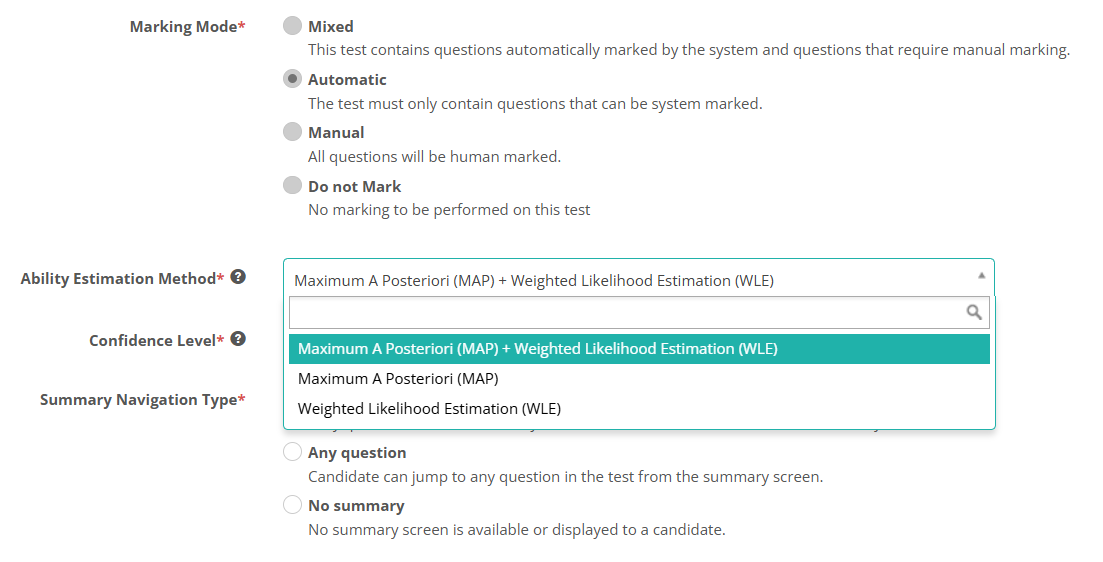
Ability Estimation Method sets how the platform estimates theta as the test runs. All three options express ability in logits on the Rasch scale and apply across every test section.
- Maximum A Posteriori (MAP) + Weighted Likelihood Estimation (WLE) — the default. Uses MAP during the test, within and across sections, to guide which item comes next, then applies WLE for final scoring.
- Maximum A Posteriori (MAP) — uses a Bayesian prior to steady the estimate while few items have been answered, so it suits shorter tests and early sections.
- Weighted Likelihood Estimation (WLE) — produces an unbiased estimate without relying on a prior, best once there are enough responses to work from.
If you're unsure, the field's help text recommends starting with MAP.
Confidence Level — a value between 0 and 1 that sets the threshold for treating an attempt's result as high or low confidence. An attempt finishing with a confidence level above this value counts as high confidence.
Building it
- Every test section in a node must be an Item Adaptive section, each with its own exit conditions and starting ability range — see Item adaptive sections.
- Every item in those sections needs a Difficulty value. Nothing enforces it. Blanks are excluded from the highest-and-lowest calculation the checks on your rule bounds work from, rather than counting as zero — so a section with every item blank isn't checked at all, and a section with only some blank is checked against a narrower range than it can actually produce. A blank means something else again at delivery: see Add items to the section.
Setting the rules
- Lower Bound (inc) and Upper Bound (exc) hold theta values, not marks, and the column labels don't change to tell you so — see How the score is calculated.
Validating and delivering
- Validation swaps its mark-based checks for difficulty-based ones, and adds two of its own: every section in a node must contain at least one item, and must meet the minimum item count you set on the section.
- The rule about giving every parallel test the same total number of items doesn't apply — these tests are exempt.
Settings
Administrators can configure the following settings at Settings > Test Designer Settings.
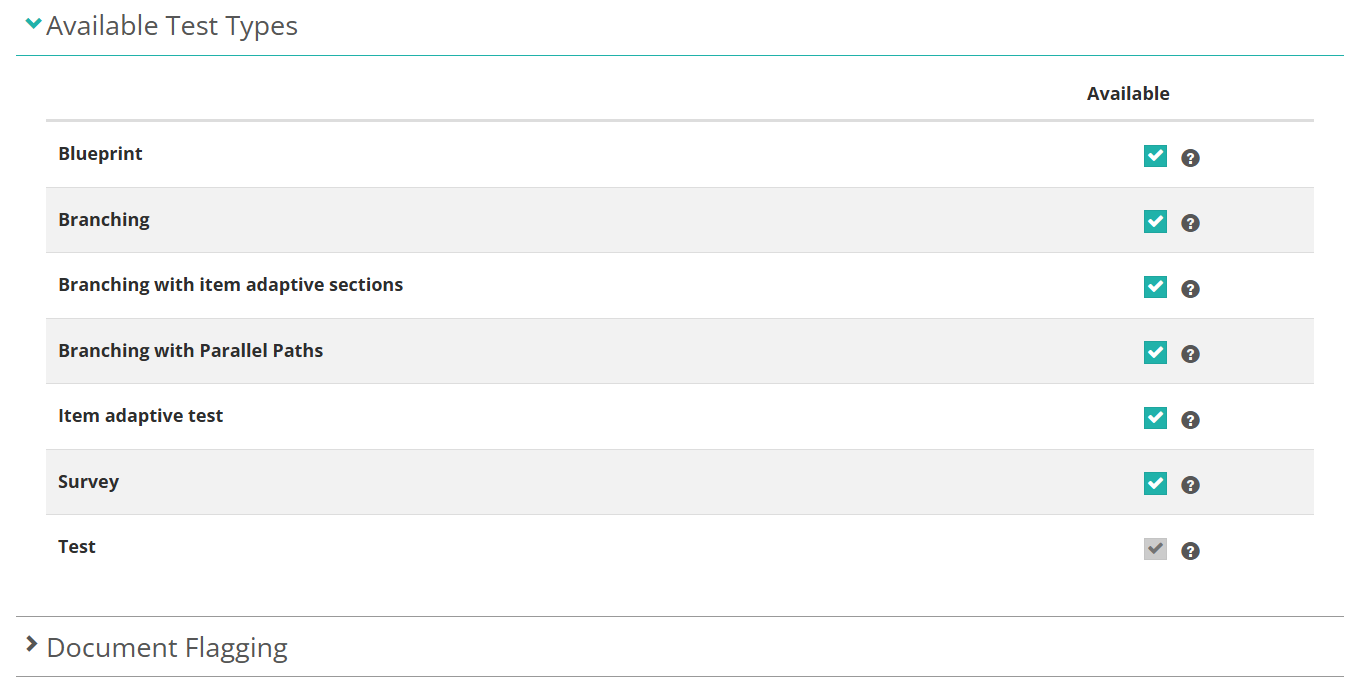
Expand Available Test Types:
Branching, Branching with Parallel Paths and Branching with item adaptive sections — control which branching test types appear in the Actions menu. If none are selected, you can't create a branching test at all.
Important
This list only offers the test types that are enabled for your platform. If a branching type isn't listed here, an administrator can't switch it on from your site's settings — contact Janison to have it enabled.
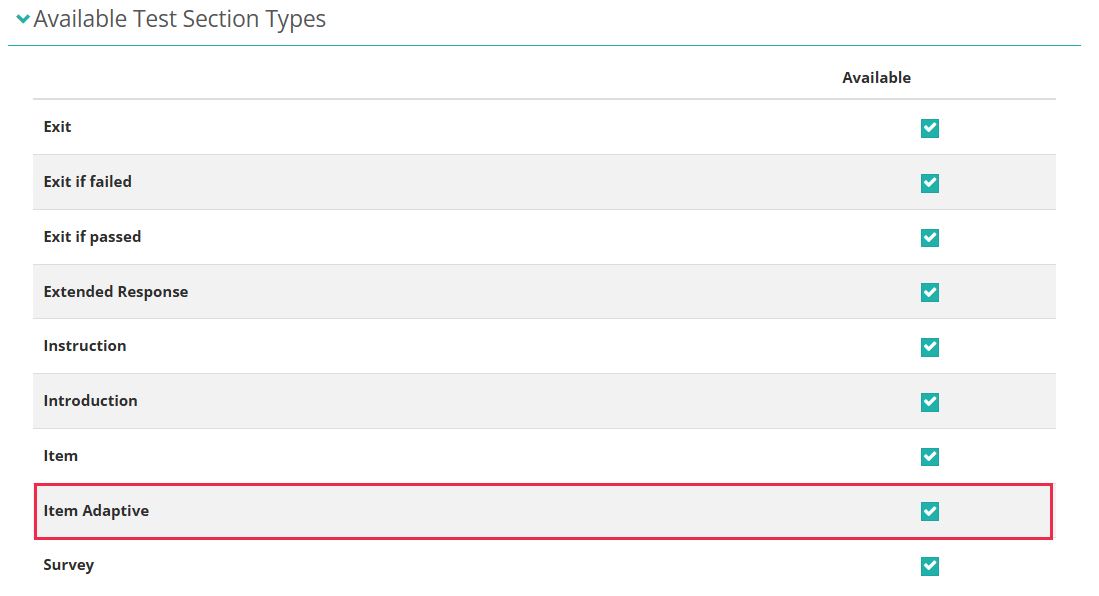
Expand Available Test Section Types:
Item Adaptive — must be ticked before you can build a Branching with item adaptive sections test. Only an administrator can turn it on; it isn't something you can enable while building a test. With the test type available but this section type left off, the Type dropdown on a new test section inside the test comes up empty and you can't add a section to a node at all. As with test types, Item Adaptive only appears in this list if it's enabled for your platform.
Expand Test Authoring Settings:
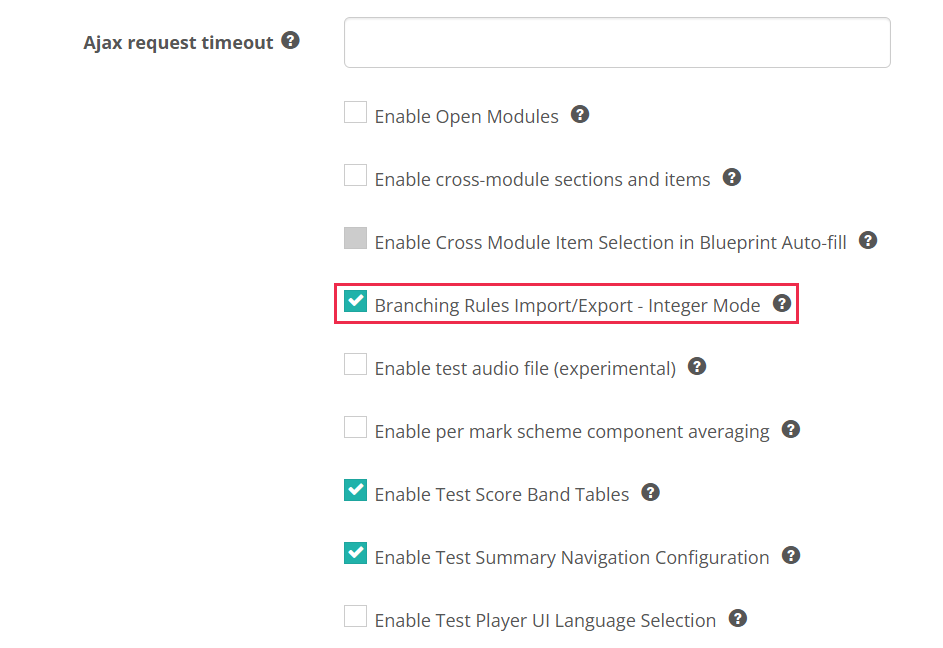
Branching Rules Import/Export - Integer Mode — changes the branching rules spreadsheet only. When on, the upper bound column is titled Upper Bound (inc) and holds an inclusive whole number, which the platform converts back to the exclusive value it stores. It does not change how rules are evaluated during a test — the upper bound is always exclusive at delivery.
Enable Paper Based Tests — controls whether Delivery Mode appears on the test form at all.
Enable Test Summary Navigation — controls whether Summary Navigation Type appears on the test form.