Personal needs and preferences (accessibility)
Personal Needs and Preferences (PNP) codes offer a versatile system for tailoring tests to the specific needs of individual test-takers. These codes allow customisation based on unique requirements, such as providing a high-contrast screen for individuals with visual impairments, or offering test items translated into the test-taker's native language. This flexibility ensures that assessments are accessible and accommodating, promoting a more inclusive testing environment that caters to diverse needs and preferences.
Note
You may see PNP referred to as disability adjustment codes (DAC) or substitute items.
Available PNP customisations
Administrators have multiple options to select from, to cover a wide range of PNP customisations:
- Exempt test-takers from using the secure browser.
- Allow substitution of items, this could be for multilingual purposes or to cater for a disability.
- Enable larger fonts in the rich text editor.
- Make the text editor toolbar stick to the top of the editor.
- Make the zoom tool available with many options around how the zoom tool functions.
- Apply themes, for example a theme using high contrast colours to cater for visual impairments.
- Allow a test-taker extra time to undertake the test.
- Resize the calculator.
Important
It is possible to apply some of these options sitewide by browsing to Settings > Test designer Settings and opening General Assessment Options. You can find settings relating to larger fonts, sticky toolbar, several zoom tool settings and resizing the calculator here. If these options are active here, they will apply to all test-takers and creating PNPs for these options is not necessary.
Settings
If you are using this feature for the first time, you may need to enable it in the system and on the test-taker profiles.
Enable PNP in Test Designer Settings
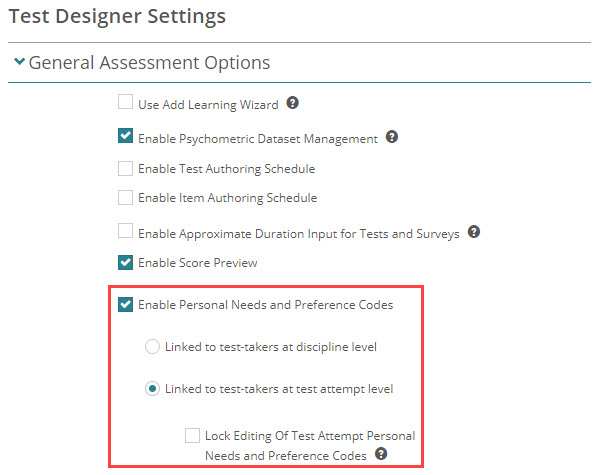
Browse to Settings > Test designer Settings and open General Assessment Options.
Check Enable Personal Needs and Preference Codes.
You can either link the PNPs to test-takers at the discipline or at the attempt level. If you link PNPs at the discipline level, the PNP will apply to all tests in that discipline. If you link them at the attempt level, the PNP will only apply to the attempt.
If you attach PNPs at the attempt level, you have an option to Lock Editing Of Test Attempt Personal Needs and Preference Codes. If the editing is locked, then no changes can be made to the attempt PNP's once the attempt is created. If editing is unlocked, then you can edit the attempt PNP's before the test-taker starts the test.
Enable PNP codes on User Settings
Browse to Settings > User Settings and open Details view.
Scroll down the list and check the Personal Needs and Preference codes box in the Visible column.
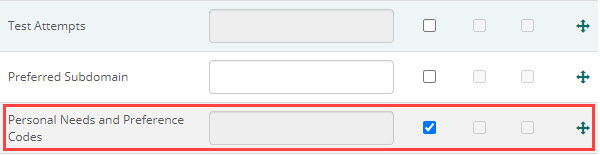
Once activated, a new section displays on the test-taker's profile where administrators can add PNPs.
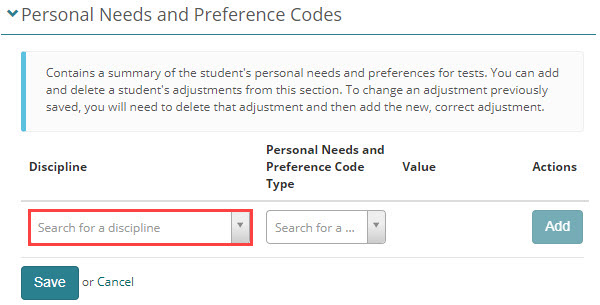
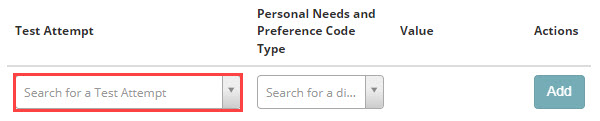
The first drop-down will either be Discipline or Test Attempt to reflect the choice you made in the Linked to… setting.
PNP types
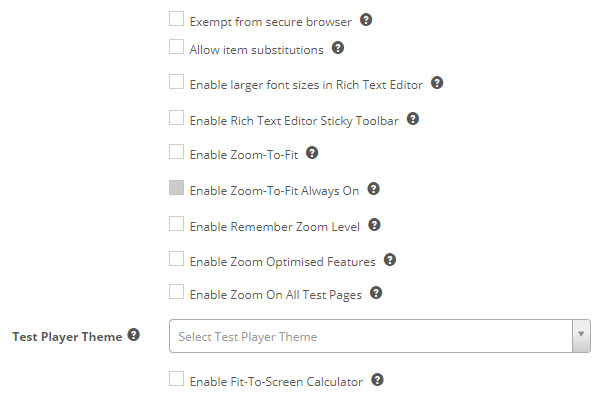
Exempt from secure browser
If this is enabled, a test-taker with this code will not need to use the secure browser to take the test. This is useful if they need to use tools that are incompatible with the secure browser.
Allow item substitutions
If checked, administrators can set item substitutions, and the system assigns test-takers allocated this code with the substitute item. This covers requirements where a test-taker requires audio, visual or motor assistance due to a disability. This option can also be utilised to assign items in different languages where relevant.
Disability adjustments
These substitute items cater for those with disability who are not able to access some types of items. This allows the system to capture the same response from a test-taker, while still measuring the intended content. For example:
- Audio alternative items replacing audio files for spelling, with text passages for proofreading.
- Visual alternative items with simplified or enlarged text and images, including text within images, for easier viewing.
- Motor assistive alternative items which change the interaction type for items so test-takers can answer items without a need to drag and drop.
Language
These substitute items cater for multilingual environments by presenting items to test-takers in their relevant language. You can deliver a single test in several languages.
Enable larger font sizes in rich text editor
In extended text item types with rich text editor enabled, a test-taker normally only has the 14 and 16pt font sizes available to them. When this setting is active, test-takers have font size options of 14, 16, 18, 20, 22, 24, 26, 28, 36, & 48pt.
Enable rich text editor sticky toolbar
When rich text editor is enabled and sticky toolbar is active, when you scroll down, the toolbar sticks to the top so that the test-taker can always view and access it.
Enable Zoom-To-Fit
Adds the "Zoom-To-Fit" option to the Zoom menu. Can be used to scale the test player to the maximum width and height of the viewport without introducing scrollbars.
Enable Zoom-To-Fit always on
Scales the test player to the maximum width and height of the viewport without introducing scrollbars. This zoom level is automatically turned on and stays on while the test-taker is taking their test. This option is not available unless the option above, Enable Zoom-To-Fit is active.
Enable remember zoom level
When a test-taker sets a zoom level (e.g., 200%) this is persisted when navigating between items.
Enable zoom optimised features
When the test player is zoomed via the zoom tool, and test player exceeds the viewport (i.e. has scrollbars on the page), the test player header and footer is optimised for better access to navigation features, tools and information.
Enable zoom on all test pages
If checked, the zoom tool will be available on all pages throughout the test while the test-taker is logged in.
Test player theme
The test player themes feature offers the capability to incorporate a logo and customise colours. If a test-taker has multiple PNP Codes containing test player themes, the system will order by the PNP Code identifier and select the first. You can read more about this feature in our topic on test player themes.
Enable Fit-To-Screen calculator
When the test player is zoomed via the zoom tool, and the calculator exceeds the viewport height, the calculator is automatically resized to fit within the viewport height so the entire calculator can be seen. Note that a test-taker requiring 300% Zoom, on a 1024×768 device would no longer see the calculator at 300% … the calculator would be closer to 150% zoomed.
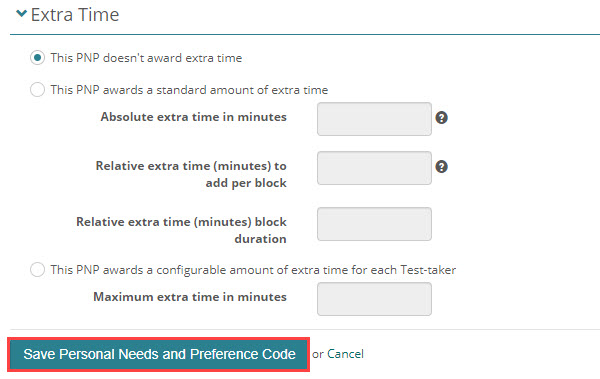
Extra time
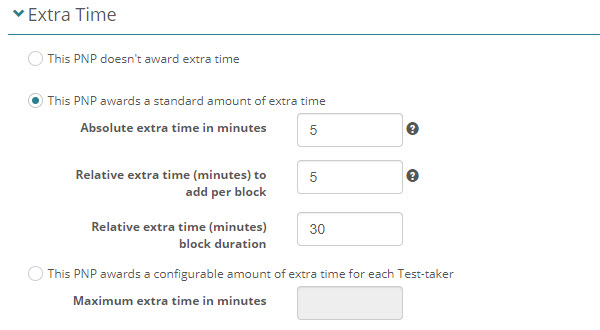
This PNP adjustment allows you to automatically grant extra time to individual test-takers. There are two options to award extra time:
Option 1 – Standard amount of extra time
Absolute extra time in minutes – Test-takers with this PNP code will receive this number of extra minutes to complete the test. This value can be used in combination with relative extra time.
Relative extra time (minutes) to add per block – Adds extra time for every full-time block present in the test. e.g., '5 minutes to add per block of 30 minutes of test duration' will add 5 minutes for any test between 30-59 minutes, and 10 minutes for tests between 60 and 89 minutes.
Relative extra time (minutes) block duration – Enter the block duration in combination with the Relative extra time (minutes) to add per block.
These values can be used in isolation or together. The absolute time and relative time assigned are totalled, meaning if you have 5 minutes absolute time and 5 minutes relative time per 30 minute block for a one hour test, the total extra time will be 15 minutes.
Option 2 – Configurable amount of extra time per test-taker
This setting provides an option for administrators to set the extra time when assigning the PNP to test-takers. You can set a limit on the maximum extra time.
Create PNP codes
Follow the steps below to create PNPs.
-
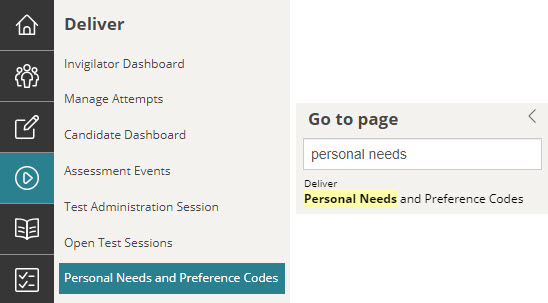
Browse to Deliver > Personal Needs and Preference Codes.
Note
If PNPs don't appear in your Deliver menu, it may be customised to appear in a different menu. If this is the case, select the Go to page icon
 and type 'personal needs…' and select the link that displays.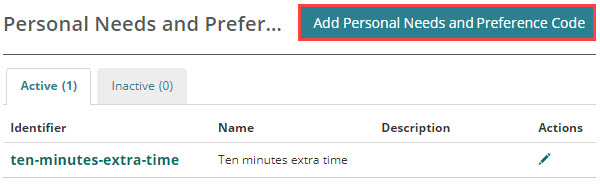
-
Select Add Personal Needs and Preference Code.
-
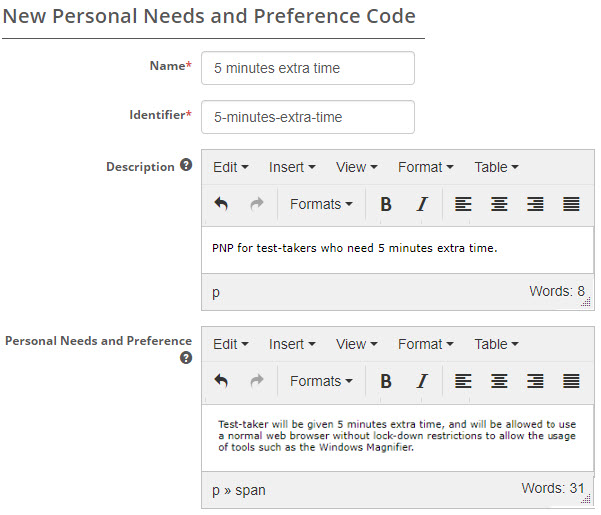
At the top of the screen enter the Name and Identifier. The free text fields are optional.
-
The next section gives you the option to select one or more PNPs.
-
The bottom section gives you the Extra Time options. Select the required option and then save.
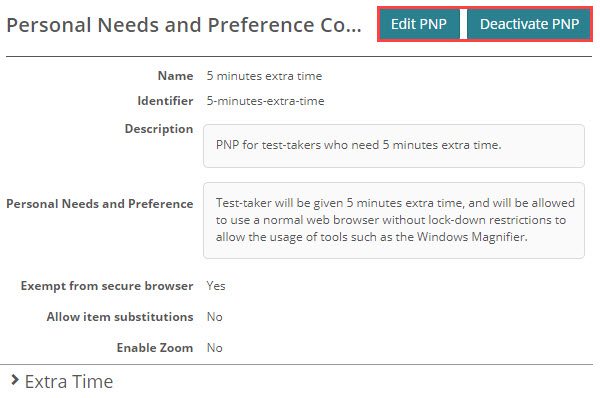
Once saved, you can view, edit or deactivate the PNP.
Allocate PNP codes
Now that we've created our PNP, we need to allocate it to the test takers. The workflow for allocating substitute test items is different to general PNPs, let's look at allocating the general PNPs first, and then we'll look at allocating the substitute items.
We can either allocate PNPs via a spreadsheet import or allocate them to individual test-takers. If you have a high number of PNPs and/or test-takers, an import is the best solution.
To allocate PNPs to individual test-takers, you can do this from their profile or from the test attempt.
Allocate PNPs via profile
Follow the steps below to allocate PNPs to test-takers via their profiles.
-
Browse to Manage People > Users and find the required test-taker.
-
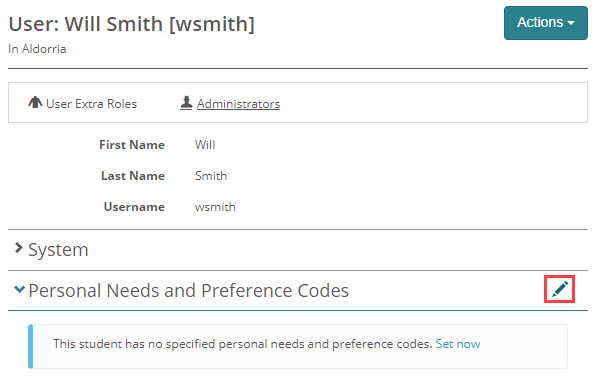
Open the test-taker profile and select the pencil icon on the Personal Needs and Preference Codes expandible.
-
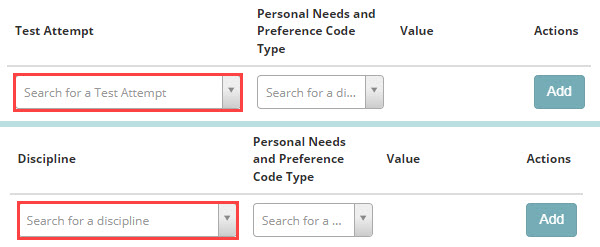
The option available in the first drop-down will depend on the Linked to… selection you made in Test Designer Settings as covered in the settings topic above.
In this example, we'll use discipline which means the PNP will apply to all tests in the selected discipline.
-
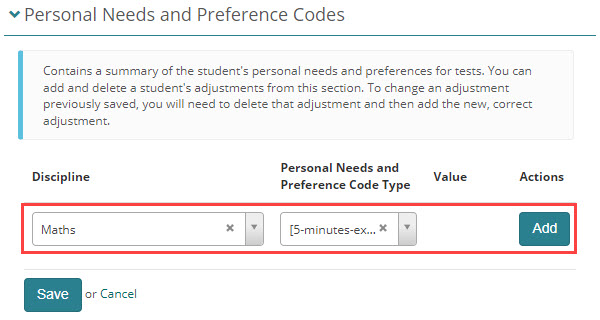
Select the Discipline, Personal Needs and Preference Code Type and then select Add.
-
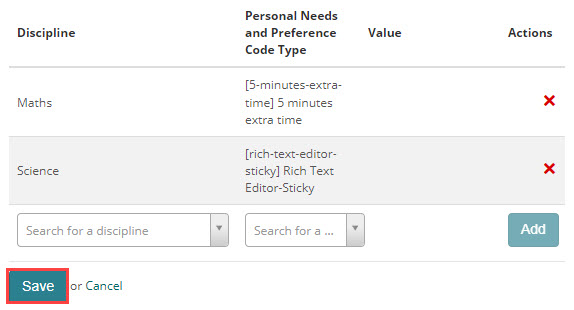
If required, repeat these steps to add other codes and then Save.
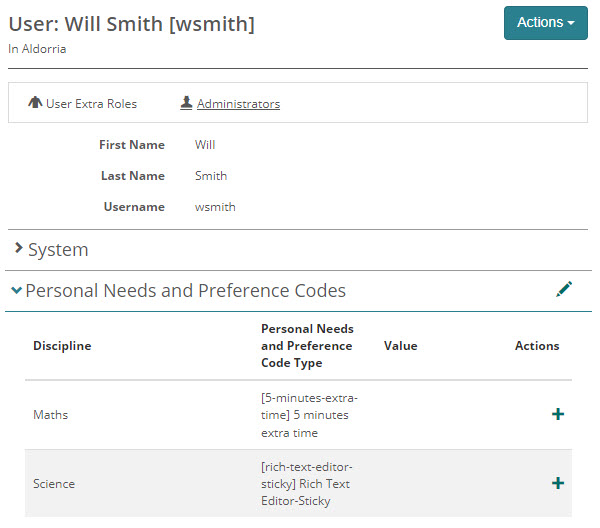
The PNP code or codes now displays on the test-taker's profile and will take affect for tests in the selected discipline or disciplines.
Substitute test items
For the general PNPs above we took two steps:
Step 1 – We created the PNP.
Step 2 – We then allocated PNP to a test-taker.
For substitute items we need to take an extra step of creating test items:
Step 1 – Create item substitute PNP.
Step 2 – Create the parent and substitute (child) items and link them.
Step 3 – Allocate the PNP to test-taker.
To create and allocate substitute items, follow the steps below.
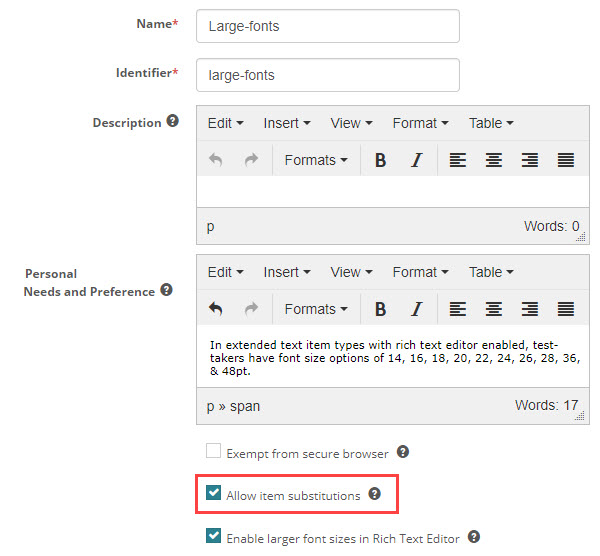
Step 1 – Create item substitute PNP
Follow the steps in the topic above to create a PNP code.
Select Allow item substitutions. In this example, we've created a PNP to accommodate visual impairments by allowing large fonts in the rich text editor.
Step 2 – Create the items
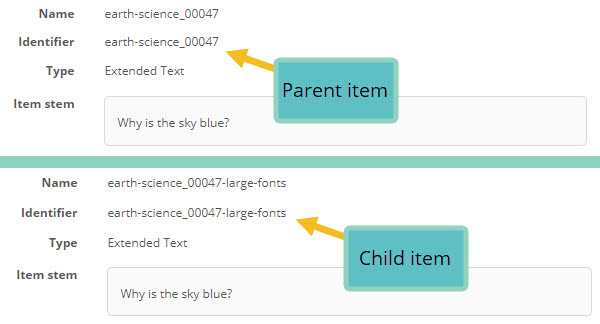
Follow the instructions in our document on item authoring to create two items, a parent item and one you'll use as a substitute item. In this example we're creating a substitute item allowing larger fonts in the rich text editor, for a test-taker with a visual impairment.
In this example, the parent item is earth-science_00047 and the substitute item earth-science_00047-large fonts.
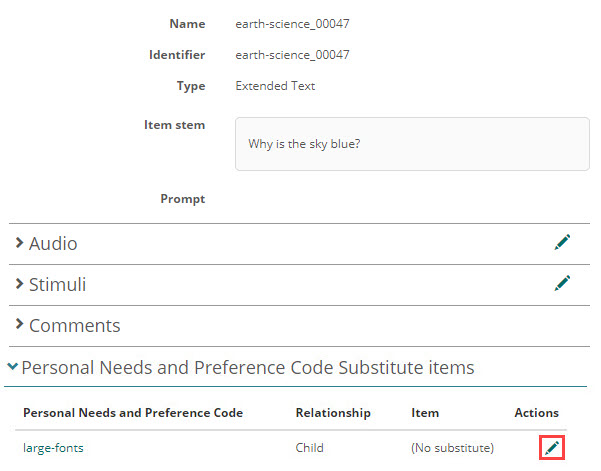
Creating the relationship
- Open the parent item.
- Expand the Personal Needs and Preference Code Substitute items section. All PNPs relating to substitute items display in the first column.
- Select the pencil icon.
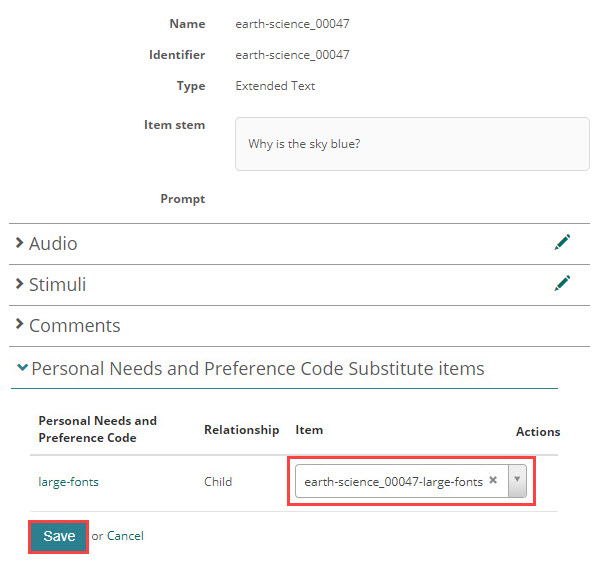
Select the substitute item and Save. In this example it's the item we created with the large fonts.
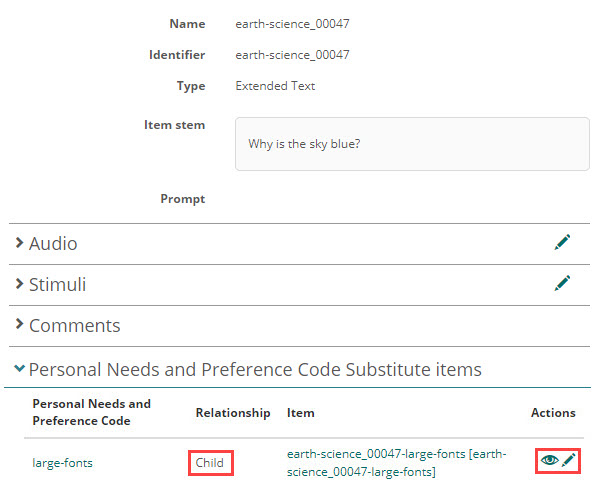
Note that the relationship is Child.
You have the options to view the item or to edit the selection.
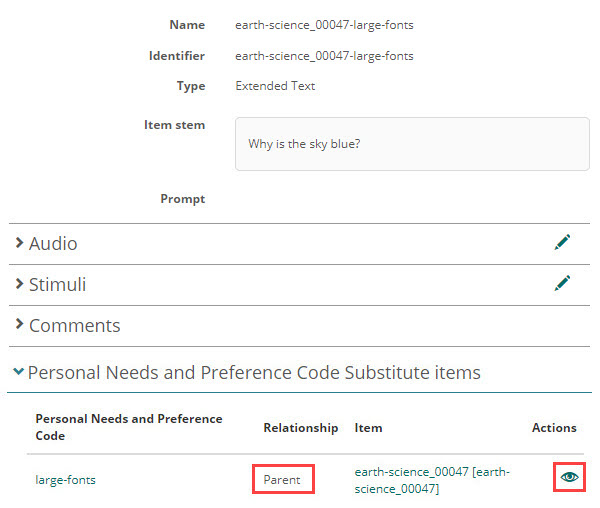
Viewing from substitute item perspective
If you view the Personal Needs and Preference Code Substitute items section of the substitute item, the Relationship displays as Parent and the parent item displays. You can view the item, but you cannot edit the selection.
The PNP is now ready to allocate to the test-takers.
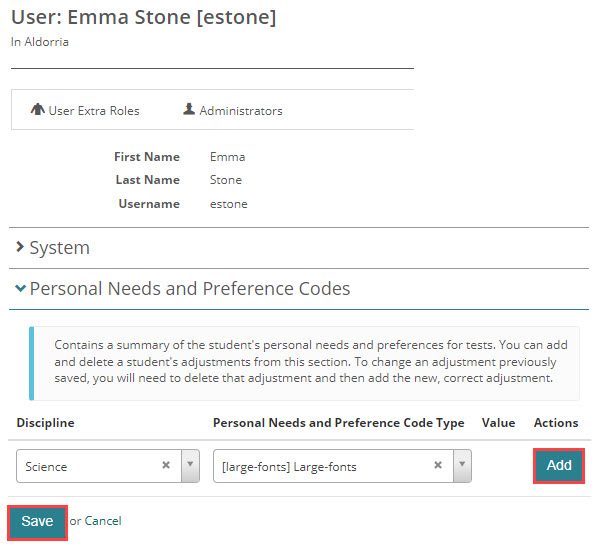
Step 3 – Allocate the PNP
Follow the steps in the topic on allocating PNPs above. Select the large fonts PNP as the Personal Needs and Preference Code Type.
While undertaking the test, the test-player will present this test-taker with the substitute item.
For language translation, the same steps apply, but the body of the text would contain the language specific text.