Organisations and organisation units
In Janison Insights, you organise the people you manage into organisations and organisation units. An organisation is the top level — typically a school, company, region, or country — and every user belongs to one. Within each organisation, organisation units break it down into smaller groups, such as:
- Departments within a school
- States within a country
- Schools within a region
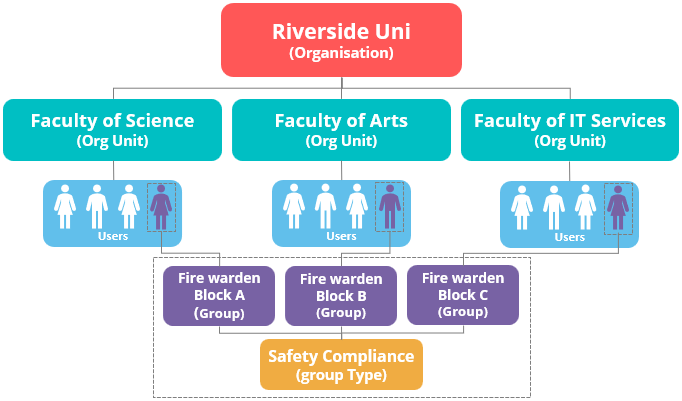
Beneath each organisation sit its organisation units, users, groups, and positions. You'll find both in the menu: organisations at Manage People > Organisations, and organisation units at Manage People > Organisation Units.
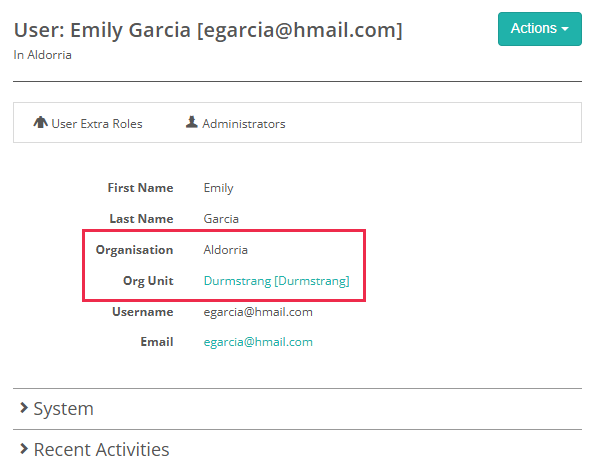
When you create a user, you assign them to an organisation and an organisation unit.
You can also scope a role to an organisation or organisation unit, so that roles such as markers or test managers only view or manage the people in their own part of the structure.
Note
Viewing and adding organisations and organisation units requires permission to manage them. Administrators have this by default; other roles can be granted it, sometimes limited to the organisations or units within their scope.
Create an organisation
There are two ways to create organisations — add them one at a time, or import several from a file. Both start from Manage People > Organisations.
Add an organisation manually
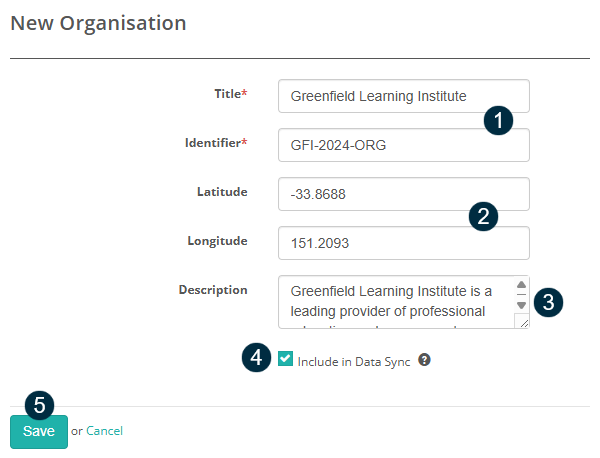
Select Add Organisation, then complete the New Organisation form:
- Enter a name in the Title field. As you type, the Identifier field populates automatically — keep it or edit it to an identifier of your choosing.
- Optionally add Latitude and Longitude for geo-location.
- Optionally add a Description. It's only seen by the people who manage organisations.
- Tick Include in Data Sync to include the organisation when syncing to a connected data platform.
-
Select Save.
Important
Each organisation has a mandatory, unique identifier. Avoid changing it once the organisation is created — the spreadsheet import relies on it to match existing organisations.
Import organisations
Importing is the quickest way to create many organisations at once.
- Select Import Organisations.
- Select the Template link to download the sample Excel template.
- Open the template and complete a row for each organisation. The template has three standard columns — Identifier, Title and Description — followed by any custom attribute columns. Save the completed file to your computer.
- Select Select File, choose your saved file, then select Upload.
- To update organisations you have imported before (matched on Identifier), tick Update Organisation details based on spreadsheet.
-
Select Save Organisations. A confirmation message shows the results, and the new organisations appear in the list.
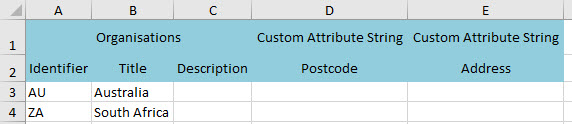
The template can also include columns for custom attributes. These must already exist in the system before you import — delete the columns if you don't use any. See Custom attributes for how to set them up.
Create an organisation unit
An organisation must already exist before you can add units to it. To manage units, go to Manage People > Organisation Units. As with organisations, you can add them one at a time or import several from a file.
Add an organisation unit manually
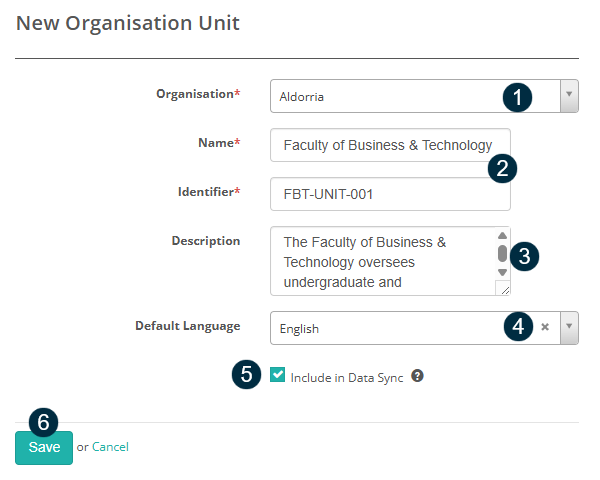
Select Add Organisation Unit, then complete the New Organisation Unit form:
- Choose the parent organisation from the Organisation dropdown.
- Enter a name in the Name field. As you type, the Identifier field populates automatically — keep it or edit it.
- Optionally add a Description. It's only seen by the people who manage organisation units.
- Choose a Default Language.
- Tick Include in Data Sync to include the unit when syncing to a connected data platform.
-
Select Save.
Important
By default, an organisation unit's identifier can't be changed after it's created. An administrator can allow editing — see Settings.
Import organisation units
- Select Import Organisation Units.
- Select a Template link to download a sample Excel template. Two are available — one with location details (address, phone and fax columns) and one without.
- Open the template and complete a row for each organisation unit. Each row needs the parent organisation's identifier, plus the unit's name and identifier. Save the completed file to your computer.
- Select Select File, choose your saved file, then select Upload.
- To update organisation units you have imported before, tick Update Organisation Unit details based on spreadsheet.
- Select Save Organisation Units. A confirmation message shows the results, and the new units appear in the list.
The template can also include columns for custom attributes, which must already exist in the system before you import.
Settings
Organisations have no settings — they're a core part of Janison Insights and are always available.
Two settings affect organisation units:
Identifier Editable — controls whether an organisation unit's identifier can be changed after it's created. By default it can't. An administrator enables this in Settings, under the Organisation section.
Organisation Unit Settings — controls which columns appear in the organisation units list and details views. An administrator configures this at Settings > Organisation Unit Settings.