Set up a quick marked event
Quick marking is a property of the assessment event, not a separate object you create. You put an event into quick marking mode, and from then on its extended-text responses are marked from Marking > Quick Mark Assessments instead of through a marking project.
This page covers the administrator's side of the job. For the marker's side, see Mark responses.
Before you start
The event must be in Draft. The Event Marking Settings panel is read-only at every other status, so you can't convert an event that's already been approved, opened, or moved to delivery.
The test needs manual marking enabled. Quick marking only shows responses waiting to be marked, so the test's marking option has to leave something for a marker to do:
- Mixed or Manual — extended-text responses reach the marker.
- Automatic — the test is marked on submission, so nothing reaches a marker.
- Do not Mark, or a survey — there's nothing to mark.
The test needs at least one extended-text item. Only extended-text responses reach a marker, so a test without them lists nothing, however it's configured.
Group types must already exist if you want markers to filter by class. You select from existing group types here — you can't create one from this panel.
Set the event to quick marking
- Go to Deliver > Assessment Events and open the event.
- Find the Event Marking Settings panel and select the edit icon.
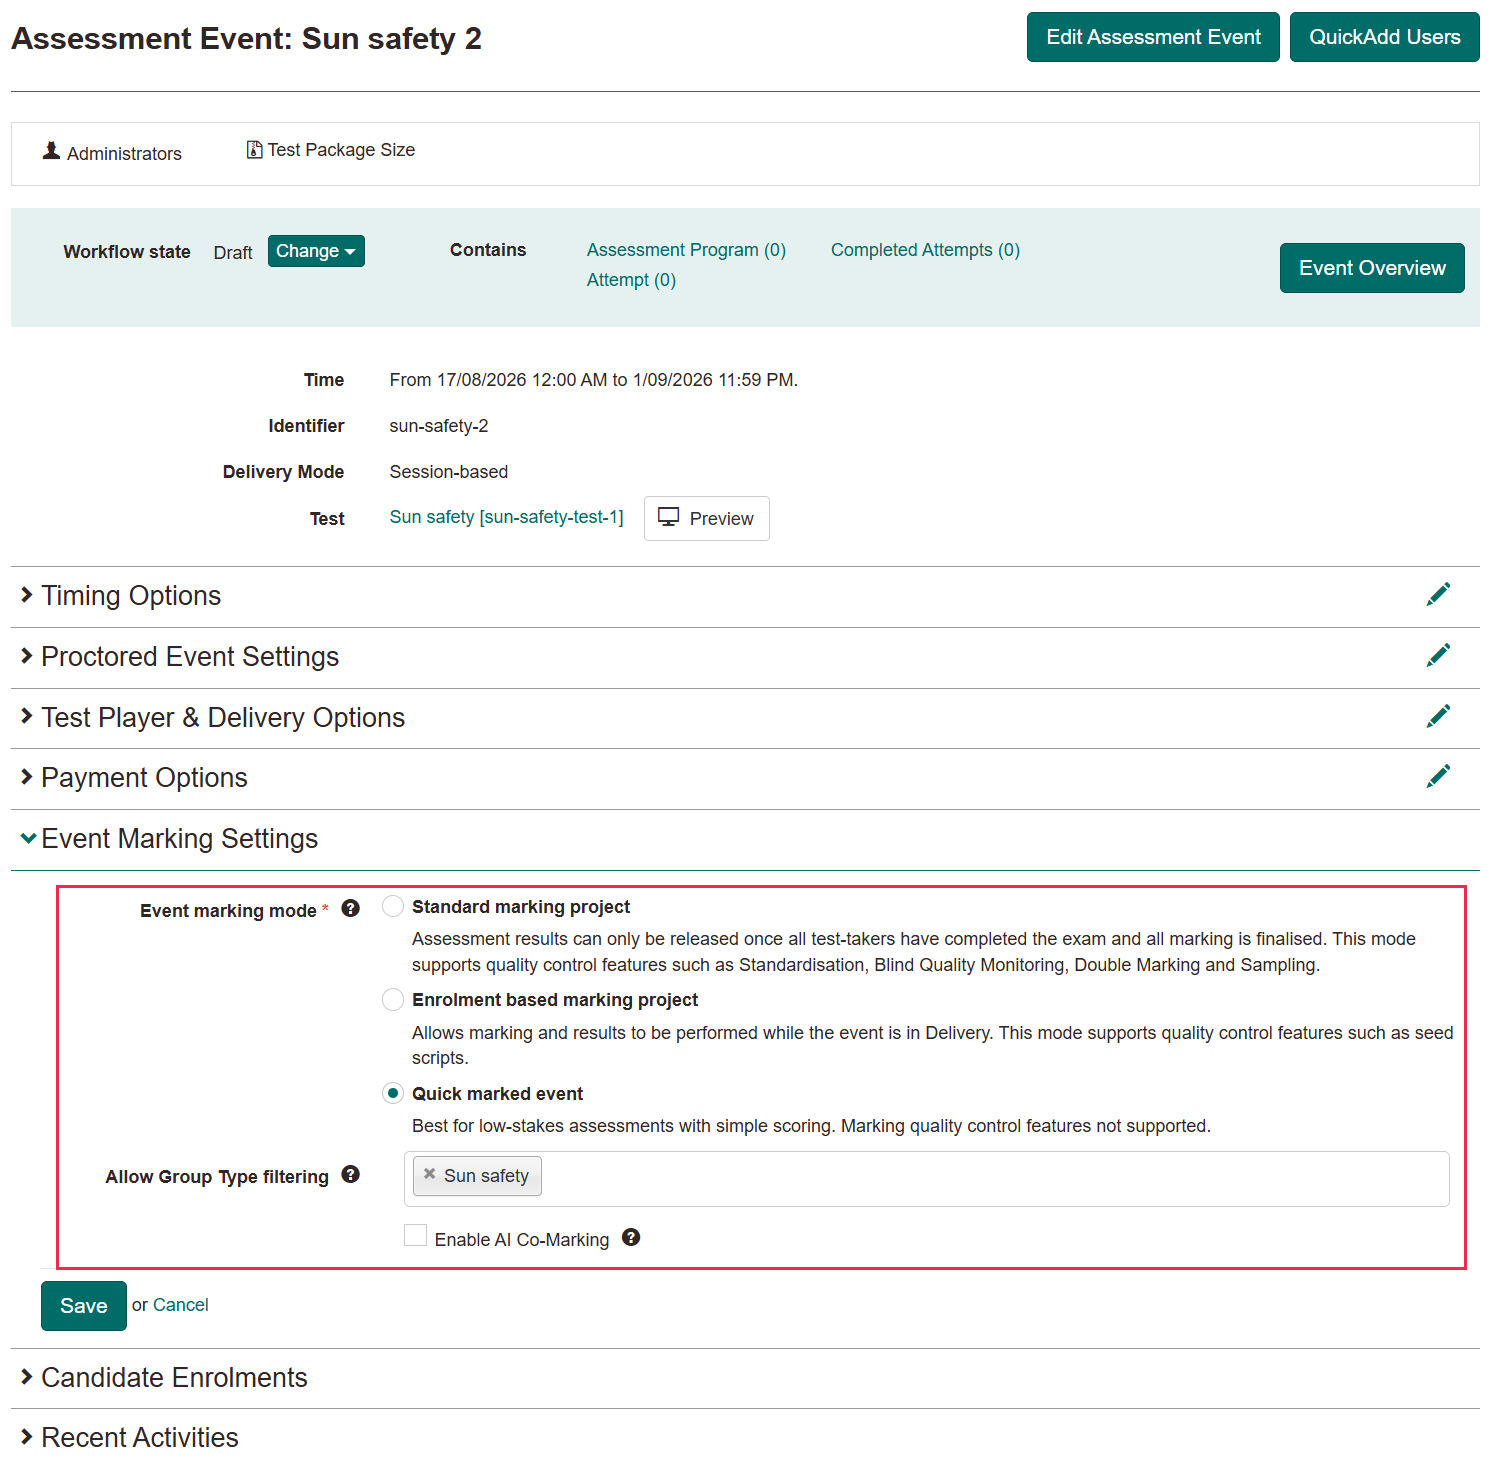
- Select Quick marked event.
- Optionally add one or more group types to Allow Group Type filtering.
- Optionally select Enable AI Co-Marking.
-
Select Save.
Choosing the marking mode
Event marking mode is a required field with 3 options. Only one can be active at a time, and the choice shapes everything about how the event is marked.
Standard marking project — results are released only once every test-taker has finished and all marking is complete. This mode supports standardisation, blind quality monitoring, double marking and sampling. See Standard marking.
Enrolment based marking project — marking and results can happen while the event is in Delivery. This mode supports seed scripts. See Enrolment based marking.
Quick marked event — best for low-stakes assessments with simple scoring, and the only mode with no marking quality controls. This is the option that lists the event under Marking > Quick Mark Assessments.
Events created through the API always get one of the other 2 modes. The API has no marking-mode field, only a flag that chooses between standard and enrolment based, so a quick marked event has to be set up in the interface.
Warning
Choose the mode before you progress the event out of Draft. There's no way to change it afterwards, and no way to migrate an event from one mode to another — you'd have to recreate the event.
Filtering responses by class
A group type is a category of group, and classes are groups. The group types you add in Allow Group Type filtering are what give markers a Groups filter on the Assessment Responses screen, where they mark.
The field lists all of your tenant's group types; start typing to narrow a long list. Each type you add appears as a chip, which you can remove with its ×.
The empty case isn't obvious, so it's worth spelling out. Add one or more group types and markers can narrow the response list to one class or several. Leave the field empty and every response in the event is included automatically, with no class picker shown at all.
So an empty setting isn't "no filtering configured yet". It's a deliberate "mark the whole event as one list", and on a large event that's a long list. Add a group type if your markers work class by class.
Selecting group types is necessary but not sufficient. A marker only gets the Groups filter if they have access to at least one active class of those types. A marker with no group access sees no filter, even on a fully configured event.
Turning on AI co-marking
With Enable AI Co-Marking on, an AI marker proposes a score for each extended-text response. The suggestion is a starting point — a marker still reviews it and finalises the response.
The checkbox only appears when the mode is set to Quick marked event and an AI marking provider is active with at least one model configured. A provider that's switched on but has no models still hides it.
Ticking the box is the last of 3 steps, not the only one. Janison sets up the provider and its models. An author then allocates an AI marker to each extended-text item — items without one aren't AI-marked, and their responses arrive for the marker to score by hand. See AI co-marking for both.
When you move an event to delivery with Enable AI Co-Marking on and some extended-text items have no AI marker allocated, Insights warns you and asks you to confirm. Read it rather than clicking through — it's telling you which part of the event won't get AI suggestions.
When responses reach markers
Setting the event up doesn't put anything in front of a marker. A submitted attempt sits in Completed until something moves it into marking, and only then do its responses appear on the Assessment Responses screen.
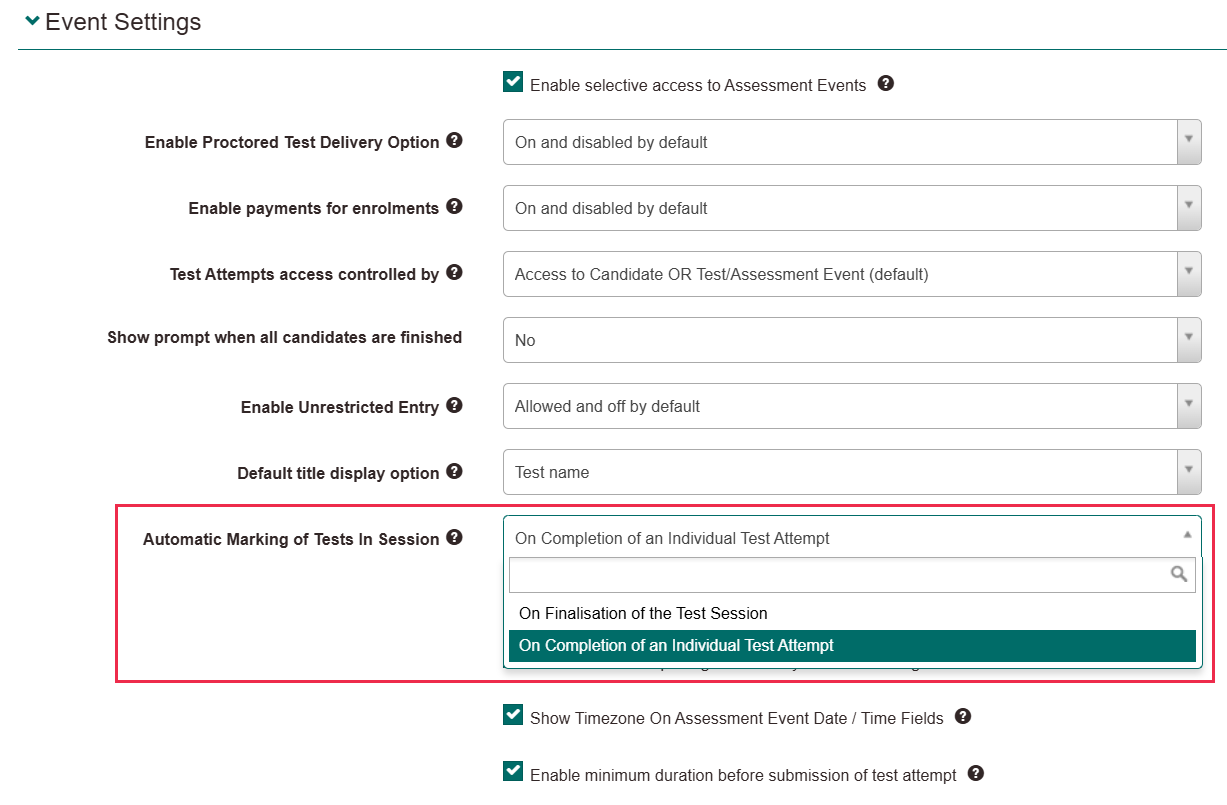
The timing comes from a tenant-wide setting, Automatic Marking of Tests In Session, at Settings > Assessment Event Settings in the Event Settings section:
- On Completion of an Individual Test Attempt — each attempt moves into marking as the test-taker submits, so responses reach markers steadily through the session.
- On Finalisation of the Test Session — the default. Attempts wait, and are released when the session is finalised, when the assessment event is closed, or when an administrator selects Mark submitted attempts on the event.
Because the setting is tenant-wide, changing it affects every session-based assessment event, not just this one.
Switching an event away from quick marking
If you change the mode on an event that was previously set to Quick marked event, Insights clears the quick marking configuration rather than keeping it dormant: Enable AI Co-Marking is reset and the selected group types are deleted.
So switching to another mode and back loses your group type selection — you'll need to re-add them.
Settings
Administrators configure quick marking on the assessment event itself, in the Event Marking Settings panel, which is editable only while the event is in Draft.
Event marking mode — sets the marking mode for this event. Select Quick marked event for quick marking.
Allow Group Type filtering — adds group types so markers can filter the response list by class.
Enable AI Co-Marking — lets an AI marker suggest scores for extended-text responses.
The same 3 settings exist as tenant-wide defaults for newly created assessment events, at Settings > Assessment Event Settings. There they're labelled Default event marking mode, Default Group Type filtering and Enable AI Co-Marking by Default. New events start on Standard marking project until you change the first of them.
Other settings elsewhere in the platform also affect quick marking.
AI Marking Provider Settings, at Marking > AI Marking Provider Settings — configures the AI marking provider and its models, and is the prerequisite for Enable AI Co-Marking appearing at all. See AI co-marking.
Automatic Marking of Tests In Session, at Settings > Assessment Event Settings in the Event Settings section — decides when a submitted attempt moves into marking, and so when its responses appear for markers. Tenant-wide, and set to On Finalisation of the Test Session by default.
Answer Accepted Confidence Tolerance, at Marking > Marking Settings — sets the read-confidence threshold below which a scanned response is flagged for a marker's attention. Set it on the Extended Text row for it to affect quick marking.
Max Score on the item, and each marking component's Available Score and half-mark setting — these are the ceilings a marker's score is validated against.