Mark responses
Markers work through a quick marked event from one screen. You choose an event, optionally narrow it to one class, then move through the responses on the Assessment Responses screen.
Marking is 2 steps. You score a response and mark it as reviewed, then submit it separately to finalise it. The gap between them is deliberate — it gives you room to revisit a score before anything is locked.
Only extended-text responses appear. The rest of the test is marked automatically, so what reaches you here is the part that needs a person's judgement.
Open the Assessment Responses screen
Go to Marking > Quick Mark Assessments. The Mark Assessment screen opens and asks you to choose what to mark.
Choose the event from Select event, optionally narrow it to one or more classes in Groups, then select View responses.
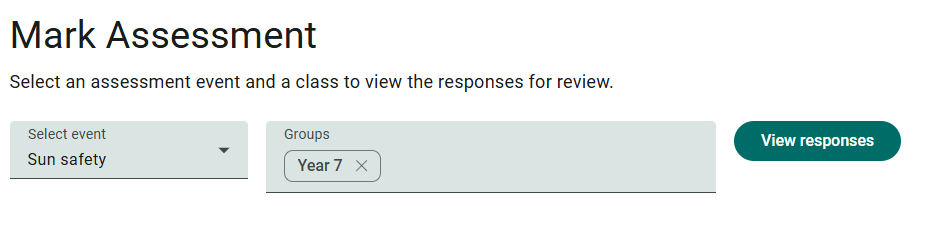
The Assessment Responses screen opens, with the event's name in the heading — for an event called Sun safety it reads "Assessment Responses: Sun safety".
Two things about the event list explain most "my event isn't there" questions:
- Only quick marked events appear. Events set to standard or enrolment based marking are marked through a marking project instead, and never show here.
- Only events in delivery appear. An event still in draft isn't listed, and neither is one that's been approved, opened, closed or cancelled. That holds even when it's set to Quick marked event.
The event list isn't filtered by your own access, but the responses are. So you may open an event and find empty tabs. The event exists and is in delivery, but none of its test-takers are in classes you have access to.
Groups takes more than one class, each added as a chip you can remove with its ×. It's optional: leave it empty and you get every response in the event that you have access to.
The field only appears if the event has group types configured and you have access to at least one class of those types.
The response list
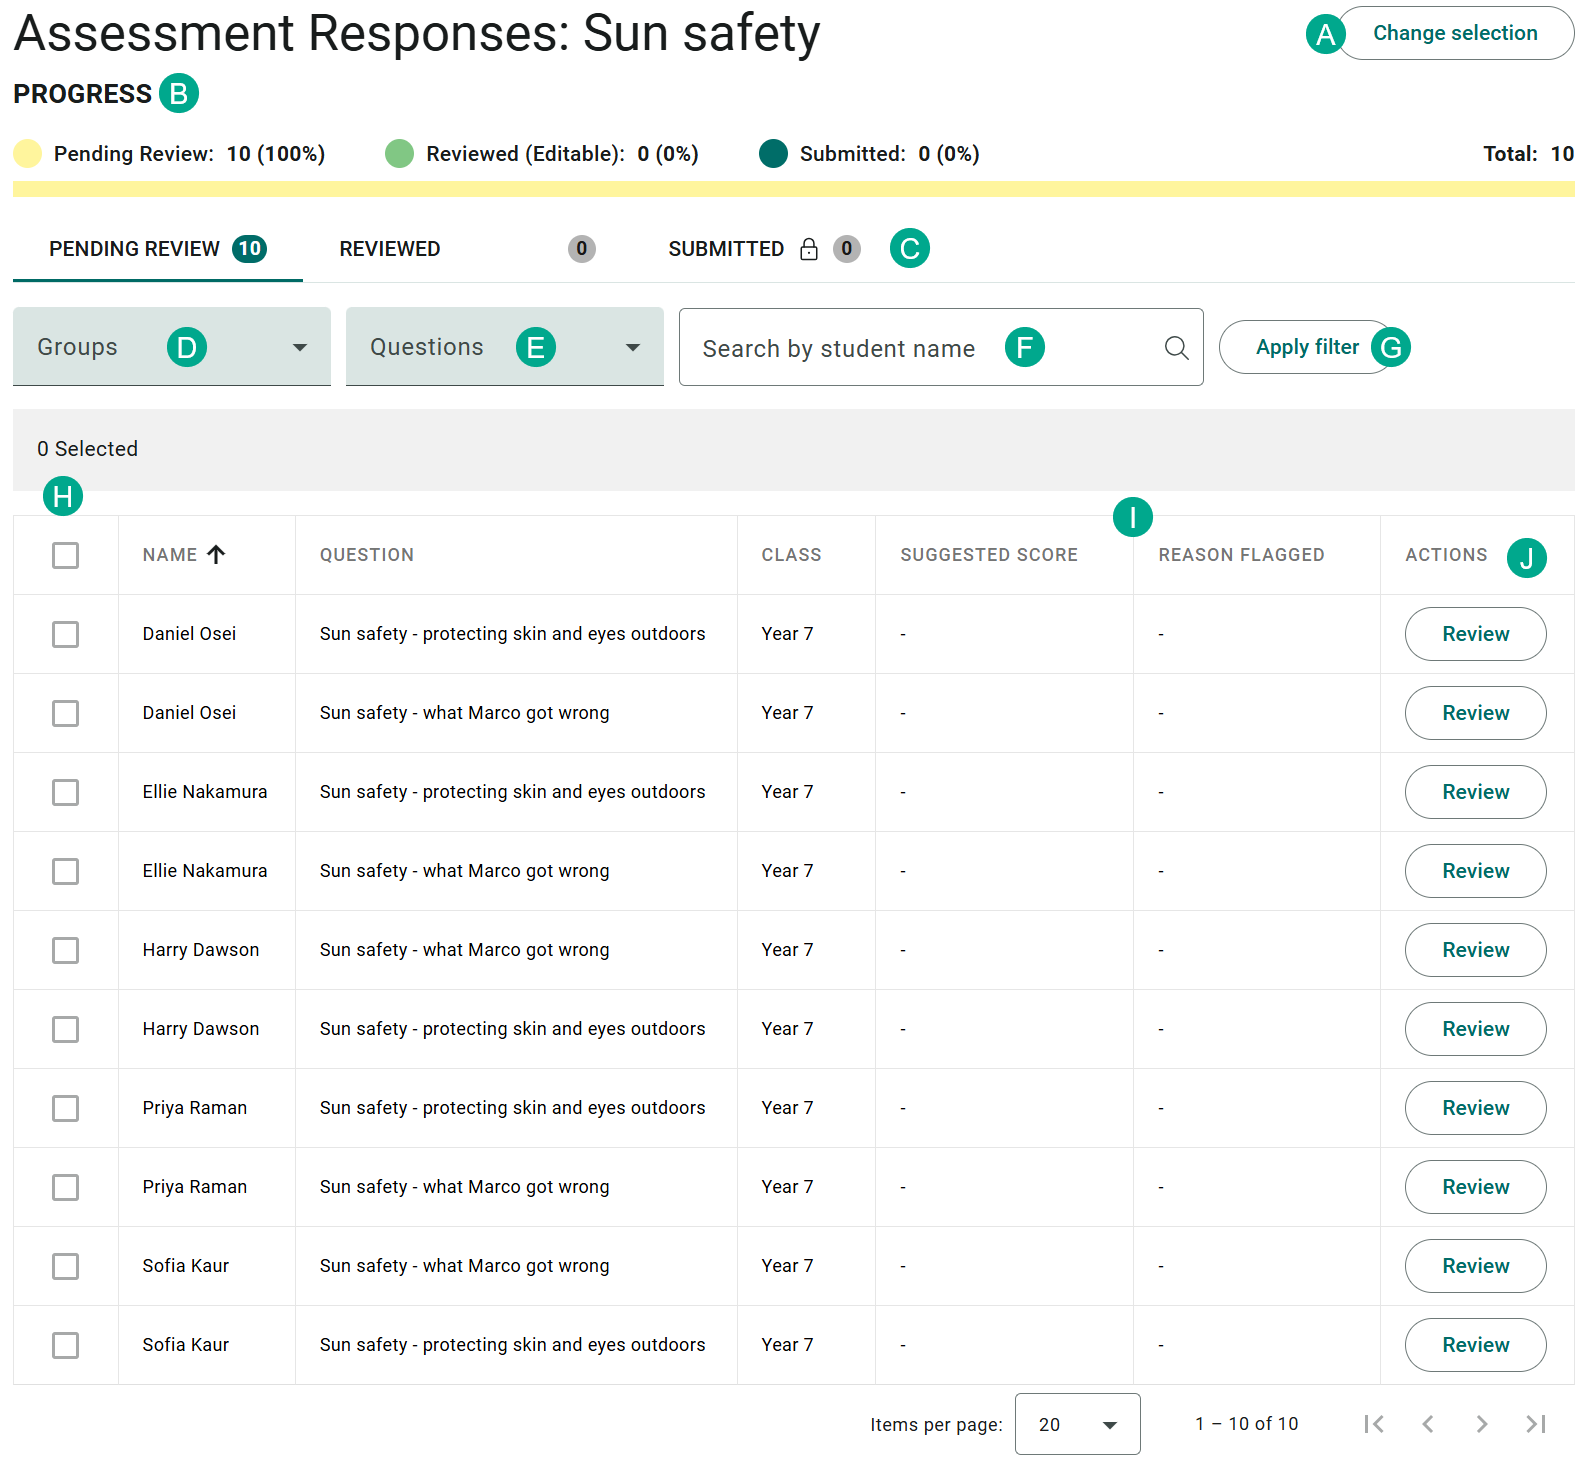
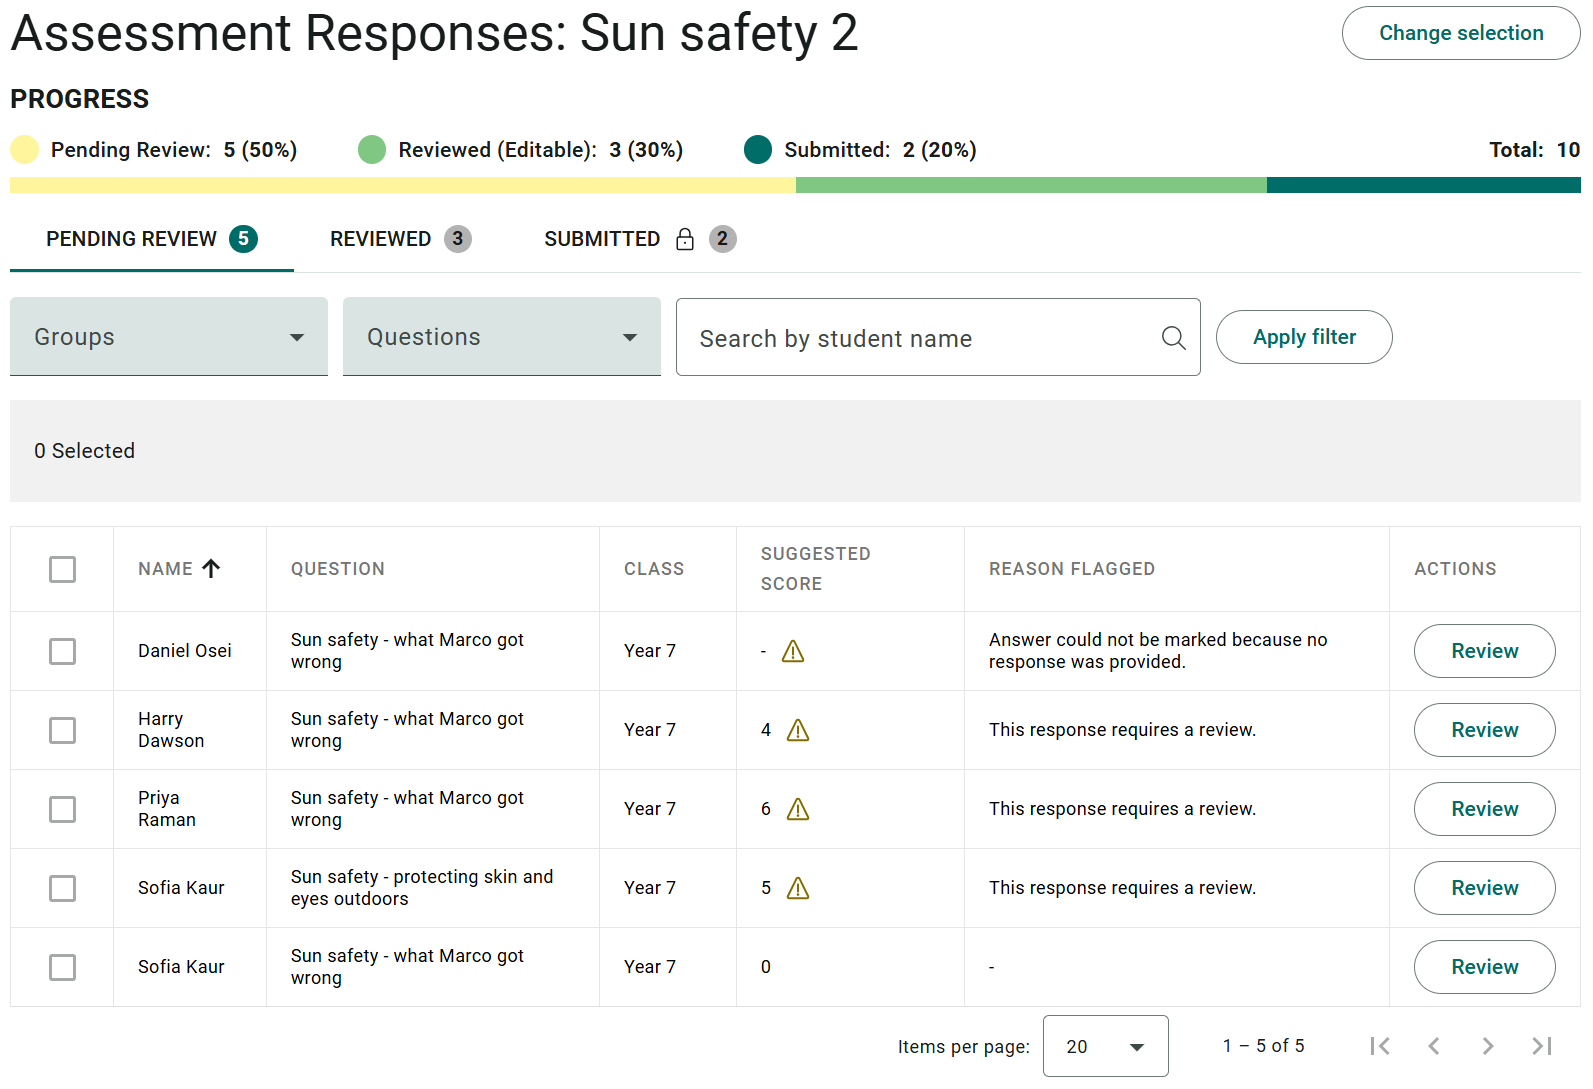
The Assessment Responses screen is where the marking happens. Its features are labelled A–J on the screen capture below, which is from an event with AI Co-Marking off, before any marking has started. That's why every response sits on PENDING REVIEW, with a dash in SUGGESTED SCORE and REASON FLAGGED.
A. Change selection — returns you to the event and class picker.
B. PROGRESS — how the event's responses are split across the 3 states, as counts and percentages, with the Total at the right.
C. The 3 tabs — the workflow, from PENDING REVIEW through REVIEWED to SUBMITTED.
D. Groups — filters by class.
E. Questions — filters by item.
F. Search by student name — finds one test-taker.
G. Apply filter — applies both filters and the search.
H. The selection checkboxes — tick rows to act on several responses at once.
I. SUGGESTED SCORE and REASON FLAGGED — the AI's proposed score, and the reason a response was flagged.
J. Review — opens that response for marking.
The tabs
The split across tabs is the workflow:
Pending Review — responses waiting for a marker. This is your queue.
Reviewed (Editable) — responses that have been scored but not finalised. These can still be changed. The tab itself is labelled REVIEWED, and the longer name comes from the PROGRESS legend above it.
Submitted — responses that have been finalised. The padlock on the tab is the clue that there's no way back.
When AI Co-Marking is switched on for the event, Pending Review behaves slightly differently. A response only appears once the AI has returned a suggested score for it, or once it's clear the item has no AI marker allocated. Responses still waiting on the AI aren't listed anywhere, so a tab that looks short early on may fill up shortly after.
Filtering and searching
You can narrow the list while you work:
- Groups filters by class. Each class is a checkbox, so you can tick several at once. A Search box at the top of the list helps when there are a lot of them.
- Questions filters by item, and works the same way — checkboxes and a Search box. You can tick several, but there's a good reason to stick to one at a time. Hold a single mark scheme in your head and apply it across every test-taker. That's faster and more consistent than working test-taker by test-taker.
- Search by student name finds one test-taker. It matches the name as Insights displays it, so a test-taker recorded with a preferred name won't be found by their legal first name. It doesn't search response IDs.
Set what you need, then select Apply filter. Nothing changes until you do.
Important
The progress counts above the tabs follow the event and class you selected, but they ignore the Questions filter and the name search. Once you filter or search, the number on a tab won't match the number of rows you can see. That's expected.
Mark a single response
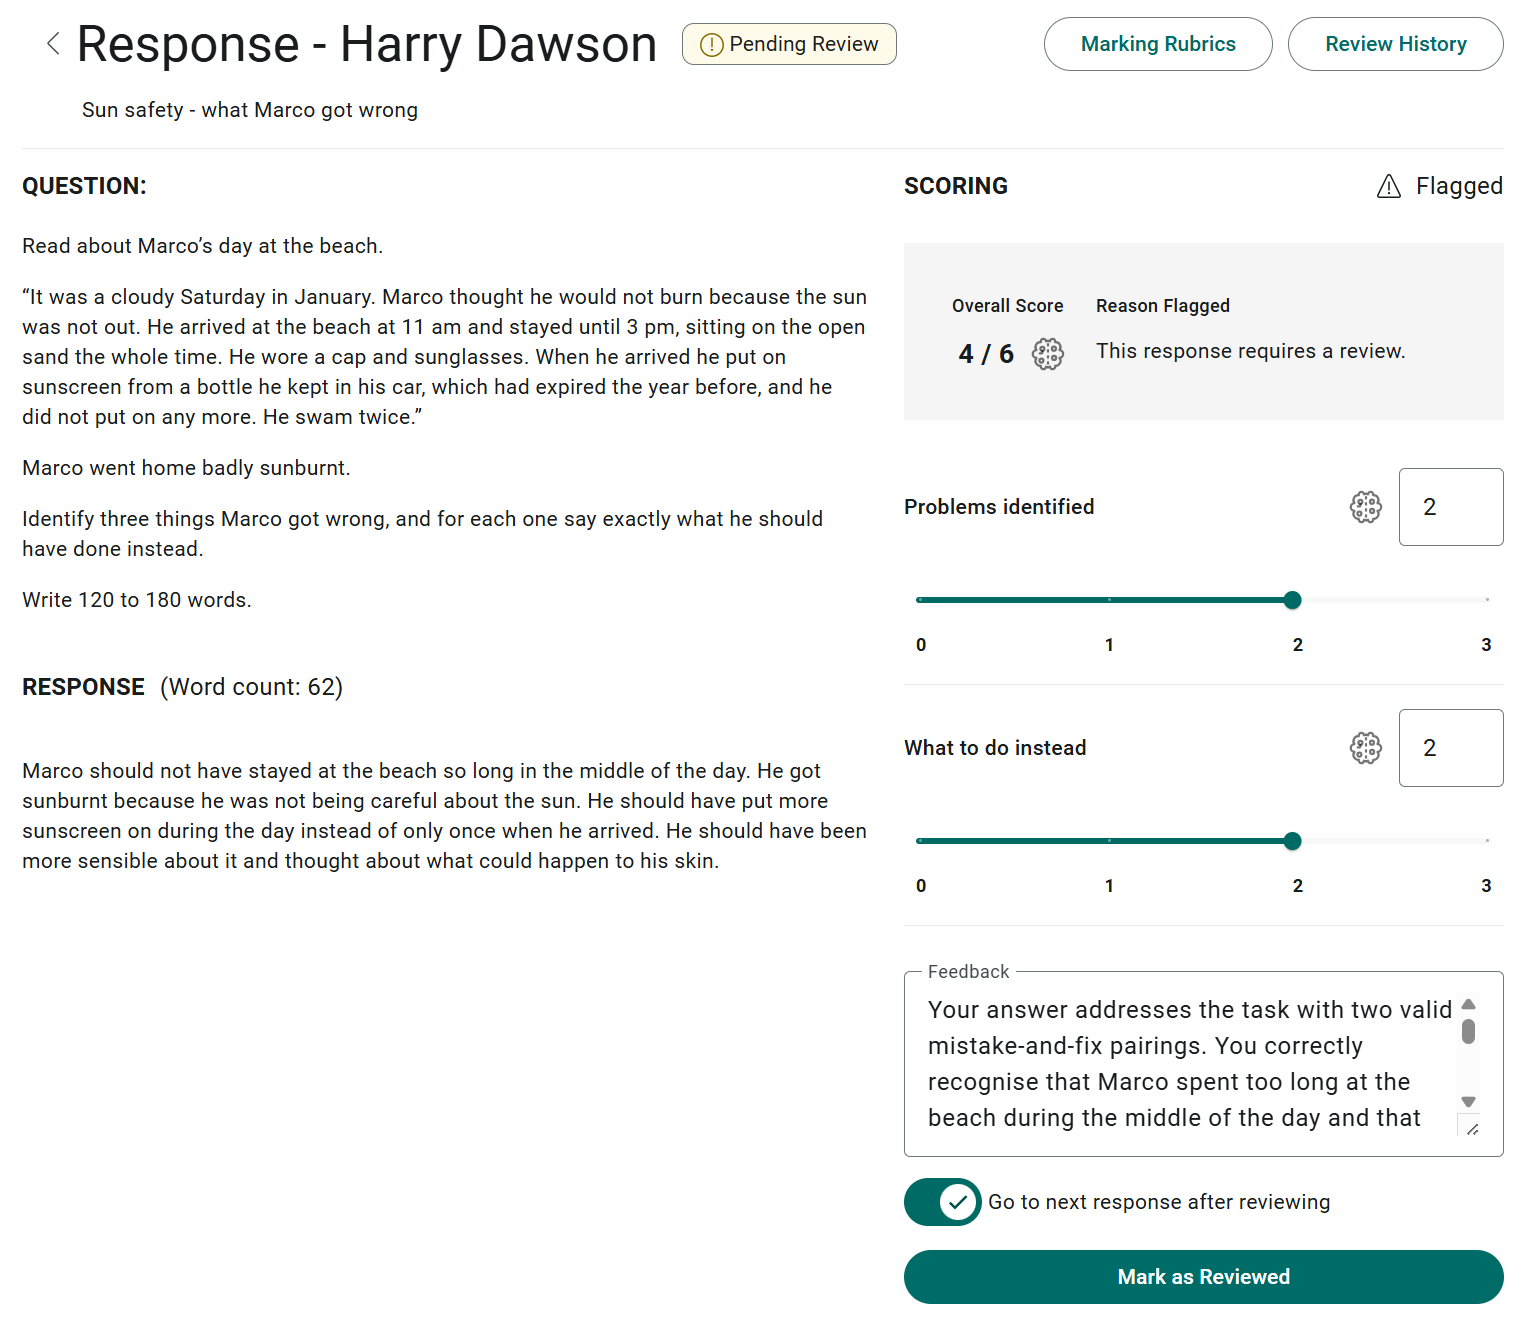
Select Review on a row to open that response. The screen is headed Response and the test-taker's name. The item name sits beneath it, with a pill showing where the response currently sits — Pending Review, Reviewed, or Submitted.
The item and the answer are on the left, under QUESTION: and RESPONSE. The word count sits next to RESPONSE, which is worth a glance where the item sets a length.
Scoring is on the right, under SCORING:
- Overall Score shows the total and the maximum. You don't type it — it's the sum of the component scores below.
- Each component of the marking scheme gets a row of its own. You get the component's name, a box to type its score into, and a slider marked with every value it allows.
- Feedback is a free-text field for comments to the test-taker.
You need to score every component before the response will save, and no component score can go above its own maximum.
In the example below, Problems identified and What to do instead are each out of 3, giving an overall total of 6.
When you've scored it, the buttons under the Feedback field depend on where the response already sits.
A pending response gives you a single button, Mark as Reviewed, with a Go to next response after reviewing toggle above it. It records your score without finalising it, and the response moves to Reviewed (Editable) where you can still change it. Leave the toggle on to go straight to the next response in the queue.
A response you've already reviewed gives you 2 buttons, Submit and Save. Save keeps your changes without finalising, so the response stays editable. Submit finalises it and moves it to Submitted. The toggle above them reads Go to next response after saving or submitting.
Save is what lets a second marker check your work. Edit the score or the feedback, save it as a draft, and the response stays on Reviewed (Editable) for someone else to look at before anyone submits it.
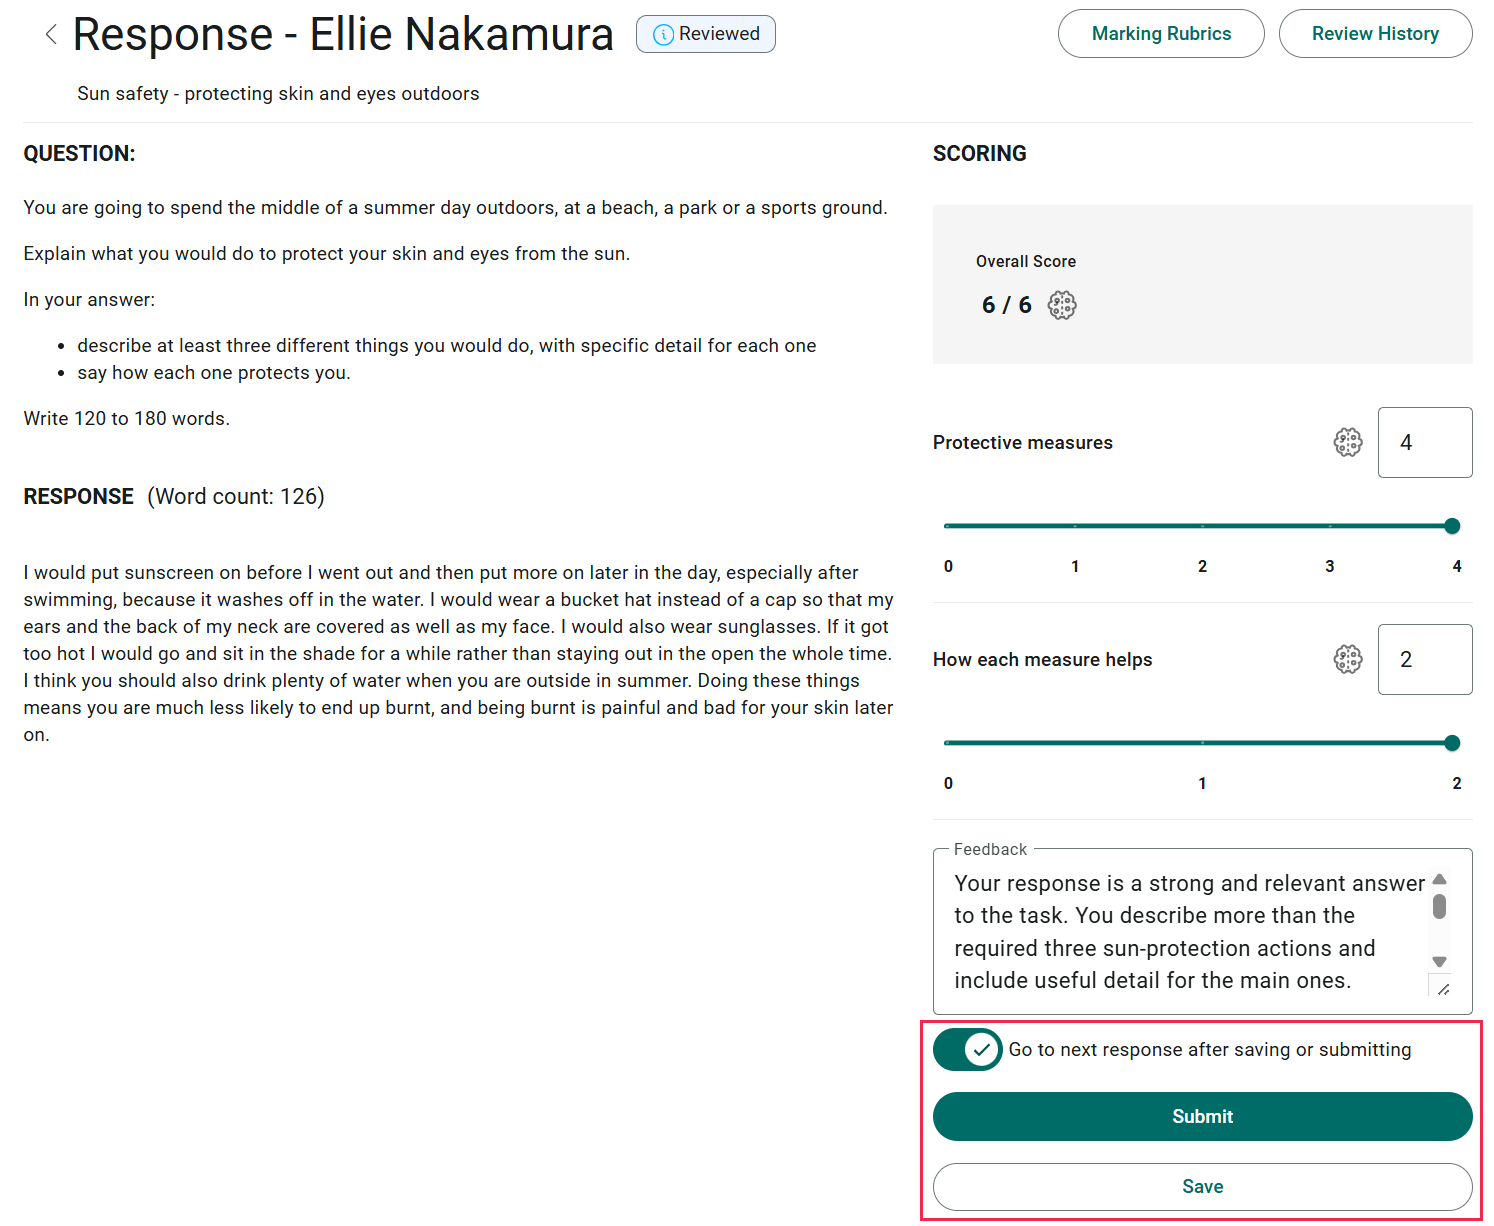
Working down the Pending Review queue with the toggle on keeps you on pending responses, so no submit option appears. Each response it takes you to is another pending one, and a pending response can only be marked as reviewed. Submitting happens from the REVIEWED tab.
Tip
Use Mark as reviewed while you're still calibrating — on the first dozen responses to a new item, before you're confident where the boundaries sit. Come back and submit once you've seen the spread.
Marking rubrics and review history
Two buttons in the header open over the top of the response, so you can check something without losing your place.
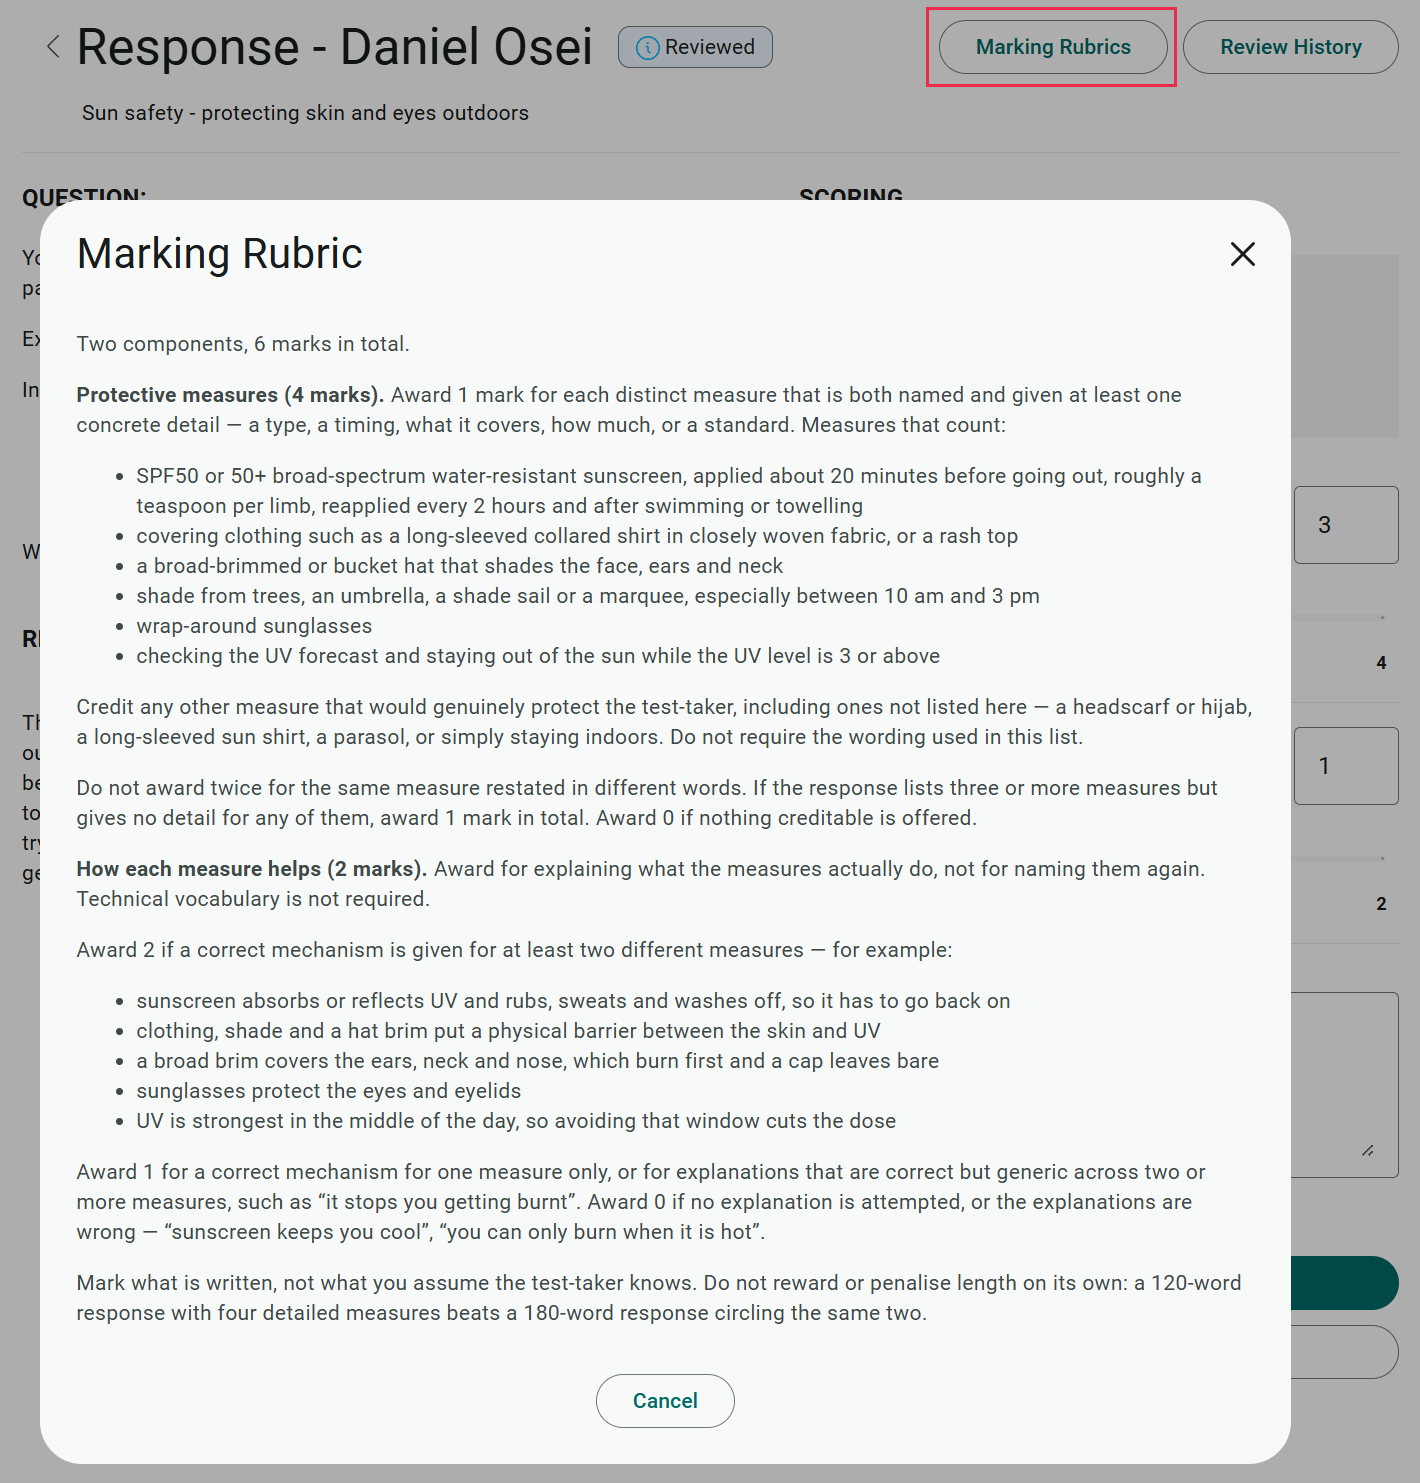
Marking Rubrics opens the rubric for the item — the criteria, the marks available for each component, and whatever guidance the author wrote. Close it with Cancel or the ✕. Where the item has no rubric attached, it tells you so instead.
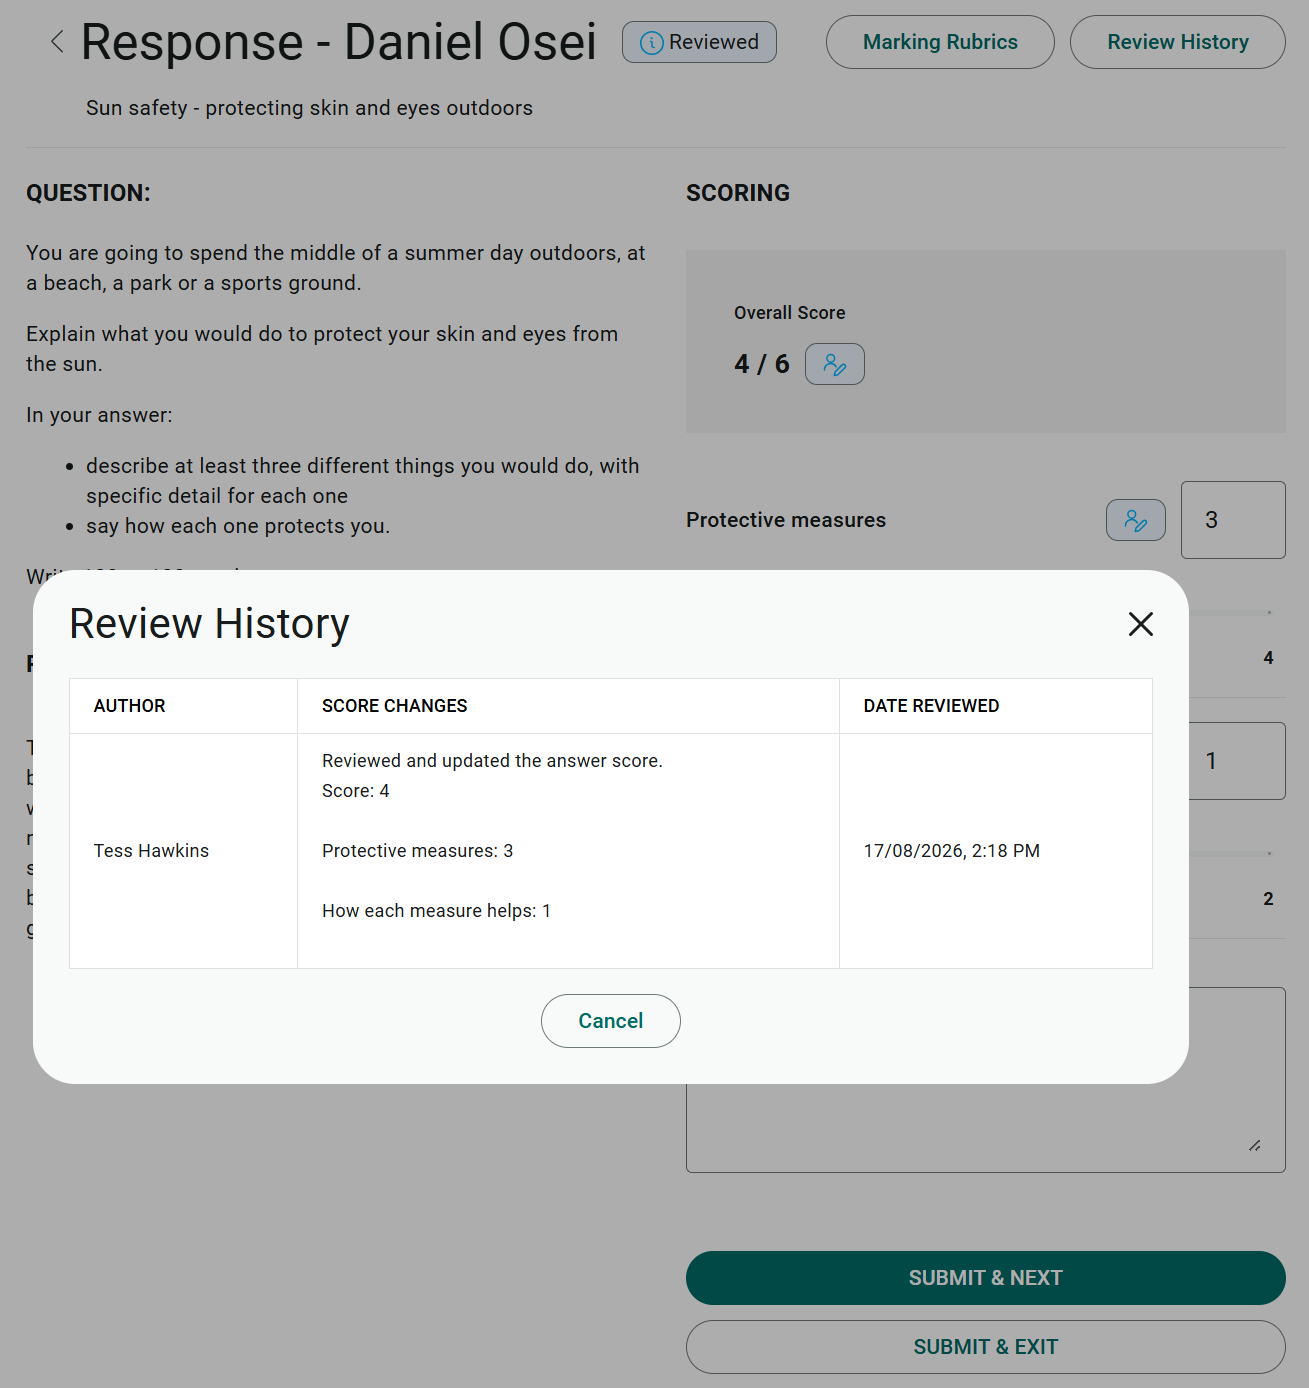
Review History lists what's already been done to this response: the AUTHOR of each change, the SCORE CHANGES they made, and the DATE REVIEWED. Each entry records the overall score and the score for every component, so you can see exactly what moved and when.
Submit a reviewed response
Reviewing and submitting are deliberately separate steps, so the REVIEWED tab is where you finalise.
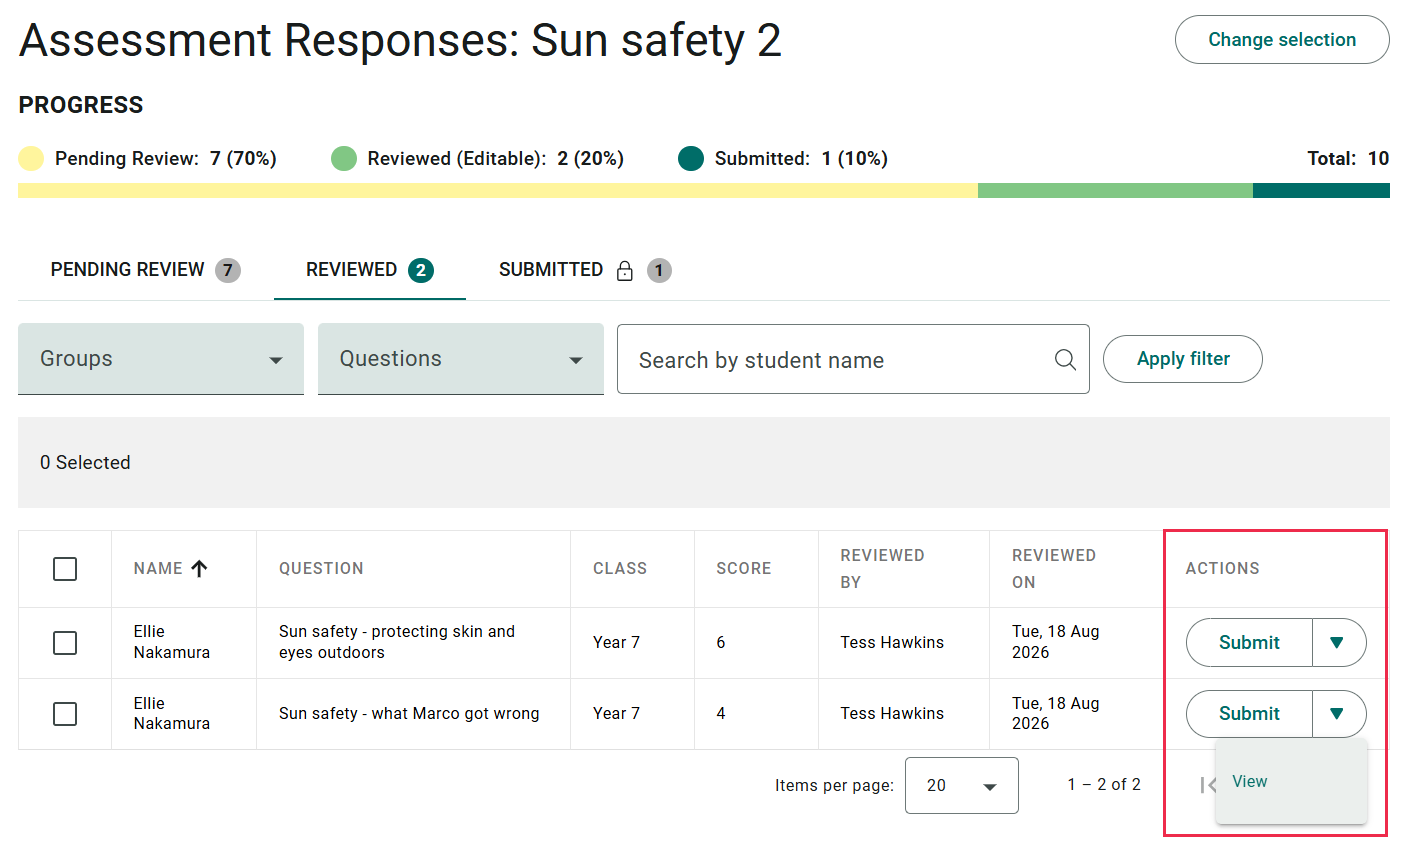
Its columns differ from Pending Review, because the response now has a marker's score attached rather than a proposed one:
| Column | What it shows |
|---|---|
| SCORE | the score you settled on, not the AI's suggestion |
| REVIEWED BY | the marker who scored it |
| REVIEWED ON | when that score was last saved |
The SUGGESTED SCORE and REASON FLAGGED columns aren't here at all. A flag only exists while a response is pending, so it can't appear on this tab or on Submitted.
Each row's Actions column has a Submit button with a dropdown beside it. Select Submit to finalise the response without opening it. Open the dropdown and select View to read it first. Submitting from the row is final.
Tip
REVIEWED ON is the date the score was last saved, not a frozen record of when you first reviewed it. Go back and change a score and the date moves with it.
Warning
There's no un-submit. Once a response is submitted, quick marking gives you no way to reopen it or change the score. Check before you submit, and use Mark as reviewed if you're not certain.
Mark responses in bulk
Both tabs with outstanding work support bulk actions, and each offers the action that fits it:
- Pending Review offers bulk Mark as reviewed, which moves the selected responses to Reviewed (Editable).
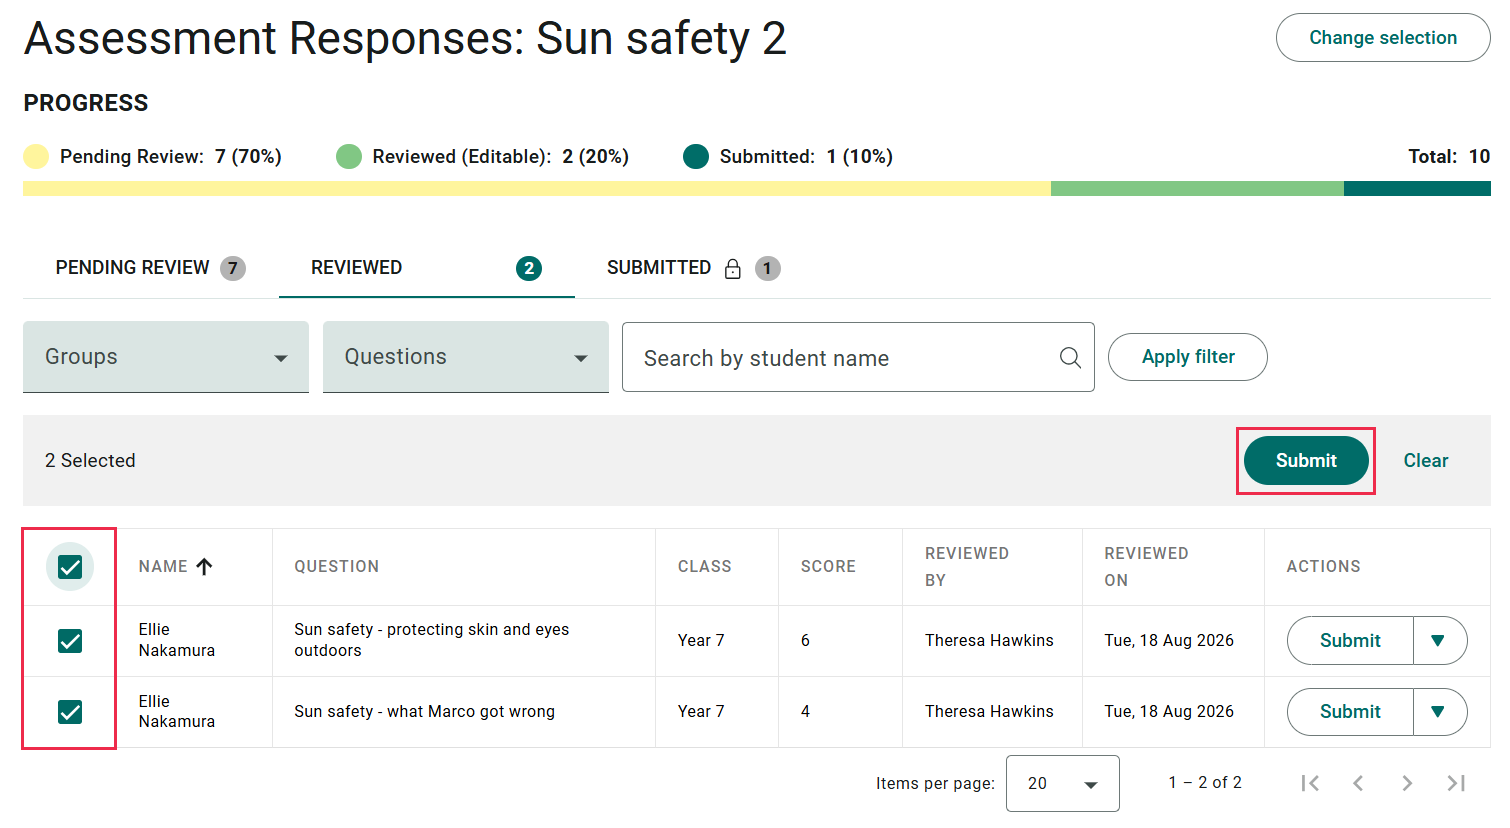
- REVIEWED offers bulk Submit, which finalises them.
Tick the responses you want, or use the header checkbox to take every row on the page. The grid shows 20 rows at a time, so that checkbox takes the page you're looking at — not every response on the tab. A bar appears above the grid showing how many you've selected, with the action button and Clear to start again.
Your selection belongs to the page you're on. Move to another page and the Selected count returns to zero, so a bulk action only ever takes rows you can see.
Bulk actions never ask you for a score — they act on whatever score is already on the response. That makes them much faster than opening each one. On Pending Review with AI Co-Marking on, the score they act on is the AI's suggestion.
Flagged responses can't be picked up by a bulk action on Pending Review: "Flagged responses require further review and can't have bulk actions applied." On an event where the AI has flagged most of the queue, that leaves little to select — which is the point. Flagged responses are the ones wanting a person's attention.
Where a bulk action reports failures, it lists each one by internal response ID — long and hard to read. A reported failure doesn't mean nothing happened, either: the responses that succeeded are still saved. Check the tab counts before retrying, and work through the remainder individually.
Warning
Bulk Submit is as final as submitting one at a time, across everything you selected. There's no un-submit. Check the scores in the SCORE column before you use it — that column shows what will be finalised.
AI suggested scores
Where AI Co-Marking is enabled for the event, responses arrive with a suggested score already proposed.
The suggestion is a starting point, not a decision. You review it, change it if you disagree, and finalise. No response is released on an AI score alone — a marker always has to submit it.
Where an item has no AI marker allocated, its responses simply arrive unscored for you to mark by hand. That's a configuration choice on the item.
SUGGESTED SCORE is the column that fills in. With AI Co-Marking off it shows a dash on every row.
Where the AI's score came from
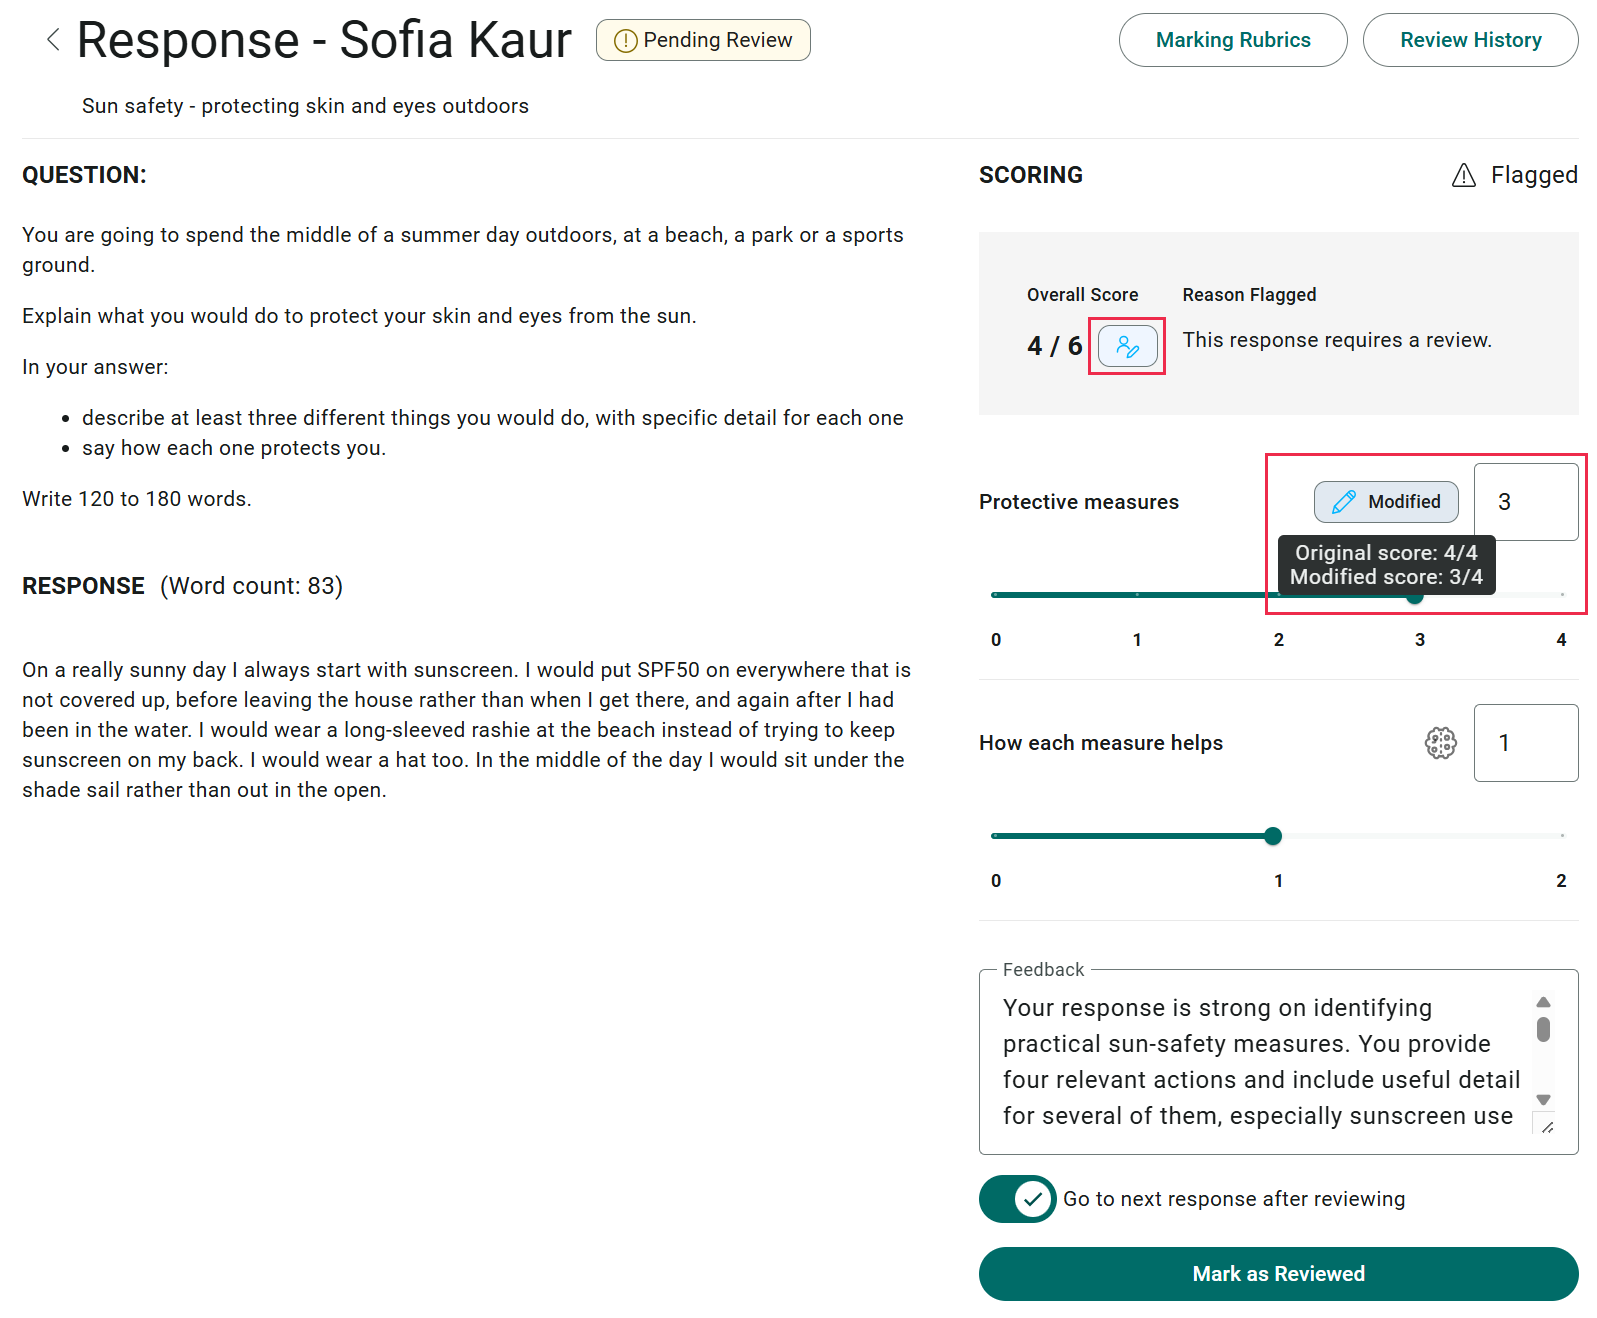
Opening a response shows you which scores are still the AI's and which a person has changed.
- Flagged appears at the top of the SCORING panel, with Reason Flagged beside the Overall Score.
- Each component carries a marker. A Modified pill means someone has changed the AI's score, and an AI indicator means the score is still the one the AI proposed. Hovering shows the original and modified values.
- Overall Score carries its own indicator, which changes once any component has been modified.
So you can tell at a glance whether a reviewed response was genuinely re-scored or simply accepted as proposed.
Important
With AI Co-Marking on, the Feedback field arrives pre-filled. The AI marking service writes it, and it reaches the test-taker as your feedback unless you change it.
Read it before you submit, so that what goes out under your name is what you meant to say.
For what an AI marker can and can't score, and the reasons a response comes back flagged, see AI co-marking.
Flagged responses
Some responses arrive flagged, which marks them as wanting your attention before they're scored. A flagged response shows the reason it was flagged.
There are 2 ways a response gets flagged, and only the first depends on AI Co-Marking:
- The AI marker asked for a review. You'll see this only on Pending Review, and only when AI Co-Marking is on for the event. Sometimes the AI scored the response and still asked for a person to look, so a flagged response often arrives with a suggested score against it. Sometimes no score arrived at all, and the response is flagged for you to mark by hand. Where the item uses Vision Marker, one of the 2 AI marking services Insights supports, that second case runs on a schedule. It releases the response about an hour after the AI started marking it.
- The scan was hard to read. This is a scanned paper response where the system read the handwriting with low confidence. An administrator sets that threshold in Answer Accepted Confidence Tolerance. It applies to paper-based attempts whether or not AI Co-Marking is on, and the flag disappears once any marker score exists.
On a low-confidence scan you get View Original Scan, and a banner warning you to check it before grading: "Low confidence in handwriting extraction. Please check the original scan to ensure the digital version accurately reflects the student's response before grading."
The text you're reading is a machine transcription, so scoring it without checking the scan means scoring something the test-taker may not have written.
A handwritten answer that ran over more than one page arrives as a single response. Insights matches the pages back to the item, joins them in page order and keeps the line breaks, so what you read follows the layout of the original.
A scanned response can also be excluded from review after it has reached your queue. Open one that has since been excluded and you see "Answer is not available for review" in place of the low-confidence banner.
On the list, a flagged response carries a warning symbol beside its score and the reason in the REASON FLAGGED column. Open it and both move to the top of the SCORING panel — see Where the AI's score came from above.
What a flag means, and what it doesn't
A flag means something asked for your attention. It isn't a verdict on the answer, and it's decided independently of the score. A response can arrive with full marks and a flag, or with zero marks and no flag. Don't read a flag as "this answer is weak", or an unflagged response as "this one's been checked". Every response on Pending Review needs your review before you submit it, flagged or not.
Most flags come from the AI marker asking for a review. The reason comes from a short set of standard sentences rather than the AI's own words. The most common is "This response requires a review.", which covers several different AI reasons.
Some flags come from Insights rather than the AI, and these name the cause directly. "Answer could not be marked because no response was provided." is one: a blank response never reaches the AI marker at all.
The flag and its reason only appear while the response is on Pending Review. Once you've reviewed it, both disappear — so if you want a record of why something was flagged, note it before you move on.
What happens after you submit
Submitting a response finalises its score and writes the mark to the test-taker's answer.
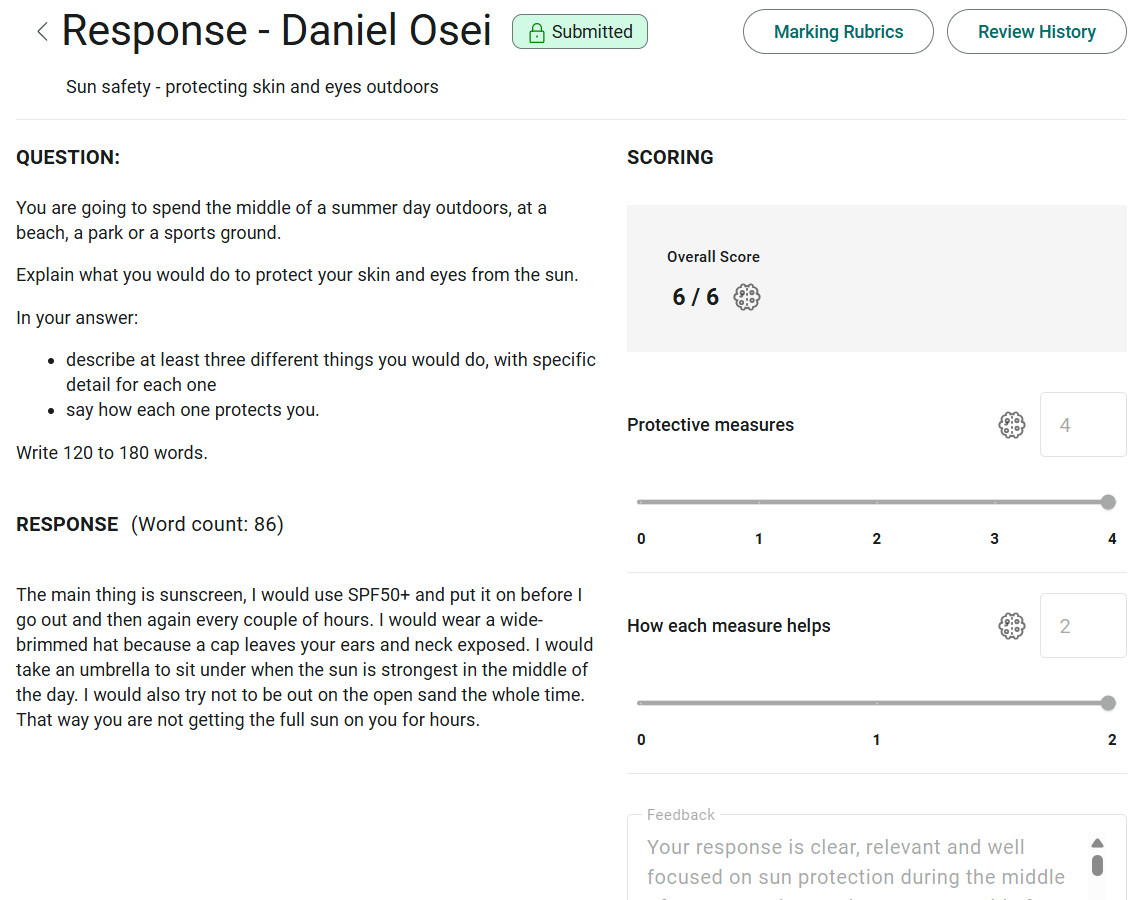
You can still open a submitted response, but everything on it is read-only. The pill beside the test-taker's name reads Submitted with a padlock, and the component scores, their sliders and the Feedback field are all greyed out. Marking Rubrics and Review History still work, so you can check the rubric that was applied and who scored it.
A test-taker's result isn't ready until every response on their attempt has been marked, not just the ones you can see on this screen. So a half-marked attempt produces no result and no detailed feedback — the test-taker sees nothing until the last response is submitted.
That includes responses where the test-taker wrote nothing. Blank extended-text responses still appear in your queue and still need a score, and leaving them unmarked silently holds up the whole attempt. Give every component a score — usually zero — then mark it as reviewed and submit it like any other response.
Important
If an event is closed while you have a response open, saving fails with "Cannot process response for this marking mode." It means the event has left delivery. Nothing more can be marked on it once that happens.
Settings
Markers don't configure anything on this screen. Everything that shapes it is set on the assessment event by an administrator, in the Event Marking Settings panel. See Set up a quick marked event for the full list.
The 3 that change what you see here:
Event marking mode — the event is only listed under Quick Mark Assessments when it's set to Quick marked event.
Allow Group Type filtering — determines whether you get a class picker and which classes it offers. When no group types are configured, you see every response you have access to and no picker.
Enable AI Co-Marking — determines whether responses arrive with a suggested score, and changes what appears on the Pending Review tab.
One setting that affects this screen sits outside the event. Answer Accepted Confidence Tolerance, at Marking > Marking Settings, sets the read-confidence threshold below which a scanned response is flagged for your attention. It has to be set on the Extended Text row to affect quick marking.
Your own access rights also matter, and they're finer-grained than "can or can't use quick marking". Opening the screen, loading the response list, submitting a score, and viewing an original scan are separate permissions. If you can reach the screen but an action fails, ask your administrator to check the individual rights rather than assuming it's broken.