Groups and group types
A group is a collection of users brought together for a shared purpose — for example, a team of markers or a cohort of test-takers. Grouping users once lets you act on all of them at the same time, rather than one by one.
A group type categorises your groups. For example, a group type called Cohort might contain the groups 2024 Intake and 2025 Intake; a Marking Team type might contain the groups Astronomy, Cardiovascular, and Climate change.
A group can draw its members from across your organisation, including from different organisation units. The example below shows a Safety Compliance group type whose fire-warden groups include users from several faculties.

Important
Only people with an Administrator role can view, add, or edit groups and group types.
What you can use groups for
Groups are used across the platform wherever you need to act on many users at once.
Deliver tests and exams
- Enrol a whole group of test-takers into an assessment event in one step
- Assign groups to test sessions and assessment venues
- Manage exam classes — set exam dates and assign invigilators for a group
Mark
Organise markers into marking teams and marking centres within a marking project, where a marker's group membership controls which scripts and teams they can see.
Communicate
Send announcements (and emails) to every member of one or more groups.
Manage users
Import and update group memberships in bulk from a spreadsheet.
Report
Filter results, test attempts, and marker statistics by group for cohort-level reporting.
Control access
Give a user a role that applies only to a particular group, rather than across the whole platform.
Reflect your structure
Link a group to an organisation and org unit so it mirrors your organisational hierarchy.
Create group types
From the menu, select Manage People > Group Types, then select Add Group Type. Complete the New Group Type form:
- Enter a Name.
- Select a Special Group Type. Leave it as Default for an ordinary group type — the other options are reserved for built-in types such as marking teams and marking centres.
- Enter a Description (optional).
- Type a group name in Enter a new group, then select the + icon (or press Enter) to add it to the list. Repeat for each group you want to add.
-
Select Save.
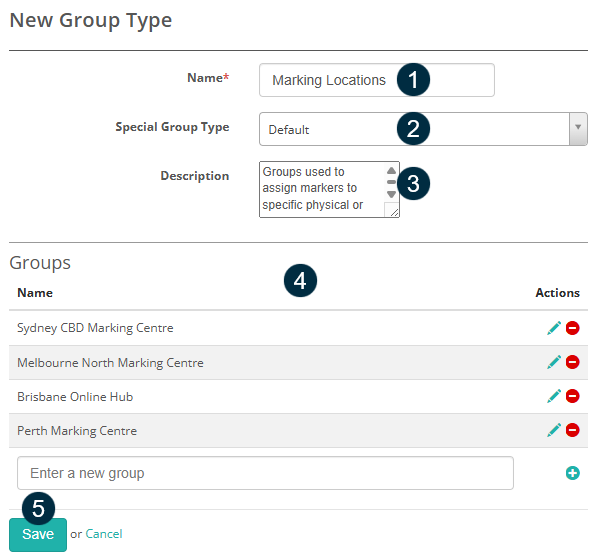
Important
You can manage up to 20 groups inline on the group type form. If a group type needs more groups than that, add them from the Groups section or use the bulk import instead.
Tip
To link groups to an organisation or org unit, add them from the Groups section instead (see Create groups). When creating a group type, select Save without entering any groups inline.
View and edit a group type
Group types are listed under Manage People > Group Types. This screen shows the group types that have already been created, and lets you search for one.
To edit a group type, select its name to open it, change the details, then select Save — this is the same form you use to create one. To delete a group type, select the delete icon next to it in the list.
Tip
Select a column heading — Display Name or Last Updated On — to reorder the list.
Create groups
There are three ways to create groups:
- Add them inline from the Group Types section — best when you're creating the group type at the same time (see Create group types)
- Add a single group from the Groups section — best when the group type already exists or isn't needed, or when you want to link the group to an organisation or org unit
- Import multiple groups from a file
To open the Groups section, select Manage People > Groups from the menu. From here you can add a single group, import groups, and import memberships. These actions appear as buttons along the top of the list — or, when more actions are available, grouped under an Actions dropdown.
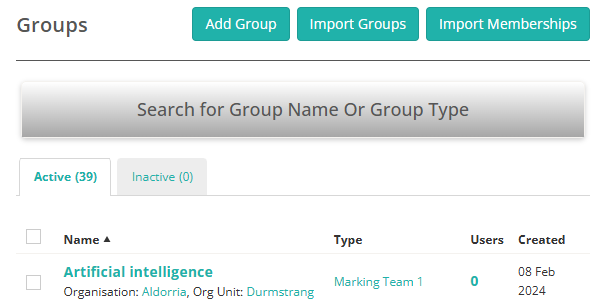
Add a single group
Select Add Group, then complete the New Group form:
- Select an Organisation and Org Unit (optional).
- Select a Group Type to link to an existing one (optional).
- Enter a Name. The Group ID populates automatically — leave it, or edit it.
- Enter a Description (optional).
- Is Active is selected by default. Clear it to create an inactive group.
-
Select Save.
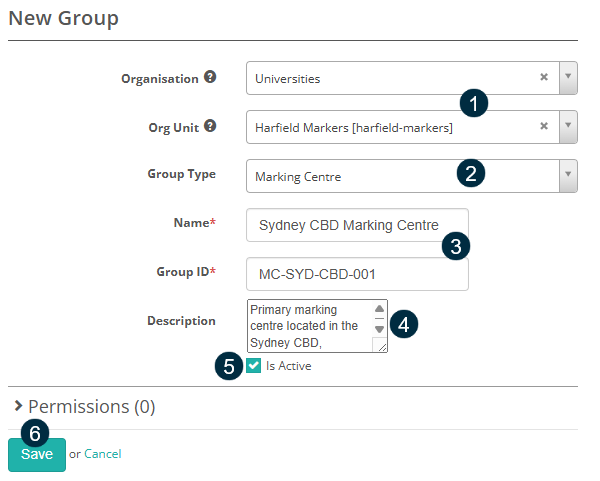
Tip
Leave the Organisation and Org Unit fields blank if you want the group to be standalone.
Import multiple groups
Select Import Groups to open the import form, then:
- Select Template to download a sample spreadsheet, then complete it — one row per group, with the organisation, org unit, group type, group ID, name, and description.
- Select Select File to choose your completed spreadsheet.
-
Select Upload.
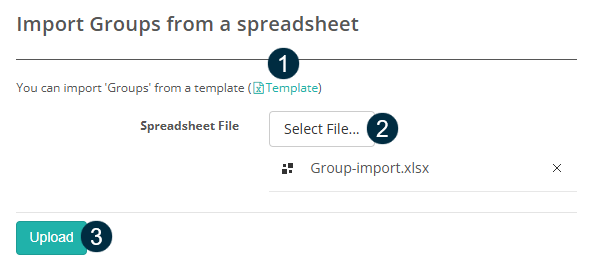
After uploading, a preview shows which groups will be added, which already exist (and so will be updated), and any rows with errors:
- To update the groups that already exist, select Update Group details based on spreadsheet.
- For any rows with errors, fix the spreadsheet and upload it again, or select Ignore to skip them.
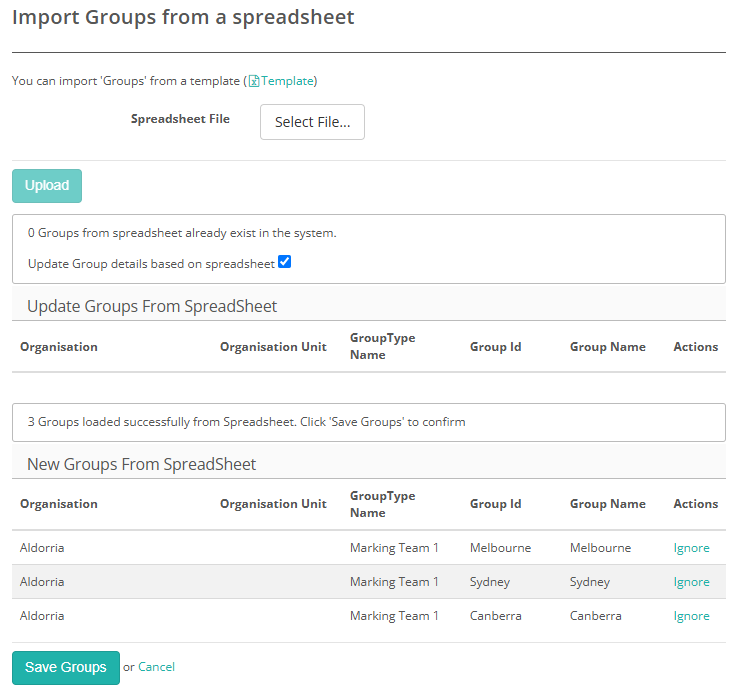
Select Save Groups to confirm.
View and edit a group
Groups are listed under Manage People > Groups. The list separates Active and Inactive groups into tabs, and shows the Name, Type, Users, and Created columns. From here you can search for a group, view its details, and edit it.
To make a group inactive, open it, select Edit Group, and clear Is Active — or select it in the list and choose Archive. Inactive groups move to the Inactive tab.
Tip
Select a column heading — Name, Type, Users, or Created — to reorder the list.
Add users to a group
There are two ways to add users to a group from the Groups section.
Add users directly
Open the group by selecting its Name, then:
- Expand the Users in Group section.
- From the type dropdown, choose what you're adding — a user, organisation, org unit, or another group.
- Select one or more of that type. For example, if you chose organisation, select the organisations whose members you want to add.
-
Select Add.
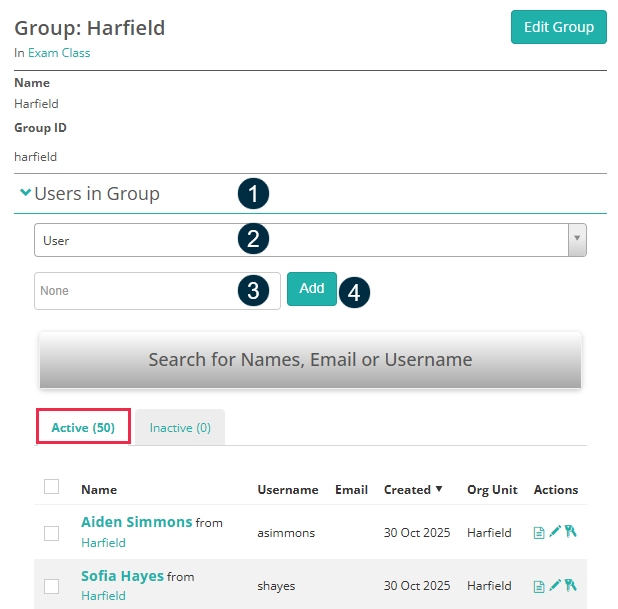
If you add an organisation, org unit, or group, every user that belongs to it is added to this group. The users you add appear under the Active tab.
Tip
To archive or remove users, select the checkbox next to their name, then select Archive or Remove.
Import users to a group
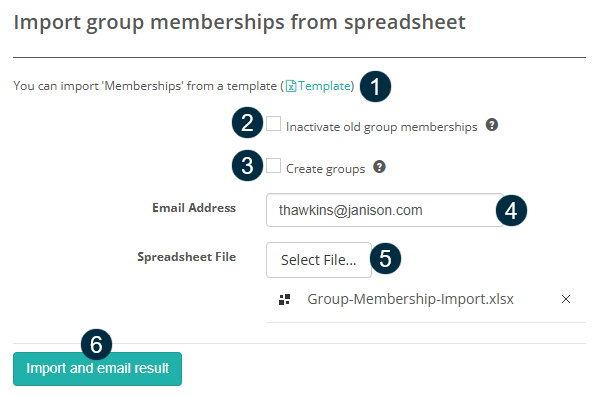
Select Import Memberships to open the import form, then:
- Select Template to download a sample spreadsheet, then complete it — one row per membership, with the username, group type name, group identifier, group name, and active status.
- Select Inactivate old group memberships to deactivate any not listed in the spreadsheet (optional).
- Select Create groups to create groups in the spreadsheet that don't yet exist (optional).
- The Email Address is pre-filled with your own — the import result is emailed here. Edit it to send the result to a different address.
- Select Select File to choose your completed spreadsheet.
-
Select Import and email result.
Note
Membership imports are processed in the background. If the file has errors, they're listed on screen — with the row, column, and value — so you can fix the spreadsheet and try again. Otherwise you'll see a message confirming the memberships were submitted for processing, and the full result is emailed to the address in the Email Address field.
Tip
You can also add group memberships using the user import feature.
Manage group permissions
You can give a user a role that applies only to a specific group, rather than across the whole platform. You need to open the group for editing to change its permissions.
- Open the group, then select Edit Group.
- Expand the Permissions section.
- Select a user, then select a role to grant them.
- Select Add.
-
Select Save to apply the changes.
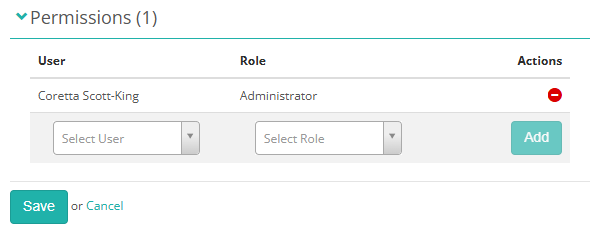
The roles available depend on how your tenant is configured. The role you choose determines what that user can do in relation to the group.
To remove a permission, select the remove icon next to the entry, then select Save.
Permissions set here apply only to this group. The same approach works for organisations and org units.
Settings
A few settings affect how groups and group types behave, and they live in different places across the platform. The main one is a tenant-wide setting: go to Settings > Tenant Settings, then open the Organisation section. It has a single group-related option:
Ensure group selection is restricted by organisation and org unit — when enabled, a user can only be added to a group whose organisation and org unit match the user's own. For example, if a group is scoped to the org unit HR, only users in HR can be added to it. This applies when adding users to a group, creating or editing a user, and during self-registration. When the setting is off, any user can be added to any group regardless of scope. It is enabled by default.
Several features also let you nominate which group type they use, set in each feature's own settings rather than here:
- The group type used for exam class scheduling (in the assessment event settings) — groups of the nominated type become exam classes, so you can set an exam date and assign invigilators for each one, and schedule exams from the enrolment screens.
- The group types you can enrol test-takers by (in the assessment event settings) — when you enrol people into an assessment event, only groups of these types are offered, so you can add a whole group at once.
- The group type offered during self-registration — set the Group Type field at the bottom of the Self Registration Form settings, and people signing up can choose one of that type's groups to join.
- The group type offered on the user Create / Edit Form — set its Group Type field, and when you create or edit a user you can add them to one of that type's groups directly on the form.
Tip
Nominating a self-registration group type lets people sort themselves into the right group as they sign up — for example, candidates choosing their school, or new starters choosing their intake — so you don't have to add each person to a group by hand.
The Import Test-takers Settings control how groups are handled when you import test-takers:
Include Groups — include group information in the import, so test-takers can be added to groups as part of the import.
Allow to create groups — for each group type, choose whether the import can create new groups of that type when they don't already exist.
Some import limits and defaults — such as the maximum number of memberships processed in a single web-based import — are set by Janison at the platform level and aren't shown in the interface.